SpringCloud学习笔记
SpringCloud微服务架构构成
- 服务注册与发现
- Eureka(❌)
- Zookeeper
- Consul
- Nacos(SpringCloudAlibaba)
- 服务负载与调用
- Ribbon
- LoadBalancer(新)
- Feign(❌)
- OpenFeign(新)
- 服务降级/熔断
- Hystrix(国内大规模使用,已停更)
- resillience for java(官网推荐)
- SpringCloudAlibabaSentienl(推荐)
- 服务消息队列
- 服务配置中心
- SpringCloudConfig(❌)
- Apolo(携程开源)
- SpringCloudAlibabaNacos(推荐)
- 服务网关
- NetflixZuul(❌)
- Zuul2(❌)
- Spring Gateway(推荐)
- 服务监控
- 全链路追踪
- 自动化构建部署
- 服务定时任务调度操作
- 服务总线
- Bus(❌)
- Nacos
- 服务开发
- SpringBoot
1. 服务注册发现
1.1 Eureka服务注册中心
1.1.1 Eureka服务端
创建项目、module,添加maven依赖
<dependencies>
    <dependency>
        <groupId>org.springframework.cloud</groupId>
        <artifactId>spring-cloud-starter-netflix-eureka-server</artifactId>
    </dependency>
    <dependency>
        <groupId>org.springframework.boot</groupId>
        <artifactId>spring-boot-starter-web</artifactId>
    </dependency>
    <dependency>
        <groupId>org.springframework.boot</groupId>
        <artifactId>spring-boot-starter-actuator</artifactId>
    </dependency>
    <dependency>
        <groupId>org.springframework.boot</groupId>
        <artifactId>spring-boot-starter-test</artifactId>
    </dependency>
    <dependency>
        <groupId>org.springframework.boot</groupId>
        <artifactId>spring-boot-devtools</artifactId>
        <scope>runtime</scope>
        <optional>true</optional>
    </dependency>
</dependencies>
创建启动类
@SpringBootApplication
//引入eureka服务端
@EnableEurekaServer
public class EruekaServerApp {
    public static void main(String[] args) {
        SpringApplication.run(EruekaServerApp.class);
    }

}
修
application.yml配置文件server: port: 7001 eureka: instance: hostname: eureka7001 # eureka服务端实例名称 lease-expiration-duration-in-seconds: 2 #服务端再收到最后一次心跳后等待的时间是上限(单位 秒),超过时将剔除服务 client: register-with-eureka: false #是否向注册中心注册自己 fetch-registry: false service-url: #设置eureka server交互的地址,查询服务和注册服务都依赖这个地址 defaultZone: http://localhost:7001/eureka/ server: #自我保护模式:如果一段时间内大量服务失去心跳,注册中心不会立刻删除这些服务 enable-self-preservation: false #关闭eureka自我保护模式,控制页面显示:THE SELF PRESERVATION MODE IS TURNED OFF. ... eviction-interval-timer-in-ms: 2000
启动服务后,访问localhost:7001/eureka即可
1.1.2 Eureka客户端配置
添加Eureka客户端依赖
 <dependency>
    <groupId>org.springframework.cloud</groupId>
    <artifactId>spring-cloud-starter-netflix-eureka-client</artifactId>
</dependency>
启动类添加Eureka服务端注解
@SpringBootApplication
//注明eureka客户端
@EnableEurekaClient
@MapperScan("com.sunyog.springcloud.dao")
public class PaymentApplication {
    public static void main(String[] args) {
        SpringApplication.run(PaymentApplication.class);
    }
}
配置文件配置Eureka位置
server:
  port: 8001

spring:
  application:
    name: cloud-payment-service

eureka:
  instance:
    instance-id: payment-8001 #设置实例名称(默认为:ip:服务名称:端口)
    prefer-ip-address: true #访问路径可以显示ip
    lease-renewal-interval-in-seconds: 1 #eureka客户端向服务端发送心跳的时间间隔
  client:
    register-with-eureka: true
    fetch-registry: true
    service-url:
      defaultZone: http://localhost:7001/eureka
服务启动后,可在Eureka页面看到名称为cloud-payment-service的微服务
1.1.3 Eureka集群配置
Eureka集群的原理是:启动多个Eureka服务端,让每一个Eureka服务端都在其他的Eureka中注册。以两台Eureka服务器为例:
修改Eureka服务器1的配置
defaultZone: http://localhost:7002/eureka/修改Eureka服务器2的配置
defaultZone: http://localhost:7001/eureka/修改Eureka客户端的配置
defaultZone: http://localhost:7002/eureka,http://localhost:7001/eureka
所有服务启动后,访问两个Eureka页面都可以看到所有的微服务
注意:
Eureka注册中心集群配置情况下,如微服务已经配置了eureak集群,但Eureka集群未全部启动时会报如下错误:
com.sun.jersey.api.client.ClientHandlerException: java.net.ConnectException: Connection refused (Connection refused)
此异常是由于部分Eureka服务找不到造成的,将所有erueka服务器启动完成即可解决
1.2 Zookeeper
Zookeeper可以作为服务注册中心使用,每向Zookeeper注册一个微服务,就相当于在Zookeeper中新建了一个临时节点,节点中保存了此微服务的全部信息。使用Zookeeper作为服务注册中心需要优先启动Zookeeper服务器,之后在客户端配置Zookeeper服务。主要步骤如下:
pom文件新增Zookeeper相关依赖
<dependency>
    <groupId>org.springframework.cloud</groupId>
    <artifactId>spring-cloud-starter-zookeeper-discovery</artifactId>
</dependency>
yml配置文件添加相关配置
server:
  port: 8004
spring:
  application:
    name: cloud-payment-service
    # 服务注册进zookeeper,临时节点
  cloud:
    zookeeper:
      connect-string: 172.16.211.101:2181
启动类启动服务发现
@SpringBootApplication
@EnableDiscoveryClient
public class Payment8004Applicaiton {
    public static void main(String[] args) {
        SpringApplication.run(Payment8004Applicaiton.class);
    }
}
服务启动后可以在Zookeeper中发现名称为cloud-payment-service的临时节点。
1.3 Consul
Consul的配置和Zookeeper类似,需要优先启动consul服务器。主要步骤如下:
pom文件添加consul依赖
 <dependency>
    <groupId>org.springframework.cloud</groupId>
    <artifactId>spring-cloud-starter-consul-discovery</artifactId>
</dependency>
yml配置文件增加配置
server:
 port: 8006
spring:
 application:
   name: consul-provider-payment
 cloud:
   consul:
     host: 172.16.211.101
     port: 8500
     discovery:
       service-name: ${spring.application.name}
启动类开启服务发现
@SpringBootApplication
@EnableDiscoveryClient
public class Payment8006Application {
    public static void main(String[] args) {
        SpringApplication.run(Payment8006Application.class);
    }
}
服务启动后,可以在consul客户端页面看到名称为consul-provider-payment的微服务。
2. 服务负载均衡LB(LoadBalance)与服务调用
Nginx--服务器负载均衡
ribbon--微服务之间的负载均衡,属于进程内LB,集成在消费者方,消费者通过它来获取服务提供者的地址
2.1 Ribbon
已进入维护模式,但主流使用
2.1.1 ribbon工作步骤
- 选择eureka server,优先选择同一区域内负载较少的server;
- 根据用户指定的策略(ribbon提供了多种策略,如:轮询、随机、根据响应时间加权),从server服务注册表中选择一个地址。
Netflix Erueka Client已经整合了Ribbon,不需要再单独引入
2.1.2 IRule接口
此接口用于根据固定的算法获取访问的服务(ribbon内部实现了轮训、随机、重试等),也可通过实现次接口的方式自定义负载均衡算法,ribbon内置的负载均衡算法如下图:
重试:先按轮询策略获取服务,如果失败了在指定时间内重试,获取可用的服务
扩展:对轮询的扩展,响应速度越快权重越大
过滤高压故障:过滤由于多次访问故障而处于熔断状态的服务,选择并发亮最小的服务
过滤故障:过滤故障实例,选择压力较小实例
默认规则:符合判断server所在区域的性能和server的可用性,选择服务器
2.1.3 修改默认均衡规则
自定义配置类,配置负载均衡规则
package com.sunyog.myrule;

import com.netflix.loadbalancer.IRule;
import com.netflix.loadbalancer.RandomRule;
import org.springframework.context.annotation.Bean;
import org.springframework.context.annotation.Configuration;
/**
 * @Author: MysteriousGT
 * @Date: 2021/2/19 11:26 上午
 * @Desc: ribbon配置,选择负载均衡算法
 * 注意:此项配置,不能在@ComponentScan注解扫描的包之内,否则会全局应用,起不到自定义的作用
 * 需要使用@RibbonClient注解,标识启动累
 */
@Configuration
public class RibbonConfig {
    @Bean
    public IRule myRule(){
        //定义为随机
        return new RandomRule();
    }
}
启动类添加
@RibbonClient注解,说明配置类和提供者服务名@RibbonClient(name = "cloud-payment-service",configuration = RibbonConfig.class)
2.1.4 自定义负载均衡算法
轮询算法原理:
实际调用服务编号i = rest接口第a次请求 % 服务器集群总数量n 注意:每次服务重启后rest接口计数从1开始创建LoadBalance接口
package com.sunyog.springcloud.lb;

import java.util.List;

import org.springframework.cloud.client.ServiceInstance;

/**
 * @Author: MysteriousGT
 * @Date: 2021/2/19 1:53 下午
 * @Desc: 负载均衡接口
 */
public interface LoadBalance {
    ServiceInstance instances(List<ServiceInstance> instances);
}
实现LoadBalance接口
package com.sunyog.springcloud.lb;

import java.util.List;
import java.util.concurrent.atomic.AtomicInteger;

import org.springframework.cloud.client.ServiceInstance;
import org.springframework.stereotype.Component;

/**
 * @Author: MysteriousGT
 * @Date: 2021/2/19 1:49 下午
 * @Desc: 自定义负载均衡算法
 */
@Component
public class MyLoadBalance implements LoadBalance {
    // 原子类,多线程下每个线程增加都会使这个值增加
    private AtomicInteger atomicInteger = new AtomicInteger(0);

    public final int autoIncrement() {
        int current, next;
        do {
            current = this.atomicInteger.get();
            next = current >= Integer.MAX_VALUE ? 0 : current + 1;
        } while (!this.atomicInteger.compareAndSet(current, next));
        System.out.println("********第几次访问,next: " + next);
        return next;
    }

    @Override
    public ServiceInstance instances(List<ServiceInstance> instances) {
        int index = autoIncrement() % instances.size();
        return instances.get(index);
    }
}
Controller中调用LoadBalance
@Autowired
private DiscoveryClient discoveryClient;

//引入自定义的负载均衡接口
@Resource
private LoadBalance loadBalance;

@GetMapping("/lb")
public String getPaymentLB() {
    List<ServiceInstance> instances=discoveryClient.getInstances("cloud-payment-service");
    if(instances==null || instances.size()<1){
        return null;
    }
    ServiceInstance res = loadBalance.instances(instances);
    URI uri = res.getUri();
    return restTemplate.getForObject(uri+"/payment/lb",String.class);
}
cloud-payment-service微服务中增加接口
@Value("${server.port}")
private String currPort;

@GetMapping("/lb")
public String getLB(){
    return currPort;
}
测试访问
2.2 OpenFeign
OpenFeign是一个声明式web服务客户端,是基于Feign进行的扩展,用于消费者服务调用。Feign是一个轻量级RestFul的HTTP服务客户端,内置了ribbon。使用Feign的注解定义接口,调用这个接口就实现了服务之间的调用。OpenFeign在Feign的基础上支持了SpringMVC的注解,@FeignClient注解可以解析SpringMVC中@RequestMapping注解下的接口,并通过动态代理的方式产生实现类,在实现类中做负载均衡并调用其他服务。
2.2.1 OpenFeign的使用
pom文件
<dependency>
    <groupId>org.springframework.cloud</groupId>
    <artifactId>spring-cloud-starter-openfeign</artifactId>
</dependency>
启动类
@SpringBootApplication
//启用OpenFeign
@EnableFeignClients
public class FeignOrderApp {
    public static void main(String[] args) {
        SpringApplication.run(FeignOrderApp.class);
    }
}
配置文件,不需要修改配置文件
Feign调用接口
@Component
//注明要被调用的微服务名称
@FeignClient(value = "cloud-payment-service")
public interface PaymentFeignService {
    /**
     * 注意:在openFeign中@RequestParam注解中的value属性不能为空
     * @GetMapping注解URL地址路径写全
     * @param id
     * @return
     */
    @GetMapping("/payment/one")
    CommonResult<Payment> getOne(@RequestParam("id") Long id);
}
Controller调用
@RequestMapping("/feign/order")
@RestController
@Slf4j
public class FeignOrderController {
    @Autowired
    private PaymentFeignService paymentFeignService;

    @GetMapping("/one")
    public CommonResult<Payment> getPaymentById(@RequestParam Long id){
        return paymentFeignService.getOne(id);
    }
}
OpenFeign内部集成了Ribbon,在服务调用过程中会自动实现负载均衡
2.2.2 OpenFeign超时控制和日志打印
OpenFeign发送请求后默认等待1秒,当对应微服务处理过程超过1秒后自动报错。未避免这种情况,需要修改默认超时时间,超时控制由Ribbon完成。yml文件配置如下:
ribbon:
  # 建立连接后从服务器读取可用资源所用的时间(被调用微服务处理时间)
  ReadTimeout: 5000
  # 建立连接所需要的时间,网络状态正常时,两端连接所需要的时间
  ConnectTimeout: 3000
开发过程中为方便调试代码,可配置开启OpenFeign日志打印,主要过程如下:
配置文件中开启OpenFeign日志
# 启动Feign日志
logging:
  level:
    # 配置feign以什么级别打印哪个接口的日志
    com.sunyog.springcloud.service.PaymentFeignService: debug
配置OpenFeign日志级别
package com.sunyog.springcloud.config;

import feign.Logger;
import org.springframework.context.annotation.Bean;
import org.springframework.context.annotation.Configuration;

@Configuration
public class FeignConfig {
    @Bean
    public Logger.Level feignLoggerLevel(){
        return Logger.Level.FULL;
    }
}
打印日志如下
2021-02-22 10:41:32.728 DEBUG 50849 --- [p-nio-80-exec-1] c.s.s.service.PaymentFeignService        : [PaymentFeignService#getOne] <--- HTTP/1.1 200 (707ms)
2021-02-22 10:41:32.728 DEBUG 50849 --- [p-nio-80-exec-1] c.s.s.service.PaymentFeignService        : [PaymentFeignService#getOne] connection: keep-alive
2021-02-22 10:41:32.729 DEBUG 50849 --- [p-nio-80-exec-1] c.s.s.service.PaymentFeignService        : [PaymentFeignService#getOne] content-type: application/json
2021-02-22 10:41:32.729 DEBUG 50849 --- [p-nio-80-exec-1] c.s.s.service.PaymentFeignService        : [PaymentFeignService#getOne] date: Mon, 22 Feb 2021 02:41:32 GMT
2021-02-22 10:41:32.729 DEBUG 50849 --- [p-nio-80-exec-1] c.s.s.service.PaymentFeignService        : [PaymentFeignService#getOne] keep-alive: timeout=60
2021-02-22 10:41:32.729 DEBUG 50849 --- [p-nio-80-exec-1] c.s.s.service.PaymentFeignService        : [PaymentFeignService#getOne] transfer-encoding: chunked
2021-02-22 10:41:32.730 DEBUG 50849 --- [p-nio-80-exec-1] c.s.s.service.PaymentFeignService        : [PaymentFeignService#getOne]
2021-02-22 10:41:32.734 DEBUG 50849 --- [p-nio-80-exec-1] c.s.s.service.PaymentFeignService        : [PaymentFeignService#getOne] {"code":200,"message":"查询成功,port: 8002","data":{"id":1,"serial":"10222212fadfadfadfadfadfa"}}
2021-02-22 10:41:32.734 DEBUG 50849 --- [p-nio-80-exec-1] c.s.s.service.PaymentFeignService        : [PaymentFeignService#getOne] <--- END HTTP (101-byte body)
2021-02-22 10:41:33.494  INFO 50849 --- [erListUpdater-0] c.netflix.config.ChainedDynamicProperty  : Flipping property: cloud-payment-service.ribbon.ActiveConnectionsLimit to use NEXT property: niws.loadbalancer.availabilityFilteringRule.activeConnectionsLimit = 2147483647
3. 服务降级、服务熔断
微服务调用过程中,一个服务可能需要依次调用A、B、C、D、……服务,若其中一个微服务调用时间过长或down机,高压微服务有可能在几秒内达到饱和,进而容易引起整个系统崩溃(“服务雪崩”),为解决这种问题,需要引入服务降级、熔断机制,保证在一个依赖服务出现问题的情况下,不会导致系统整体失效,提高分布式系统的弹性。
3.1 Hystrix
用于服务降级、服务熔断、接近实时的监控(hystrix dashboard)、限流、隔离等。
注意:hystrix官方已停止更新,进入维护阶段。官方建议使用 resilience4j替代,但国内使用较少。使用SpringCloudAlibabaSentinel实现熔断和限流的较多。
Hystrix是一个用于处理分布式系统的延迟和容错的开源库,在分布式系统里,许多依赖不可避免的会调用失败,Hystrix能够保证在一个依赖出现问题的情况下,不会导致整体系统失败,避免联级故障,提高分布式系统的弹性。“断路器”是一个开关装置,当某个服务但愿发生故障后,通过断路器的故障监控向调用方返回一个符合预期的可处理的备选响应,保证线程不会被长时间不必要的占用,从而避免故障蔓延,乃至雪崩。
3.1.1 主要概念
服务降级 fallback
if(正常){

}else{//服务降级
  //服务降级,向调用方返回一个符合预期的、可处理的备选响应
  //而不是长期等待或抛出调用方法无法处理的异常
  //如返回:服务器忙,请稍后重试
}
常见情况包括:程序运行异常、超时、服务熔断触发、线程池/信号已满等
服务熔断 break
服务器压力过大,直接拒绝访问(保险丝断了),然后调用服务降级的方法并返回友好提示。
一般过程如下:
服务熔断机制是应对雪崩效应的一种微服务链路保护机制。当扇出链路的某个微服务出错不可用或者响应时间太长时,会进行服务降级,进而熔断该节点微服务的调用,快速返回错误信息。当检测到该节点微服务调用响应正常后,回复该链路
服务限流 flow limit
高并发操作下,流量瞬间激增情况下,严禁一窝蜂涌入。控制所有访问请求以规定标准(一秒内几个请求)有序进行
3.1.2 Hystrix方法级服务降级
添加pom依赖
<dependency>
    <groupId>org.springframework.cloud</groupId>
    <artifactId>spring-cloud-starter-netflix-hystrix</artifactId>
</dependency>
启动类开启服务降级
@SpringBootApplication
@EnableEurekaClient
//开启服务降级
@EnableCircuitBreaker
public class PaymentHystrix8001App {
    public static void main(String[] args) {
        SpringApplication.run(PaymentHystrix8001App.class);
    }
}
注解标明需要降级的方法(service类)
@HystrixCommand(fallbackMethod = "paymentFailHandler",
     commandProperties = {
    //超时2s或系统保存后服务降级==>调用fallbackMethod方法
    		@HystrixProperty(name = "execution.isolation.thread.timeoutInMilliseconds",value = "2000")
    }
)
public String paymentFail(Integer id) {
    int timeNum=2;
    try {
        TimeUnit.SECONDS.sleep(timeNum);
    } catch (InterruptedException e) {
        e.printStackTrace();
    }
    return "线程池:" + Thread.currentThread().getName() + " \tpayment info fail.id: " + id+"耗时 "+timeNum+" s";
}

public String paymentFailHandler(Integer id){
    return "系统繁忙,请稍后再试:<br/>线程池:" + Thread.currentThread().getName()+" \tpaymentFailHandler"+id;
}
Feign调用时可以通过如下方式引入Hystrix:
yml配置文件开启Hystrix
feign:
  hystrix:
    enabled: true
启动类注明使用Hystrix
@SpringBootApplication
@EnableFeignClients
@EnableHystrix
public class HystrixFeignOrder80App {
    public static void main(String[] args) {
        SpringApplication.run(HystrixFeignOrder80App.class);
    }
}
其他操作同上
3.1.3 业务类服务降级
避免每一个业务方法都需要设定自己的服务降级方案,对于不需要精确说明的方法,可以设定全局服务降级方案解决。使用方式:
开启Hystrix服务降级后,在业务类上使用@DefaultProperties 注解表明服务降级fallback方法,在可能会被降级的方法使用@HystrixCommand注解注明
@RestController
@RequestMapping("/hystrix/feign/order")
@Slf4j
@DefaultProperties(defaultFallback = "paymentGlobalFallbackMethod")
public class HystrixFeignOrderController {
  	...
    @Autowired
    private HystrixFeignOrderService hystrixFeignOrderService;

  	//需要服务降级的方法
    @HystrixCommand
    @GetMapping("/time/out/{id}")
    public String timeOut(@PathVariable("id") Integer id){
        return hystrixFeignOrderService.timeOut(id);
    }

  	//全局fallback
    public String paymentGlobalFallbackMethod(){
        return "全局服务降级启动";
    }
}
3.1.4 Feign接口级服务降级
针对Feign接口进行服务降级,可以实现针对不同的微服务,设定不同的服务降级方案,主要步骤:
开启feign hystrix支持(yml、启动类配置)
创建Feign接口的实现类,添加到Spring容器
@Component public class HystrixFeignServiceImp implements HystrixFeignOrderService { @Override public String paymentOk(Integer id) { return "---------feign接口实现类,fallback payment ok-------"; } @Override public String timeOut(Integer id) { return "---------feign接口实现类,fallback payment OK -------"; } }@FeignClient注解中注明fallback属性@Component @FeignClient(value = "CLOUD-PROVIDER-HYSTRIX-PAYMENT",fallback = HystrixFeignServiceImp.class) public interface HystrixFeignOrderService { @GetMapping("/payment/hystrix/ok/{id}") String paymentOk(@PathVariable("id") Integer id); @GetMapping("/payment/hystrix/time/out/{id}") String timeOut(@PathVariable("id") Integer id); }
3.1.5 Hystrix服务熔断
Hystrix服务熔断机制的注解是@HystrixCommand,当服务调用失败次数到一定的阈值(默认5秒内20次失败)会启动熔断。
当断路器打开(即熔断)之后,Hystrix会启动一个休眠时间窗,在这个时间窗之内,降级逻辑作为临时的主逻辑,当休眠时间窗到期,熔断器进入半开放状态,释放一次请求到原来的主逻辑上,若此次请求返回正常,断路器闭合,恢复主逻辑;若此次请求依然有问题,断路器继续保持打开状态,休眠时间重新计算。
断路器可设置的参数在类HystrixCommandProperties中查看,博客说明,具体配置如下:
@Service
public class PaymentService {
    //在10秒钟内,10次请求失败60%后即熔断
    //当正常访问后,服务重新启用
    @HystrixCommand(fallbackMethod = "paymentCircuitBreakerFallback",commandProperties = {
        //是否开启断路器
        @HystrixProperty(name = "circuitBreaker.enabled",value="true"),
        //请求次数
        @HystrixProperty(name = "circuitBreaker.requestVolumeThreshold",value = "10"),
        //时间范围
        @HystrixProperty(name = "circuitBreaker.sleepWindowInMilliseconds",value = "10000"),
        //失败率达到多少后熔断
        @HystrixProperty(name = "circuitBreaker.errorThresholdPercentage",value="60")
    })
    public String paymentCircuitBreaker(@PathVariable("id")Integer id){
        if(id<0){
            throw new RuntimeException("ID的值不能小于 0,实际值为:"+id);
        }
        String serialId = IdUtil.simpleUUID();
        return Thread.currentThread().getName()+"\t调用成功,流水号:"+serialId;
    }

    public String paymentCircuitBreakerFallback(@PathVariable("id")Integer id){
        return "服务熔断已开启,ID不能为负数:"+id;
    }
}
3.1.6 服务监控HystrixDashboard使用
创建新项目/模块,添加HystrixDashboard的maven依赖
<dependency>
    <groupId>org.springframework.cloud</groupId>
    <artifactId>spring-cloud-starter-netflix-hystrix-dashboard</artifactId>
</dependency>
配置文件设定端口号
server:
  port: 9001
创建启动类,使用注解启动HystrixDashboard
@SpringBootApplication
@EnableHystrixDashboard
public class HystrixDashboardApp9001 {
    public static void main(String[] args) {
        SpringApplication.run(HystrixDashboardApp9001.class);
    }
}
配置类,配置Hystrix相应的Servlet
@Configuration
public class DashboardConfig {
    @Bean
    public ServletRegistrationBean getServlet(){
        HystrixMetricsStreamServlet streamServlet = new HystrixMetricsStreamServlet();
        ServletRegistrationBean<HystrixMetricsStreamServlet> res =
                new ServletRegistrationBean<>(streamServlet);
        res.setLoadOnStartup(1);
        res.addUrlMappings("/hystrix.stream");
        res.setName("HystrixMetricsStreamServlet");
        return res;
    }
}
浏览器访问
localhost:9001/hystrix出现Hystrix页面,说明成功HystrixDashboard搜索框中输入
http://localhost:8001/hystrix.stream点击Monitor Stream按钮可进入8001端口服务的监控页面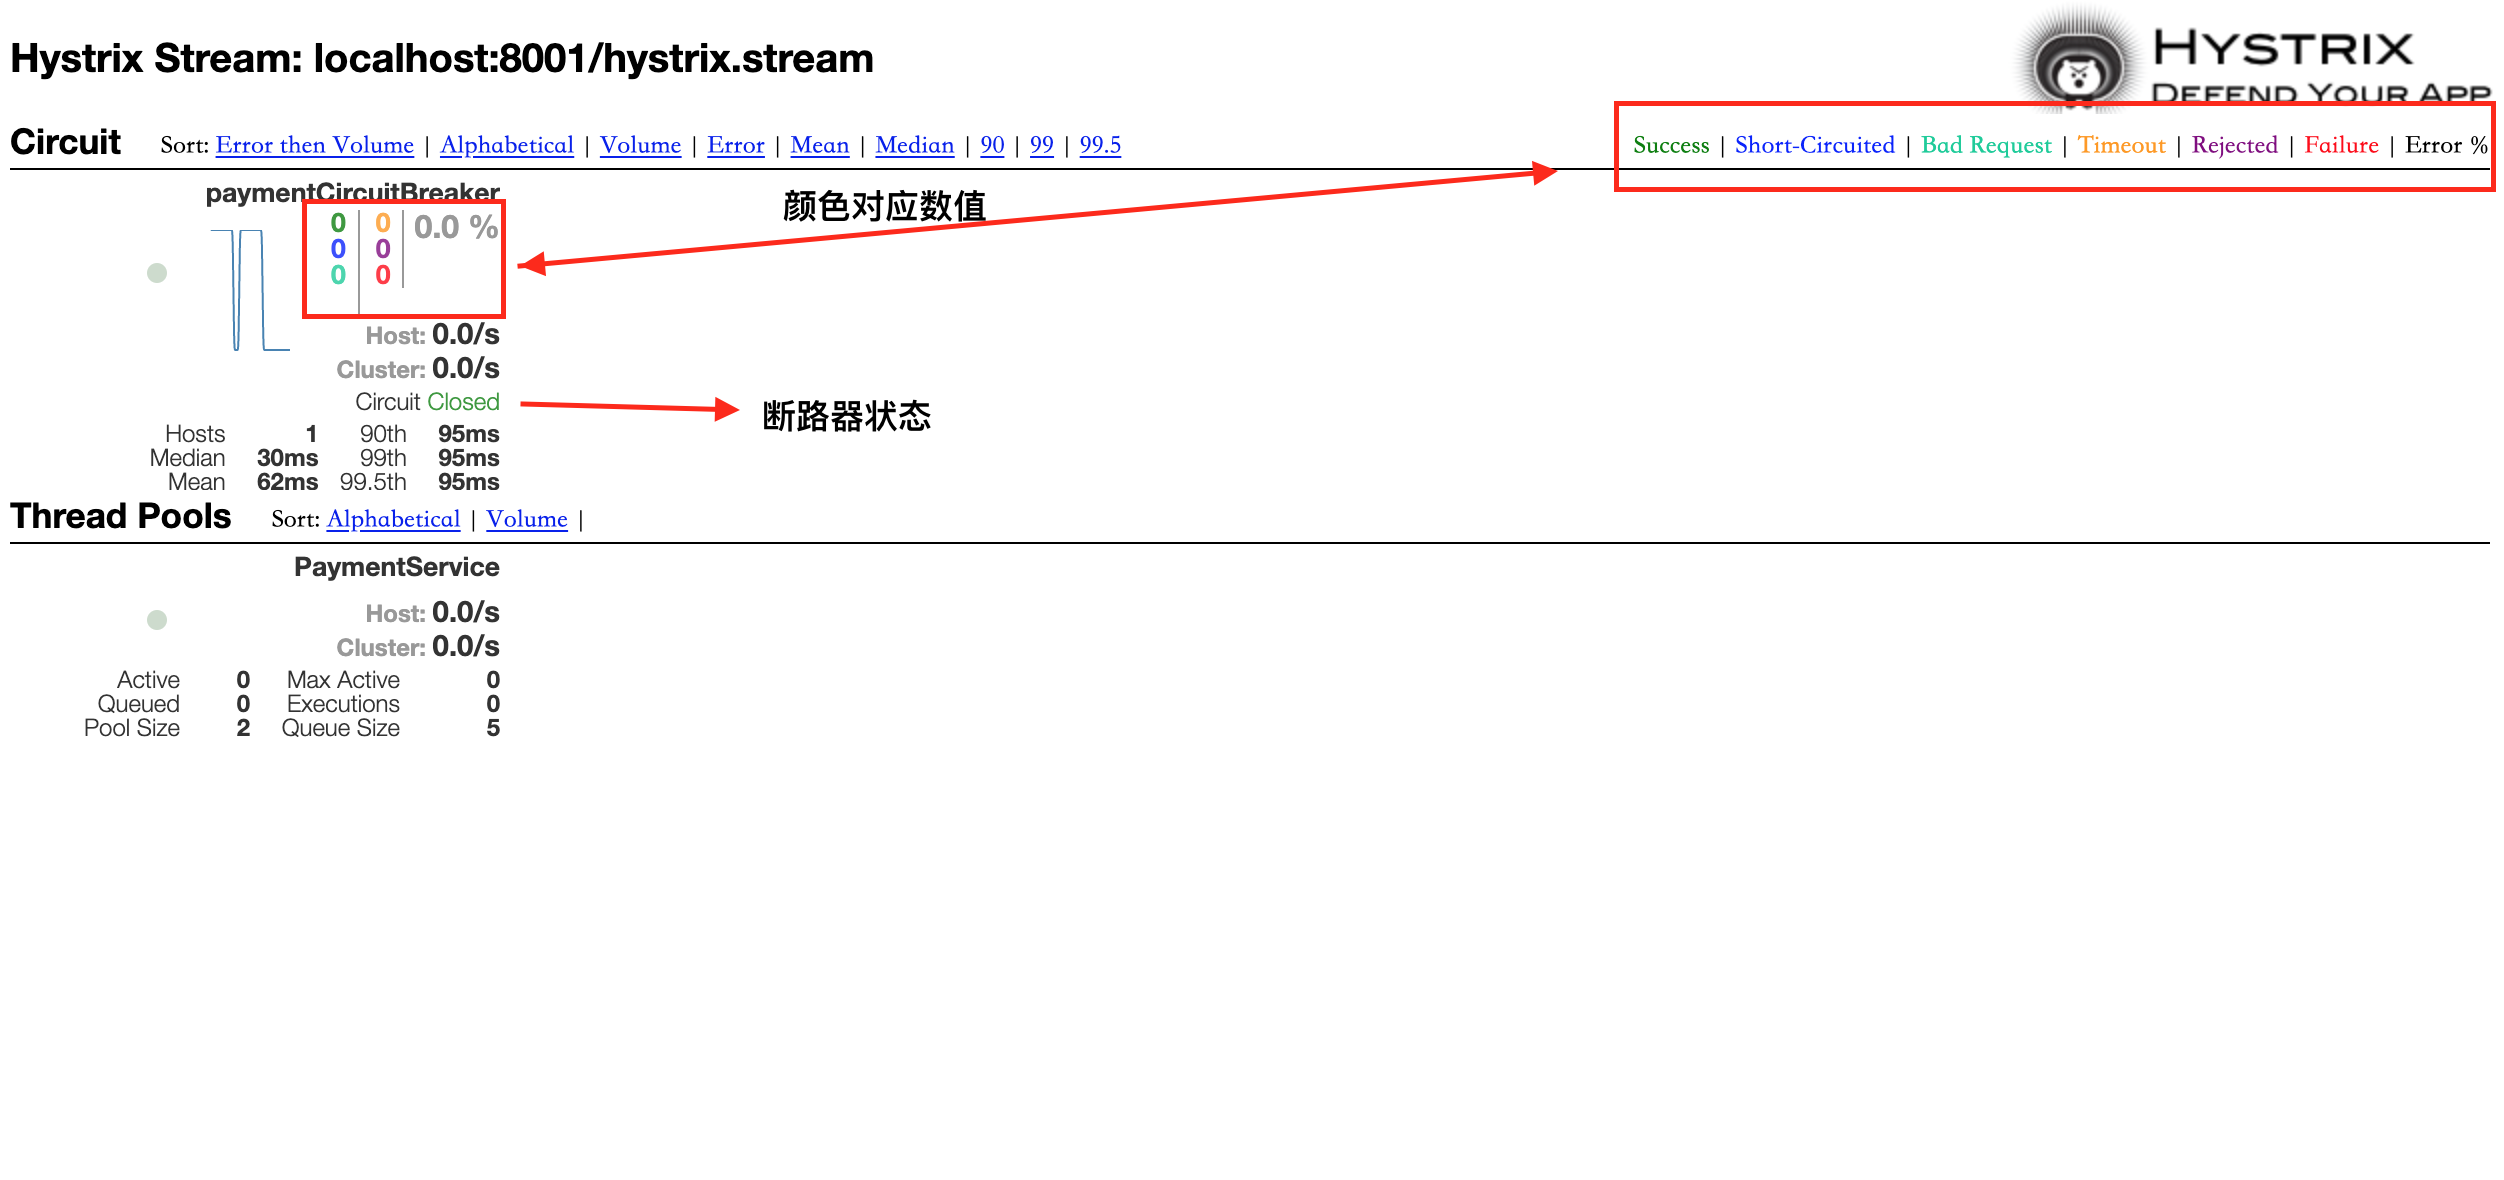
3.1.7 Hystrix处理流程
4. 微服务消息
**消息总线:**在微服务系统中,通常会使用轻量级的消息代理来构建一个共同的消息主题,并让系统中所有微服务实例都连接上来,由于该主题中产生的消息会被所有实例监听和消费,所以称为消息总线。在总线上的实例,都可以广播一些需要让其他链接在该主题上的实例都知道的消息。
4.1 MQ消息队列
4.1.1 rabbitMQ环境配置
下载
erlang和rabbitmq安装包rabbitmq-server-3.7.28-1.el7.noarch.rpm erlang-21.3.8.21-1.el7.x86_64.rpmyum安装
socat(安装erlang时会用到)yum -y install socat安装erlang
rpm -ivh erlang-21.3.8.21-1.el7.x86_64.rpm安装rabbitmq
rpm -ivh rabbitmq-server-3.7.28-1.el7.noarch.rpm启动rabbitmq
# 启动rabbitmq
systemctl start rabbitmq-server

# 其他命令
# 启动服务
rabbitmq-server-detached
# 查看状态
rabbitmqctl status
# 关闭服务
rabbitmqctl stop
# 列出角色
rabbitmqctl list_users
配置rabbitmq网页插件
# 创建目录
mkdir /etc/rabbitmq
cd /etc/rabbitmq
# 启用插件:
rabbitmq-plugins enable rabbitmq_management
配置web端外部访问账号
# 添加角色
rabbitmqctl add_user rabbitmq rabbitmq
# 添加权限
rabbitmqctl set_permissions -p / rabbitmq ".*" ".*" ".*"
# 修改用户角色
rabbitmqctl set_user_tags rabbitmq administrator
4.2 SpringCloudBus分布式消息总线
SpringCloudBus是用来将分布式系统的节点和轻量级消息系统链接起来的框架,它整合了Java的事件处理机制和消息中间件的功能,Bus支持两种消息代理,RabbitMQ和Kafka。Bus能够管理和传播分布式系统间的消息、状态更新等,也可以当作微服务间通信的通道。
利用分布式总线刷新分布式配置的方式有两种,
利用消息总线触发一个Config客户端的/bus/refresh,进而刷新所有客户端的配置
消息总线触发一个服务端ConfigServer的/bus/refresh,进而刷新所有客户端的配置
其中,第二种更合适。因为微服务本身是业务模块,不应该承担配置刷新的职责,也破坏了微服务个节点的对等性,而微服务在迁移时,网络地址通常会变化、如果使用第一种方式刷新会增加工作量。
4.2.1 配置Bus动态刷新全局广播
Config服务端、客户端添加
bus-mq依赖<!--消息总线,rabbitmq支持--> <dependency> <groupId>org.springframework.cloud</groupId> <artifactId>spring-cloud-starter-bus-amqp</artifactId> </dependency>服务端配置
rabbitmq,配置bus刷新点spring: # rabbitmq配置 rabbitmq: host: 172.16.211.101 port: 5672 username: rabbitmq password: rabbitmq # 暴露bus刷新配置的端点 management: endpoints: web: exposure: include: 'bus-refresh'客户端配置
rabbitmqspring: # rabbitmq配置 rabbitmq: host: 172.16.211.101 port: 5672 username: rabbitmq password: rabbitmq启动Config服务端、客户端服务,修改git上的配置文件,可以看到3344上的配置已经修改了,但3355和3366上的配置没有修改
发送post命令,同步配置更改
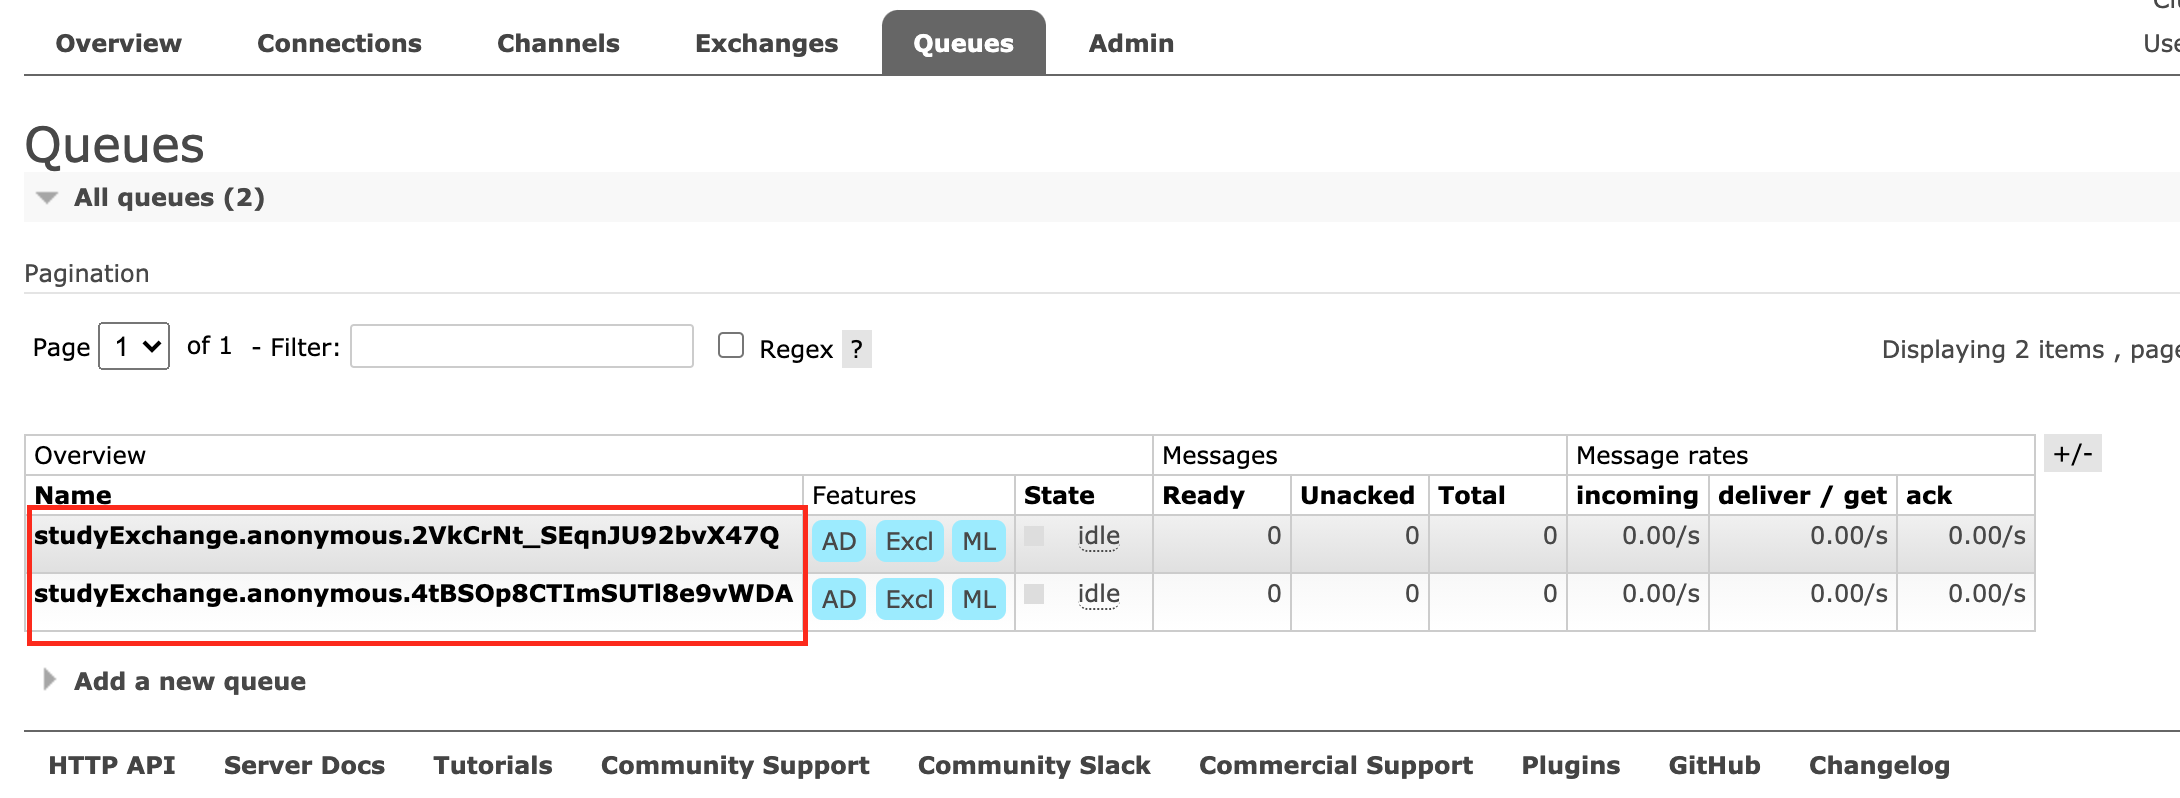
curl -X POST "http://localhost:3344/actuator/bus-refresh"在RabbitMQ管理页面,Exchanges(交换机)中可以看到新增了一个名称为springCloudBus的
topic。当一个服务刷新数据时,它会把这个信息放到topic中,这样其他监听同一个topic的服务就能接到通知,然后更新自身配置。
4.2.2 Bus动态刷新定点通知
定点通知:Bus动态刷新只通知一部分客户端,其他不通知。
通知公式:
# http://配置中心服务端host+port/actuator/bus-refresh/指定需要更新配置的服务,格式为  服务名:端口号
http://localhost:3344/actuator/bus-refresh/{destination}
如只通知3355,则命令为:
curl -X POST "http://localhost:3344/actuator/bus-refresh/config-client:3355"通知结果可看出,3355已更改,3366未更改:
//3344内容
config:
  info: spring-cloud-config master version=1.1.1
//3355内容
spring-cloud-config master version=1.1.1
//3366内容
spring-cloud-config master version=6.6
4.3 Stream微服务消息驱动
引入原因:微服务中可使用的消息中间件技术众多(rabbitMQ,rocketMQ,Kafka),在同一个微服务系统中可能会使用多种消息中间件,需要引入一种适配器,来屏蔽底层差异,统一消息的编程模型
SpringCloudStream是一个构建消息驱动微服务的框架,应用程序通过input(对应消费者)或者output(对应生产者)与SpringCloudStream中的binder对象交互。通过配置来绑定,SpringCloudStream的binder对象与消息中间件交互,实现了应用程序与消息中间件之间的隔离。目前Stream只支持rabbitMQ和Kafka
Stream中的通信方式遵循发布-订阅模式,使用topic主题进行广播,topic在rabbitMQ中就是Exchange,在Kafka中就是topic。
4.3.1 Stream基础
- Binder绑定器,用于连接中间件,屏蔽差异;
- Channel通道,是队列的一种抽象,在消息通讯系统中就是实现存储和转发的媒介,通过Channel对队列进行配置
- Source和Sink,SpringCloudStream的输入输出,即消息的生产者和消费者
@input注解,标识输入通道,通过该输入通道接收到的消息进入应用程序@output注解,标识输出通道,发布的消息通过该通道离开应用程序@StreamListener注解,监听队列,用于消费者的队列消息接受@EnableBinding注解,指通道channel和exchange绑定到一起
4.3.2 Stream基础生产者-消费者构建
消息生产者项目构建
创建module,引入maven依赖
<dependencies>
    <dependency>
        <groupId>org.springframework.cloud</groupId>
        <artifactId>spring-cloud-starter-stream-rabbit</artifactId>
    </dependency>
    <dependency>
        <groupId>org.springframework.cloud</groupId>
        <artifactId>spring-cloud-starter-netflix-eureka-client</artifactId>
    </dependency>
    <dependency>
        <groupId>org.springframework.boot</groupId>
        <artifactId>spring-boot-starter-web</artifactId>
    </dependency>
    <dependency>
        <groupId>org.springframework.boot</groupId>
        <artifactId>spring-boot-starter-actuator</artifactId>
    </dependency>
    <dependency>
        <groupId>org.springframework.boot</groupId>
        <artifactId>spring-boot-devtools</artifactId>
        <scope>runtime</scope>
        <optional>true</optional>
    </dependency>
    <dependency>
        <groupId>org.projectlombok</groupId>
        <artifactId>lombok</artifactId>
    </dependency>
</dependencies>
配置文件添加Stream相关配置
server:
  port: 8801
spring:
  application:
    name: cloud-stream-provider
  # spring cloud stream相关配置
  cloud:
    stream:
      binders: # 此处配置需要绑定的rabbitmq服务信息
        defaultRabbit: #表示定义的名称,用于binding整合
          type: rabbit #消息中间件类型
          environment: #tabbitmq配置信息
            spring:
              rabbitmq:
                host: 172.16.211.101
                port: 5672
                username: rabbitmq
                password: rabbitmq
      bindings: #服务整合处理
        output: #通道名称,表示消息的生产者
          destination: studyExchange #约定好的目的地,要使用的Exchange名称定义
          content-type: application/json #设置消息类型为json,文本则设置为text/plain
          binder: defaultRabbit #设置要绑定的消息服务具体设置
eureka:
  client:
    service-url:
      defaultZone: http://localhost:7001/eureka
    instance:
      lease-renewal-interval-in-seconds: 2 #心跳的时间间隔,默认为30秒
    lease-expiration-duration-in-seconds: 5 #如果超过5秒时间间隔,默认为90秒
    instance-id: send-8801.com #在消息列表时显示的主机名称
    prefer-ip-address: true #访问路径变为IP地址
添加启动类(正常无修改)
@SpringBootApplication
@EnableEurekaClient
public class StreamRabbitProvider8801App {
    public static void main(String[] args) {
        SpringApplication.run(StreamRabbitProvider8801App.class);
    }
}
创建Stream消息发送Service及其实现类
public interface ImessageProvider {
     public String send();
}
package com.sunyog.springcloud.service.impl; import lombok.extern.slf4j.Slf4j; import org.springframework.cloud.stream.annotation.EnableBinding; import org.springframework.cloud.stream.messaging.Source; import com.sunyog.springcloud.service.ImessageProvider; import org.springframework.messaging.MessageChannel; import org.springframework.messaging.support.MessageBuilder; import javax.annotation.Resource; import java.util.UUID; /** * @Author: MysteriousGT * @Date: 2021/3/3 9:45 上午 * @Desc: 这里不需要@service注解,基于Stream的服务需要使用@enableBinding注解 * * Source和Sink: SpringCloudStream的输入输出,即消息的生产者(source)和消费者(sink) * 注解@EnableBinding(Source.class):表示定义消息的推送管道,此处为消息源(生产者) */ @EnableBinding(Source.class) @Slf4j public class ImessageProviderImpl implements ImessageProvider { @Resource //消息发送管道 private MessageChannel output; @Override public String send() { String serial= UUID.randomUUID().toString(); //此处见官网文档:https://docs.spring.io/spring-cloud-stream-binder-rabbit/docs/3.1.1/reference/html/spring-cloud-stream-binder-rabbit.html#_partitioning_with_the_rabbitmq_binder output.send(MessageBuilder.withPayload(serial).build()); log.info("==========Stream 消息:serial: "+serial); return null; } }创建Controller,调用Stream消息发送服务
@RestController
@RequestMapping("/stream/provider")
public class SendMessageController {
    @Autowired
    private ImessageProvider imessageProvider;

    @GetMapping("/send/message")
    public String sendMessage(){
        return imessageProvider.send();
    }
}
启动项目,调用相应接口发送消息
rabbitmq验证消息是否已发送
消息消费者
创建module,引入maven依赖包(pom文件同消息生产者)
修改配置文件,增加stream消费者的配置
server:
  port: 8802
spring:
  application:
    name: cloud-stream-consumer
  cloud:
  # stream配置,除input和生产者不同,其他都一样
    stream:
      binders:
        defaultRabbit:
          type: rabbit
          environment:
            spring:
              rabbitmq:
                host: 172.16.211.101
                port: 5672
                username: rabbitmq
                password: rabbitmq
      bindings:
        input: #通道名称,表示消息的生产者
          destination: studyExchange
          content-type: application/json
          binder: defaultRabbit
# eureka配置除主机名称外,其他和生产者一样
eureka:
  client:
    service-url:
      defaultZone: http://localhost:7001/eureka
    instance:
      lease-renewal-interval-in-seconds: 2
    lease-expiration-duration-in-seconds: 5
    instance-id: receive-8802.com #在消息列表时显示的主机名称
    prefer-ip-address: true
创建消息接收服务,接收消息
/**
 * @Author: MysteriousGT
 * @Date: 2021/3/3 10:08 上午
 * @Desc: 绑定stream输入,同Stream输出端,区别与Source
 */
@EnableBinding(Sink.class)
@Component
@Slf4j
public class ReceiveMessageListener {
    @Value("${server.port}")
    private String currPort;

    @StreamListener(Sink.INPUT)
    public void input(Message<String> message){
        log.info("消费者 1 号,===>接收到的消息:"+message.getPayload()+"\t端口号:"+currPort);
    }
}
启动类同消息生产者
发送消息,查看消息消费者日志
4.3.3 Stream分组消费
**重复消费:**Stream消费者如果是集群,同样配置下,所有消费者都会接收到生产者发送到管道中的消息,这种情况在同样的服务中出现(如:订单)会产生过渡消费的情况,应该避免。
**故障产生原因:**两个服务默认的分组流水号不同,被认定为不同的组,所以可以重复消费
**解决方式:**自定义配置分组,将两个服务分配到同一个组。不同组可以消费(存在重复消费),同一个组内会发生竞争关系,只有其中一个可以消费。
在rabbitMQ管理页面的Queues中可以看到有多个分组:
通过修改配置信息,把两个服务都分到同一个组,实现轮训分组,8802,8803两个微服务增加如下配置:
spring:
	cloud:
    stream:
			bindings: #服务整合处理
        input: #通道名称,表示消息的生产者
          group: stream-rabbitmq-consumer # 修改rabbitmq分组
消息持久化
当配置了rabbitmq分组以后,会自动实现持久化功能,即如果消费者服务器宕机一段时间,这段时间内生产者在不断的产生消息,当生产者服务器启动后会自动获取到中间未被消费的消息,防止了消息丢失。
5. 微服务配置中心
SpringCloudConfig为微服务架构中的微服务提供集中化的外部配置支持,配置服务器为各个不同微服务应用的所有环境提供了一个中心化的外部配置。
SpringCloudConfig分为服务端和客户端两部分,服务端称为分布式配置中心,是一个独立的微服务应用,用来连接配置服务器并未客户端提供配置信息、加密、解密等访问接口。客户端通过指定的配置中心来管理应用资源和相关配置内容,并在启动时从配置中心获取配置信息,默认采用git存储配置信息,并通过git客户端工具来管理配置内容。
配置中心的作用
- 集中管理配置文件
- 不同环境(dev、test、beta、release)不同配置,动态更新配置
- 运行期间动态调整配置时不需在每个微服务上修改配置文件
- 配置发生变化后,服务不需要重启即可感知到配置变化并应用新配置
- 将配置信息以rest形式暴露
5.1 SpringCloudConfig
5.1.1 配置中心服务端配置
创建项目、module,添加maven依赖
<dependencies>
    <dependency>
        <groupId>org.springframework.cloud</groupId>
        <artifactId>spring-cloud-config-server</artifactId>
    </dependency>
    <dependency>
        <groupId>org.springframework.cloud</groupId>
        <artifactId>spring-cloud-starter-netflix-eureka-client</artifactId>
    </dependency>
    <dependency>
        <groupId>org.springframework.boot</groupId>
        <artifactId>spring-boot-starter-web</artifactId>
    </dependency>
    <dependency>
        <groupId>org.springframework.boot</groupId>
        <artifactId>spring-boot-starter-actuator</artifactId>
    </dependency>
</dependencies>
创建启动类,开启配置服务
@EnableConfigServer
@SpringBootApplication
public class ConfigCenter3344App {
    public static void main(String[] args) {
        SpringApplication.run(ConfigCenter3344App.class);
    }
}
新建配置文件,添加eureka、config相关配置
server:
  port: 3344
spring:
  application:
    name: cloud-config-center
  cloud:
    config:
      server:
        git:
          uri: https://gitee.com/sunyog/springcloud.git
          search-paths: #搜索目录
            - springcloud-config
      label: master #读取分支
eureka:
  client:
    service-url:
      defaultZone: http://localhost:7001/eureka
git仓库下创建配置文件
git地址/springcloud-config/application-dev.ymlserver: port: 8080启动eureka服务端、config服务端,浏览器访问http://localhost:3344/master/application-dev.yml,返回结果为:
server: port: 8080访问http://localhost:3344/application/dev/master,结果为:
{
  name: "application",
  profiles: [
  	"dev"
  ],
  label: "master",
  version: "8c7d97902481484efc5615e61ab4dbb12e5271b5",
  state: null,
  propertySources: [
    {
      name: "https://gitee.com/sunyog/springcloud.git/springcloud-config/application-dev.yml",
      source: {
      	server.port: 8080
      }
    }
  ]
}
5.1.2 配置读取规则
/{label}/{application}-{profile}.yml
/分支/应用-环境,(推荐使用此种方式)
/{application}-{profile}.yml
默认为master分支
/{application}/{profile}[/{label}]
5.1.3 配置中心客户端使用
新建项目、添加依赖
<dependencies>
    <dependency>
        <groupId>org.springframework.cloud</groupId>
        <artifactId>spring-cloud-starter-config</artifactId>
    </dependency>
    <dependency>
        <groupId>org.springframework.cloud</groupId>
        <artifactId>spring-cloud-starter-netflix-eureka-client</artifactId>
    </dependency>
    <dependency>
        <groupId>org.springframework.boot</groupId>
        <artifactId>spring-boot-starter-web</artifactId>
    </dependency>
    <dependency>
        <groupId>org.springframework.boot</groupId>
        <artifactId>spring-boot-starter-actuator</artifactId>
    </dependency>
    <dependency>
        <groupId>org.springframework.boot</groupId>
        <artifactId>spring-boot-starter-test</artifactId>
    </dependency>
    <dependency>
        <groupId>org.springframework.boot</groupId>
        <artifactId>spring-boot-devtools</artifactId>
        <scope>runtime</scope>
        <optional>true</optional>
    </dependency>
</dependencies>
创建bootstrap.yml配置文件,并添加配置
server:
  port: 3355
spring:
  application:
    name: cloud-config-client
  cloud:
    # spring cloud config 服务端配置
    config:
      label: master # 分支名称
      name: application # 配置文件名称
      profile: test # 读取后缀名出,综上:master分支上的application-dev.yml文件
      uri: http://localhost:3344 #配置中心地址
eureka:
  client:
    service-url:
      defaultZone: http://localhost:7001/eureka
创建启动类
@EnableEurekaClient
@SpringBootApplication
public class ConfigClient3355App {
    public static void main(String[] args) {
        SpringApplication.run(ConfigClient3355App.class);
    }
}
创建controller类,添加rest访问远程配置的接口
@RestController
@RequestMapping("/config/client")
public class ConfigClientController {
    @Value("${config.info}")
    private String configInfo;

    @GetMapping("/info")
    public String getConfigInfo(){
        return configInfo;
    }
}
启动服务,访问
localhost:3355/config/client/infomaster test application version=1.0.1此时如果修改了原创配置文件,在配置中心服务端可以看到修改,但是在客户端没有修改,需要设置分布式配置动态刷新
bootstrap.yml文件说明
application.yml是用户级资源配置项,bootstrap.yml是系统级,优先级更高。SpringCloud会创建一个BootStrapContext上下文作为Spring应用的ApplicationContext的父级上下文,初始化时,BootstrapContext负责从外部加载配置属性并解析配置,这两个上下文共享一个从外部获取的Environment,从而保证两个上下文的分级配置。将配置中心客户端的配置文件改为bootstrap.yml保证了优先加载次文件
5.1.4 分布式配置动态刷新(手动版)
添加监控依赖
<dependency>
    <groupId>org.springframework.boot</groupId>
    <artifactId>spring-boot-starter-actuator</artifactId>
</dependency>
修改bootstrap主配置文件,暴露监控端点
management:
  endpoints:
    web:
      exposure:
        include: "*"
业务类添加刷新配置注解
@RefreshScope
@RestController
@RequestMapping("/config/client")
public class ConfigClientController {
    @Value("${config.info}")
    private String configInfo;

    @GetMapping("/info")
    public String getConfigInfo(){
        return configInfo;
    }
}
发送一个post请求,让3355获取最新配置
curl -X POST "http://localhost:3355/actuator/refresh"修改远程配置文件,后浏览器访问
master test application version=2.1.1.beta
[注]:必须发送POST请求获取最新配置,否则无法获取更新的配置
但,当微服务配置客户端为一个集群,如何实现一次通知,配置处处生效?需要引入分布式消息总线解决,基本原理:
ConfigClient实例都监听MQ中同一个topic(默认是SpringCloudBus),当一个服务刷新数据时,它会把这个消息放入到topic中,监听同一topic的服务都能接到通知,然后更新自身的配置
6. 微服务网关
Netflix研发的微服务网关Zuul已停止更新,Zuul2开发进度无限期推迟,所以Spring自研微服务网关Gateway。SpringCloud技术架构如下图所示,外部请求通过微服务网关实现对内部服务的访问。
Gateway基于异步非阻塞模型进行开发,性能更高。基于SpringFramework5.X、SpringBoot2.X进行构建,可以对路由指定断言Predicate和过滤器Filter,同时集成了Hystrix的断路器功能,集成了SpringCloud服务发现功能、请求限流功能,支持路径重写,支持websocket。

Zuul采用Tomcat容器,使用传统的Servlet IO处理模型,运行时接受请求并未每隔请求分配一个线程,然后调用service()方法,……,在高并发情况下,线程数飙升,严重影响整个系统效率。
Gateway使用非阻塞式处理模型,基于SpringWebFlux,一个非阻塞式异步web框架,它不需要依赖ServletAPI,并基于Reactor来实现响应式流规范。
6.1 Gateway
6.1.1 Gateway路由、断言、过滤
Route 路由
构建网关的基本模块,它由ID、目标URI、一系列断言和过滤链组成,如果断言为true则匹配该路由
Predicate 断言
参考
java.util.function.Predicate,开发人员可以匹配HTTP请求中的所有内容,如果请求与断言相匹配则进行路由Filter 过滤
使用过滤器可以在请求被路由前、后对请求进行修改
6.1.2 Gateway工作流程
- 客户端向SpringCloudGateway发送请求,然后在GatewayHandlerMapping中找到与请求相对应的路由,将其发送到GatewayWebHandler
- Handler再通过指定的前置过滤器来对发送的请求执过滤逻辑(主要包括:参数校验、权限校验、流量监控、日志输出、协议转换等)
- 过滤后发送给相应的业务处理逻辑
- 后置过滤器执行过滤逻辑(主要包括:增加或修改响应内容、日志输出、流量监控等)
6.1.3 Gateway使用
创建项目/module,引入maven依赖
<dependency>
    <groupId>org.springframework.cloud</groupId>
    <artifactId>spring-cloud-starter-gateway</artifactId>
</dependency>

<dependency>
    <groupId>org.springframework.cloud</groupId>
    <artifactId>spring-cloud-starter-netflix-eureka-client</artifactId>
</dependency>
<dependency>
    <groupId>org.springframework.boot</groupId>
    <artifactId>spring-boot-devtools</artifactId>
    <scope>runtime</scope>
    <optional>true</optional>
</dependency>
启动类开启Eureka注册中心
@SpringBootApplication
@EnableEurekaClient
public class GatewayApplication {
    public static void main(String[] args) {
        SpringApplication.run(GatewayApplication.class);
    }
}
配置文件增加Eureka配置、Gateway配置
server:
  port: 9527
spring:
  application:
    name: cloud-gateway
  cloud:
    gateway:
      routes:
        - id: payment_router  #路由id,没有固定规则,要求唯一
          uri: http://localhost:8001  #匹配后提供服务的路由地址
          predicates:
            - Path=/payment/one/** #断言,路径匹配的进行路由
        - id: payment_router2
          uri: http://localhost:8001
          predicates:
            - Path=/payment/lb/**
eureka:
  client:
    register-with-eureka: true
    fetch-registry: true
    service-url:
      defaultZone: http://localhost:7001/eureka
  instance:
    hostname: cloud-gateway-service
启动服务后访问
http://localhost:9527/payment/one?id=1或http://localhost:9527/payment/lb,可成功通过Gateway访问到8001服务
注意:Gateway的路由有两种配置方式,一种是以上所示通过yml配置文件配置,一种是在代码中注入RoutLoacatior的方式配置,官网代码举例
@Configuration
public class GatewayConfig {
    @Bean
    public RouteLocator getRouteLocator(RouteLocatorBuilder builder){
        RouteLocatorBuilder.Builder routes = builder.routes();
        //配置路由,此方法可执行多次
        routes.route("path_router_01",e->e.path("/projects").uri("https://spring.io"));
				//routes.route(...);
        return routes.build();
    }
}
6.1.4 配置动态路由
动态路由可实现通过服务名调用,在网关层实现负载均衡,配置文件如下:
spring:
  application:
    name: cloud-gateway
  cloud:
    gateway:
      discovery:
        locator:
          enabled: true #开启从注册中心动态创建路由,利用微服务名进行路由
      routes:
        - id: payment_router  #路由id,没有固定规则,要求唯一
          uri: lb://cloud-payment-service  #lb表示通过配置中心获取微服务
          predicates:
            - Path=/payment/one/** #断言,路径匹配的进行路由
        - id: payment_router2
          uri: lb://cloud-payment-service
          predicates:
            - Path=/payment/lb/**
6.1.5 Predicate断言
Predicate包括以下几种类型:
[After]
[Before]
[Between]
[Cookie]
[Header]
[Host]
[Method]
[Path]
[Query]- After Route Predicate配置
- Path=/payment/one/** #断言,路径匹配的进行路由
- After=2021-02-26T15:22:20.735+08:00[Asia/Shanghai] #在固定时间之后可访问注意:获取中国时间可通过System.out.println(ZoneDateTime.now())方法获取。将时间设定为一小时以后,访问/payment/one路径,发现报404错误,
Before、Between Route Predicate配置同After(注意,Between需要配置两个时间用
“,”隔开)Cookie Route Predicate配置
需要两个参数,一个是CookieName,一个是正则表达式,路由规则会通过CookieName和正则表达式匹配
- Path=/payment/one/** #断言,路径匹配的进行路由
- Cookie=username,zzyy
curl命令发送cookie:
curl http://localhost:9527/payment/one?id=1 --cookie "username=zzyy"Head Route Predicate配置和Cookie差不多,cookie名称改为请求头名称
- Path=/payment/one/** #断言,路径匹配的进行路由
- Header=x-request-id,\d
curl命令发送请求头
curl http://localhost:9527/payment/one?id=1 -H "x-request-id:1"其他
- Method=GET #必须是GET方法
- Query=username,\d #要有参数username,值必须是整数
6.1.6 Filter过滤器
Gateway内置过滤器有两种GatewayFilter单一过滤器(31个)和GlobalFilter全局过滤器(10个),具体配置见文档第 6、7 两章。
自定义过滤器,需要实现GlobalFilter和Ordered两个接口
@Component
@Slf4j
public class MyGatewayFilter implements GlobalFilter, Ordered {
    @Override
    public Mono<Void> filter(ServerWebExchange exchange, GatewayFilterChain chain) {
        log.info("========= 进入自定义过滤器 ==========");
        String id = exchange.getRequest().getQueryParams().getFirst("id");
        if(StringUtils.isEmpty(id)){
            log.info("id值不能为空,已返回");
            exchange.getResponse().setStatusCode(HttpStatus.NOT_ACCEPTABLE);
            //不通过,返回
            return exchange.getResponse().setComplete();
        }
        //发送给下一个过滤器
        return chain.filter(exchange);
    }

    @Override
    public int getOrder() {
        //数字越小优先级越高
        return 0;
    }
}重启服务后,浏览器访问http://localhost:9527/payment/one?id=-1返回错误,并且日志打印如下内容。
2021-02-26 15:58:57.606 INFO 66933 --- [ctor-http-nio-2] c.s.springcloud.filter.MyGatewayFilter : ========= 进入自定义过滤器 ==========访问http://localhost:9527/payment/one返回异常页面,日志打印如下内容:
2021-02-26 16:00:21.615  INFO 66933 --- [ctor-http-nio-2] c.s.springcloud.filter.MyGatewayFilter   : ========= 进入自定义过滤器 ==========
2021-02-26 16:00:21.615  INFO 66933 --- [ctor-http-nio-2] c.s.springcloud.filter.MyGatewayFilter   : id值不能为空,已返回
7. 服务链路追踪
在微服务架构中,一个客户端发起的请求在后端系统中需要经过多个不同的服务节点调用,来协同产生最后的请求结果,每一个请求都会产生一条复杂的分布式服务调用链路,链路中任何一个环节出现高延时或错误都会引起整个请求的失败。
7.1 SpringCloudSleuth
SpringCloudSleuth提供了一套完整的服务跟踪解决方案,并兼容支持了zipkin。
SpringCloud从F版本开始就不需要自己构建Zipkin server了,只需要调用响应的jar包即可。zipkin官网
7.1.1 Zipkin
一条服务调用链路,通过一个Trace id唯一标识,Span标识发起的请求信息,各个span通过parent id关联起来。服务调用链路图:
Trace和span关系链路图:
7.1.2 搭建链路监控
以下示例,通过对微服务payment8001,order80服务进行修改,实现链路监控。
在服务生产者、消费者端分别添加pom依赖
<!--包含了zipkin和sleuth-->
<dependency>
    <groupId>org.springframework.cloud</groupId>
    <artifactId>spring-cloud-starter-zipkin</artifactId>
</dependency>
修改配置文件,增加zipkin和sleuth配置
spring:
  sleuth:
    sampler:
      probability: 1
  zipkin:
    base-url: http://localhost:9411
生产者新增接口,消费者调用接口
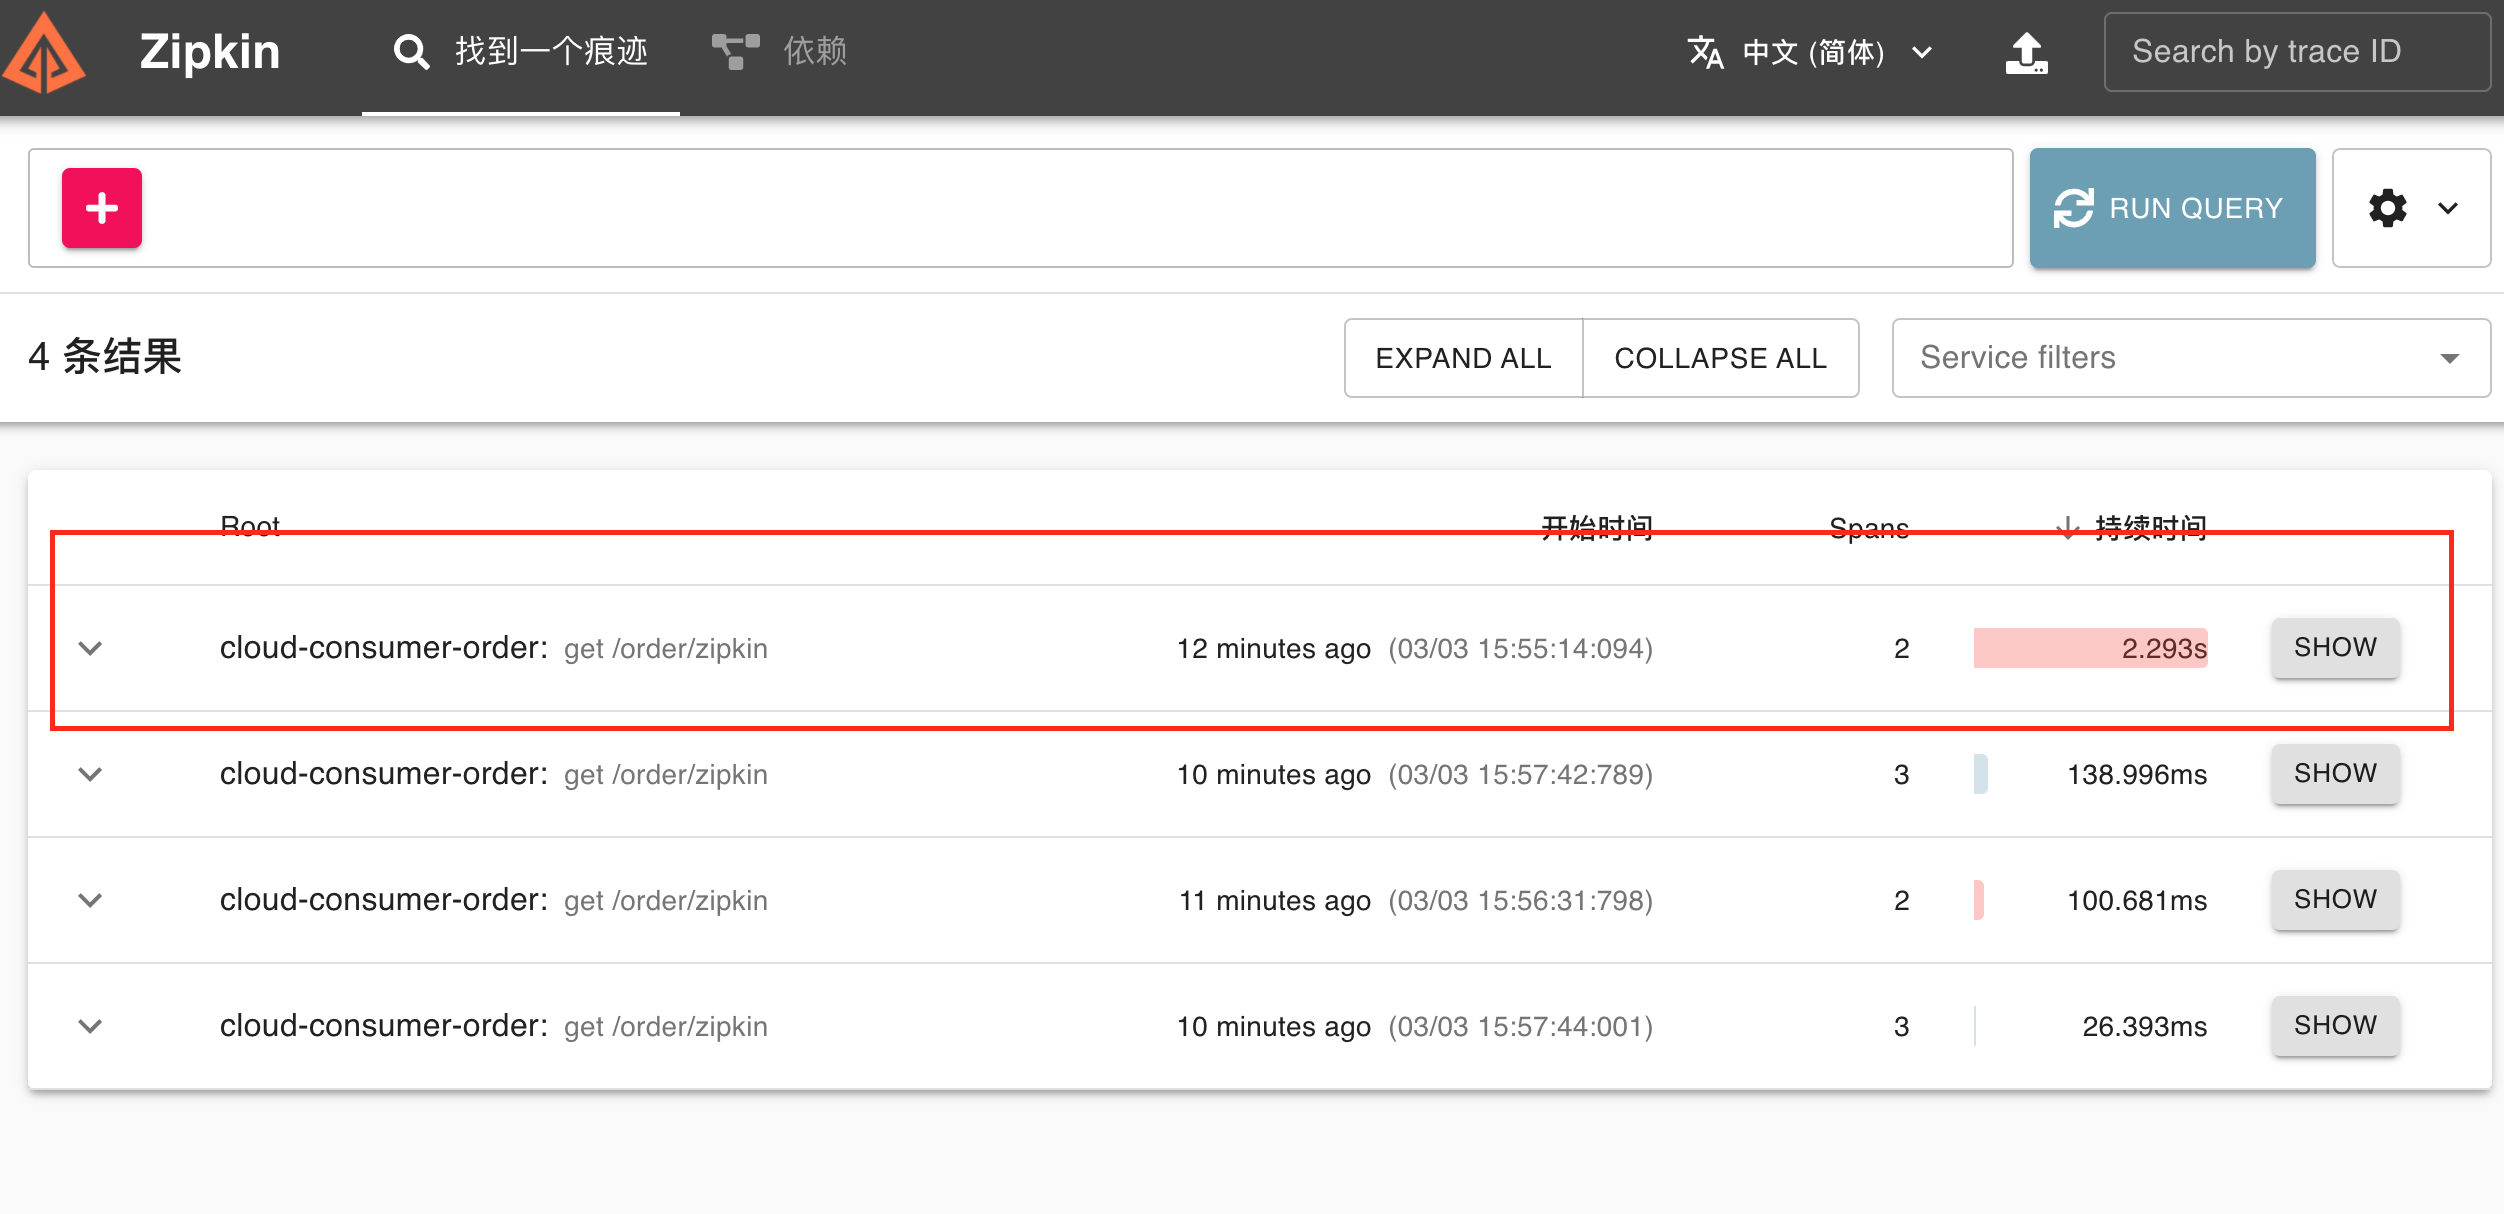
//consumer接口
@GetMapping("/zipkin")
public String paymentZipkin(){
    return restTemplate.getForObject(PAYMENT_URL+"/payment/zipkin",String.class);
}
//provider接口
@GetMapping("/zipkin")
public String zipkin(){
    return "hi i am payment zipkin server fall back, welcome to my zone, hhhh";
}
启动zipkin服务、生产者、消费者服务,访问
localhost/order/zipkin接口浏览器访问
localhost:9411查看zipkin服务调用链路,点击show按钮查看调用详情