Spring核心编程思想学习笔记
IoC概述
Inversion Of control
IoC的主要实现策略
服务定位模式(Service Location Pattern)
服务定位模式被称作策略模式的升级版,属于J2EE模式,在通过JNDI查询或定位各种服务时使用。具体说明见:JNDI和服务定位模式说明
依赖注入模式 DI,包括:构造器注入、setter注入、属性注入、接口注入 <Spring常用>
上下文依赖查询(Contextualized Lookup),如JavaBeans中的BeanContext <Spring常用>
模板方法模式(Template Method Design Pattern),用于生命周期管理
策略模式(Strategy Design Pattern)
IoC容器的职责
- 依赖处理,包括依赖查找和依赖注入
- 生命周期管理,包括容器和被托管资源的生命周期
- 配置管理,包括容器的配置、外部化配置、被托管资源的配置(包括JavaBean或其他资源)
常见IOC容器的实现
JavaBeans作为IoC容器,特性包括:依赖查找、生命周期管理、配置元信息、事件、自定义、资源管理、持久化。
轻量级容器的特征(区别轻重)[1]
- 管理应用代码的行为
- 快速启动
- 容器不需要特殊的配置
- 不过度依赖外部API
- 能够管理细粒度的对象
依赖查找VS依赖注入
| 类型 | 依赖处理 | 实现的便利性 | 代码入侵性 | API依赖性 | 可读性 |
|---|---|---|---|---|---|
| 依赖查找 | 主动获取 | 繁琐 | 强 | 依赖容器API | 良好 |
| 依赖注入 | 被动提供 | 便利 | 弱 | 不依赖容器API | 一般 |
构造器 VS Setter注入[1:1]
setter优势
- Setter可以最大程度上运用
JavaBeans property-editor类型转换机制 - 方便对Beans属性进行修改
- 对于不同属性的Setter方法的执行顺序没有约束,构造器注入可以约束。不是所有的Setter方法都会被调用
构造器优势
- 负值字段通常为final,OOP鼓励对象不变,线程安全
- 减少getter、setter方法(减少代码量)
SpringIoC容器
SpringIoC依赖查找
概述
JavaEE提供了简单的依赖查找方法,如
单一类型的依赖查找,如JNDI中的javax.naming.Context#lookup(javax.naming.Name) 和JavaBeans中的java.beans.beancontext.BeanContext
集合类型依赖查找,如java.beans.beancontext.BeanContext,实际在BeanContextServices#getCurrentServiceClasses方法中实现
层次依赖查找,如javav.beans.beancontext.BeanConntext
单一依赖查找
按Bean名称查找,包括getBean(String)和Spring2.5引入的覆盖默认参数查找getBean(String,Object...),不建议使用,一般建议只读查找
按Bean类型查找,包括Spring3.0提供的getBean(Class)和Spring4.1提供的getBean(Class,Object...)
按类型的延迟查找,包括getBeanProvider(Class)和getBeanProvider(ResolvableType)(在泛型中详解)
//单一依赖查找,按类型的延迟查找
public static void lookupByClassLazy(BeanFactory beanFactory){
        ObjectProvider<String> beanProvider=beanFactory.getBeanProvider(String.class);
        System.out.println(beanProvider.getObject());
}Bean名称+类型查找,getBean(String,Class)
集合依赖查找
按类型获取Bean名称列表,包括getBeanNamesForType(Class)和Spring4.2提供的getBeanNamesForType(ResolvableType)
按类型获取Bean实例列表,getBeanOfType(Class)及其重载方法
按注解类型获取Bean名称列表,getBeanNamesForAnnotation(Class<? extends Annotation>)(@since Spring3.0)
按注解类型获取Bean实例列表,getBeansWithAnnotation(Class<? extends Annotation>)(@since Spring3.0)
获取指定名称+指定注解标注的Bean实例,findAnnotationOnBean(String,Class<? extends Annotation)(@since Spring3.0)
层次依赖查找
层次性依赖查找通过HierarchicalBeanFactory接口实现,类似于双亲委派模型,通过getParentBeanFactory()方法获取双亲
层次性查找有以下几种方式:
- 根据Bean名称查找,基于
HierarchicalBeanFactory#containsLocalBean方法实现 - 根据Bean类型查找实例(列表),包括单一类型的查找
BeanFactoryUtils#beanOfType,集合类型查找BeanFactoryUtils#beansOfTypeIncludingAncestors - 根据Java注解查找名称列表,通过
BeanFactoryUtils#beanNamesForTypeIncludingAncestors实现
延迟依赖查找
Spring中的延迟查找通过org.springframework.beans.factory.ObjectFactory接口实现,他的子接口ObjectProvider 也很常用,其中提供了函数式编程的支持,如getIfAvaliable(Supplier)和ifAvaliable(Consumer)。
安全依赖查找
这里说的安全是指类型安全,依赖查找的安全性对比如下表
| 类型 | 代表是实现 | 是否安全 |
|---|---|---|
| 单一类型 | BeanFactory#getBean | 否 |
ObjectFactory#getObject | 否 | |
ObjectProvider#getIfAvailable | 是 | |
| 集合类型 | ListableBeanFactory#getBeansOfType | 是 |
ObjectProvider#stream | 是 |
层次性的依赖查找取决于其扩充的BeanFactory的类型的安全性
解释说明,在使用BeanFactory的getBean方法时,如果需要获取一个没有注册过的类型的Bean,则运行时报错NoSuchBeanDefinitionException ;或按类型获取时,该类型存在多个Bean,又没有设定@Primary属性,则运行时报错NoUniqueBeanDefinitionException。示例代码如下:
public class BeanFactorySafetyDemo {
    public static void main(String[] args) {
        AnnotationConfigApplicationContext context = new AnnotationConfigApplicationContext();
        context.register(DependencyLookupSafetyDemo.class);
        context.refresh();
        //类型非安全
        //getBean获取不存在的bean
        BeanFactory beanFactory = context;
        ObjectProvider<String> provider = beanFactory.getBeanProvider(String.class);
        //ObjectFactory#getBean获取不存在的bean
        testGetBeanSafe(beanFactory, a -> a.getBean(User.class));
        testGetBeanSafe(beanFactory, a -> provider.getObject());

        //类型安全
        String strBean = provider.getIfAvailable(() -> "empty str bean");
        System.out.println(strBean);

        provider.stream().forEach(System.out::println);

        Map<String, String> beansOfType = ((ListableBeanFactory) beanFactory).getBeansOfType(String.class);
        beansOfType.forEach((k, v) -> System.out.println(v));
        context.close();
    }

    private static void testGetBeanSafe(BeanFactory beanFactory, Consumer<BeanFactory> func) {
        try {
            func.accept(beanFactory);
        } catch (NoSuchBeanDefinitionException e) {
            System.out.println("异常 👉" + e);
        }
    }
}
内建可查找的依赖
AbstractApplicationContext内建可查找的依赖(内建单例对象)
| Bean名称 | Bean实例 | 使用场景 |
|---|---|---|
| environment | Environment对象 | 外部化配置及Profiles |
| systemProperties | java.util.Properties对象 | Java系统属性 |
| systemEnvironment | Java.util.Map对象 | 操作系统环境变量 |
| messageSource | MessageSource对象 | 国际化文案 |
| lifecycleProcessor | LifecycleProcessor对象 | LifecycleBean处理器 |
| applicationEventMulticaster | ApplicationEventMulticaster对象 | Spring事件广播器 |
注解驱动Spring应用上下文内建可查找的依赖
| Bean名称 | Bean实例 | 使用场景 |
|---|---|---|
| org.springframework.context.annotation.internalConfigurationAnnotationProcessor | ConfigurationClassPostProcessor对象 | 处理Spring配置类 |
| org.springframework.context.annotation.internalAutowiredAnnotationProcessor | AutowiredAnnotationBeanPostProcessor对象 | 处理@Autowired以及@Value注解 |
| org.springframework.context.annotation.internalCommonAnnotationProcessor | CommonAnnotationBeanPostProcessor对象 | (条件激活)处理JSR-250注解,如@PostConstruct等 |
| org.springframework.context.event.internalEventListenerProcessor | EventListenerMethodProcessor对象 | 处理标注@EventListenerd 的Spring注解监听方法 |
| org.springframework..context.event.internalEventListenerFactory | DefaultEventListenerFactory对象 | @EnventListener事件监听方法适配为ApplicationListener |
| org.springframework..context.annotation.internalPersistenceAnnotationProcessor | PresistenceAnnotationBeanPosstProcessor对象 | (条件激活)处理JPA注解场景 |
依赖查找中的经典异常
| 异常类型 | 触发条件 | 出现场景 |
|---|---|---|
| NoSuchBeanDefinitionException | 当查找的bean不在容器中时 | BeanFactory#getBean ObjectFactory#getObject |
| NoUniqueBeanDefinitionException | 按类型查找时,容器中存在多个Bean实例 | BeanFactory#getBean(Class) |
| BeanInstantiationException | 当Bean所对应的类型是非具体的类(接口或抽象类) | BeanFactory#getBean |
| BeanCreationException | 当Bean的初始化过程中报错时 | Bean的初始化方法执行出现异常 |
| BeanDefinitionStoreException | 当BeanDefinition配置元信息非法时 | XML配置资源无法打开 |
SpringIoC依赖注入
简单概述
按Bean名称注入
按Bean类型注入
2.1 单个Bean对象
2.2 集合Bean对象
注入容器内建Bean对象
注入非Bean对象
注入类型
5.1 实时注入
5.2 延迟注入
依赖注入的模式和类型
手动模式--通过配置或编程的方式提前安排注入规则
- XML配置元信息
- Java注解元信息
- API配置元信息
自动模式--实现方提供依赖自动关联的方式,按照内建的注入规则注入,主要是通过Autowring自动绑定 (这种模式不建议使用)
表:依赖注入类型表
| 注入类型 | 实现方式 |
|---|---|
| setter方法 | |
| 构造器 | |
| 字段 | @Autowired User user; |
| 方法 | @Autowired public void user(User user){...} |
| 接口回调 | class MyBean implements BeanFactoryAware{...} |
自动绑定(Autowiring)模式、限制和不足
表:自动绑定模式说明
| 模式 | 说明 |
|---|---|
| no | 默认值,未激活Autowiring,需要手动指定依赖注入对象 |
| byName | 根据被注入属性的名称作为Bean名称进行查找,并将对象设置到该属性 |
| byType | 根据被注入属性的类型作为依赖类型进行查找,并将该对象设置到该属性 |
| constructor | 特殊的byType类型,用于构造器参数 |
上表中说明的所有模式都是org.springframework.beans.factory.config.AutowireCapableBeanFactory 接口中定义的常量,其中常量AUTOWIRE_AUTODETECT已弃用
自动绑定的实现方式举例
<!--byName自动绑定 autowire="byName"-->
<bean id="super-user" class="top.sunyog.thinking.ioc.overview.domain.SuperUser" autowire="byName">
    <!--如果有一个User类型名称为user的bean,则此行可以不配置,Spring会自动将这个bean设置到这个属性-->
    <!--<property name="user" ref="user"/>-->
</bean>注意:Spring官方文档中不建议使用自动绑定这种方式,因为这种方式是不精确的,而且容易产生歧义性(当存在多个同类型的bean时)。建议使用注解的方式配置bean的依赖。
Setter方法依赖注入
Spring中实现setter注入的方式有5种,包括:
- XML配置的setter注入
- 注解配置的setter注入
- API配置的setter注入
- autowiring模式下的byName方式注入
- autowring模式下的byType方式注入
其中,前三种属于手动注入,后两种属于自动注入。以上setter注入方式的实例代码如下:
基础代码
//用户类,包括id和name属性,构造方法,setter、getter方法
public class User {
    private Long id;
    private String name;

    //省略无参构造、全参构造
    //省略getter、setter方法
}

//待setter注入的bean
public class UserHolder {
    private User user;

    //省略无参构造、全参构造
    //省略getter、setter方法
    //省略toStrig方法
}
方式一、基于XML配置文件实现的setter注入
<beans ...>
<bean id="userBean" class="top.sunyog.thinking.ioc.overview.domain.User">
<property name="id" value="100"/>
<property name="name" value="test name"/>
</bean>

<bean id="userHolderBean" class="top.sunyog.thinking.ioc.overview.domain.UserHolder">
<!-- setter注入 -->
<property name="user" ref="userBean"/>
</bean>
        </beans>
使用该bean
public static void main(String[]args){
        //创建容器
        DefaultListableBeanFactory beanFactory=new DefaultListableBeanFactory();
        //加载配置
        XmlBeanDefinitionReader xmlBeanReader=new XmlBeanDefinitionReader(beanFactory);
        //xml配置文件的classpath路径
        String location="classpath:/META-INF/dependency-setter-context.xml";
        int beanSize=xmlBeanReader.loadBeanDefinitions(location);
        //以上代码可以通过ClasspathXmlApplicationContext类实现同样的读取xml配置文件的工作
        System.out.println("读取到Bean的数量为:"+beanSize);

        //读取userHolder
        UserHolder userHolder=beanFactory.getBean("userHolderBean",UserHolder.class);
        System.out.println(userHolder);
        }

//执行此方法,打印结果如下
//读取到Bean的数量为:2
//UserHolder{user=User{id=100, name='test name'}}
方式二、基于注解配置的setter注入
@Bean(name = "userHolderBean")
public UserHolder userHolderBean(User user){
        UserHolder userHolderBean=new UserHolder();
        userHolderBean.setUser(user);
        return userHolderBean;
        }
方式三、基于API的setter注入
基于API的注入方式就是通过Spring依赖注入的底层代码实现setter注入,不需要引入XML或注解即可实现配置
public class DiSetterDemo {
    public static void main(String[] args) {
        AnnotationConfigApplicationContext context = new AnnotationConfigApplicationContext();
        //注册配置
        context.register(DiSetterDemo.class);
        //创建beanDefinition
        BeanDefinitionBuilder builder = BeanDefinitionBuilder.genericBeanDefinition(UserHolder.class);
        builder.addPropertyReference("user", "userBean");
        BeanDefinition beanDefinition = builder.getBeanDefinition();
        //注册 userHolder 的 beanDefinition
        context.registerBeanDefinition("userHolderBean", beanDefinition);
        //启动容器上下文
        context.refresh();

        UserHolder userHolder = context.getBean(UserHolder.class);
        System.out.println(userHolder);
        //关闭容器
        context.close();
    }

    @Bean
    public User userBean() {
        return new User(1L, "i am a user bean");
    }
}方式四、方式五可见自动绑定(Autowiring)模式、限制和不足 一章中的代码示例,两者的区别是autowire="byName"和autowire="byType"
构造器依赖注入
和setter注入相同,构造器注入也有XML、注解、API三种手动注入方式;自动模式可以通过constructor实现。以上几种实现方式和setter注入的实现方式类似。
XML配置
<bean id="userHolderBean" class="top.sunyog.thinking.ioc.overview.domain.UserHolder">
    <constructor-arg ref="user"/>
</bean>
注解方式
@Bean
public UserHolder userHolderBean(User user){
        return new UserHolder(user);
        }
API方式
//...省略容器创建、启动、获取bean、关闭相关代码(和setter方式一样)
BeanDefinitionBuilder builder=BeanDefinitionBuilder.genericBeanDefinition(UserHolder.class);
        builder.addConstructorArgReference("userBean");
        BeanDefinition beanDefinition=builder.getBeanDefinition();
//注册 userHolder 的 beanDefinition
        context.registerBeanDefinition("userHolderBean",beanDefinition);
自动绑定的实现方式
<bean id="userHolderBean" class="top.sunyog.thinking.ioc.overview.domain.UserHolder" autowire="constructor">
</bean>
注意:相比于setter注入,更建议使用构造方法注入,因为setter注入中各个属性的setter方法执行顺序是不固定的,而且setter方法对于属性来说意味着是可写的;而构造方法注入天生是有顺序的,而且能够保证属性只读。
字段注入
字段注入只有手动模式,主要通过以下三个注解配置元信息
@Autowired@Resource@Inject(可选,依赖于JSR-330)
注意,字段注入会忽略掉静态字段,即将@Autowired注解打在静态字段上时,只能获取到一个null,可以在源码AutowireedAnnotationBeanPostProcessor 中看到相关的代码
方法注入
方法注入的实现方式主要是通过将以下几个注解打到方法上实现
- @Autowired
- @Resource
- @Inject
- @Bean(不设置名称时使用方法名作为bean名称)
注意,方法注入时不关心方法的名称,只需要传入被注入的Bean参数即可。示例代码如下:
@Service
public class TestService {
    private UserHolder holder1;
    private UserHolder holder2;

    @Resource
    public void initHolder1(UserHolder holder) {
        this.holder1 = holder;
    }

    @Autowired
    public void initHolder2(UserHolder holder) {
        this.holder2 = holder;
    }
}
接口回调注入
主要通过Aware接口及其子接口的回调方法实现注入。接口回调属于自动注入的方式。Spring内建可实现的Aware接口如下
| 接口名称 | 说明 |
|---|---|
| BeanFactoryAware | 获取Spring容器BeanFactory对象 |
| ApplicationContextAware | 获取Spring应用上下文 |
| EnvironmentAware | 获取Environment对象 |
| ResourceLoaderAware | 获取资源加载器对象,ResourceLoader |
| BeanClassLoaderAware | 获取加载当前Bean Class的ClassLoader |
| BeanNameAware | 获取当前Bean的名称 |
| MessageSourceAware | 获取MessageSource对象,用于国际化 |
| ApplicationEventPublisherAware | 用于处理Spring事件 |
| EmbeddedValueResolverAware | 获取StringValueResoulver对象,用于处理占位符 |
示例代码如下:
public class DependencyInject2Demo implements BeanFactoryAware, ApplicationContextAware {
    private static BeanFactory beanFactory;
    private static ApplicationContext applicationContext;

    public static void main(String[] args) {
        AnnotationConfigApplicationContext context = new AnnotationConfigApplicationContext();
        context.register(DependencyInject2Demo.class);
        context.refresh();
        //比较两个对象是否为自动注入的对象
        System.out.println(beanFactory == context.getBeanFactory());
        System.out.println(applicationContext == context);
        context.close();
    }

    @Override
    public void setBeanFactory(BeanFactory beanFactory) throws BeansException {
        DependencyInject2Demo.beanFactory = beanFactory;
    }

    @Override
    public void setApplicationContext(ApplicationContext applicationContext) throws BeansException {
        DependencyInject2Demo.applicationContext = applicationContext;
    }
}
依赖注入类型选择
少依赖注入:构造器注入,Spring官方建议
多依赖注入:setter注入,无法保证注入的顺序
便利性:字段注入
声明类:方法注入,建议@Bean时使用
基础类型注入
这里的基础类型包括以下几种
- 原生类型(八大基本类型)
- 标量类型,如Number、Character、Boolean、Enum、Locale、Charset、Currency、Properties、UUID
- 常规类型,如Object、String、TimeZone、Calendar、Optional等
- Spring提供的类,如Resource、InputSource、Formatter等
这里展示Spring内置类的注入示例:
修改User类的属性
public class User {
    private Long id;
    private String name;
    private Resource configResource;
    //省略无参构造、全参构造
    //省略getter、setter方法
    //省略toString方法
}
修改xml配置文件
<bean id="userBean" class="top.sunyog.thinking.ioc.overview.domain.User">
    <property name="id" value="100"/>
    <property name="name" value="test name"/>
    <property name="configResource" value="classpath:/META-INF/config/user-config.properties"/>
    <!-- 注意:需要保证/META-INF/config/user-config.properties文件存在 -->
</bean>这里需要涉及到类型转换的工作,如xml配置文件中的字符串转换为Resource对象、注入标量类型时字符串到标量类型的转换等,类型转换的具体实现逻辑可以查看类型转换章节
集合类型注入
集合类型就是基础类型的集合,主要包含数组和集合两类。
数组类型(Array):原生类型、标量类型、常规类型、Spring类型
集合类型(Collection):
2.1. Collection:List、Set(SortedSet、NavigableSet、EnumSet)
2.2. Map:Properties
代码样例如下:
扩展User类,创建城市枚举类
public class SuperUser extends User {
    private City[] addr;
    private List<City> lifeCity;
    //省略getter、setter、toString方法
}

public enum City {
    SHANGHAI, BEIJING, SHENZHEN, GUANGZHOU;
}
添加xml配置
<beans>
<bean id="super-user" class="top.sunyog.thinking.ioc.overview.domain.SuperUser" parent="user" autowire="byName">
<property name="addr" value="BEIJING,SHANGHAI"/>
<property name="lifeCity" value="SHANGHAI,GUANGZHOU"/>
</bean>
</beans>
也可以使用以下方式配置集合类型
<beans>
<bean id="super-user" class="top.sunyog.thinking.ioc.overview.domain.SuperUser" parent="user" autowire="byName">
<property name="addr" value="BEIJING,SHANGHAI"/>
<property name="lifeCity">
    <list>
        <value>SHANGHAI</value>
        <value>SHENZHEN</value>
    </list>
</property>
</bean>
</beans>
限定注入
可以使用@Qualifier注解对Bean进行限定,被限定的注解会被分组,当使@Autowired注解注入bean时,如果同时标注了@Qualifier 注解,则只会获取到带有@Qualifier注解的bean;如果没有同时标注@Qualifer,则只会获取到没有@Qualifier的bean。
由于@Qualifier可以用来标注注解,故可以基于此进行自定义的扩展(自定义注解),如SpringCloud中的@LoadBalanced
以下代码明确说明了Qualifier的用法:
public class DiQualifierDemo {
    @Autowired
    private Collection<User> autoUsers;
    @Resource
    @Qualifier
    private Collection<User> qualifierUsers;
    @Resource
    @UserGroup
    private Collection<User> groupedUsers;

    @Bean
    public User user1() {
        return createUser(1L);
    }

    @Bean
    public User user2() {
        return createUser(2L);
    }

    @Bean
    @Qualifier
    public User user3() {
        return createUser(3L);
    }

    @Bean
    @UserGroup
    public User user4() {
        return createUser(4L);
    }

    private User createUser(Long id) {
        User user = new User();
        user.setId(id);
        return user;
    }

    public static void main(String[] args) {
        AnnotationConfigApplicationContext context = new AnnotationConfigApplicationContext();
        context.register(DiQualifierDemo.class);
        context.refresh();

        DiQualifierDemo demo = context.getBean(DiQualifierDemo.class);
        //意向输出user.id=1,2,3,4
        System.out.println("没有分组的bean: " + demo.autoUsers);
        //意向输出user.id=3,4
        System.out.println("使用Qualifier分组的bean: " + demo.qualifierUsers);
        //意向输出user.id=4
        System.out.println("使用自定义注解UserGroup分组的bean: " + demo.groupedUsers);
        context.close();
    }
}@UserGroup注解如下:
@Qualifier
@Target({ElementType.FIELD, ElementType.METHOD})
@Retention(RetentionPolicy.RUNTIME)
@Inherited
public @interface UserGroup {
}
延迟依赖注入
延迟依赖注入主要通过注入ObjectFactory或ObjectProvider两个Api,间接的注入所需要的Bean。建议使用ObjectProvider 类,因为此类功能丰富。代码示例如下:
public class DiQualifierDemo {
    @Resource
    private ObjectProvider<User> userProvider;

    public static void main(String[] args) {
        //省略启动容器相关的代码
        demo.userProvider.stream().forEach(System.out::println);

        context.close();
    }
}
依赖处理过程
在依赖的处理过程中,主要涉及以下几个类的相关功能
- 入口:
DefaultListableBeanFactory#resolveDependency - 依赖描述:
DependencyDescriptor - 自动绑定候选对象处理器
AutowireCandidateResolver
DefaultListableBeanFactory#resolveDependency方法的执行流程如下
图:Spring依赖处理流程图
@Autowired注入原理
@Autowired注入的过程:
- 元信息解析
- 依赖查找
- 依赖注入
主要实现在AutowiredAnnotationBeanPostProcessor类的postProcessProperties()和postProcessMergedBeanDefinition() 两个方法,其中postProcessMergedBeanDefinition()用于构建元数据,postProcessProperties()进行注入
构建元数据和依赖注入注入的主要代码运行时序图如下(以AnnotationConfigApplicationContext上下文为例)
具体的方法执行流程为:
在注入@Autowired标注的依赖时,使用的是AutowiredAnnotationBeanPostProcessor处理器完成注入工作;其他的注解,如@Resource 注解标注的依赖,使用的是CommonAnnotaionBeanPostProcessor ;对于自定义注解标注的依赖,使用的是自定义配置的处理器,而所有这些处理器最初都是从InstantiationAwareBeanPostProcessor 接口继承来的postProcessProperties方法中完成的注入工作。
JSR-330 @Inject注入原理
@Inject注入过程
- 如果jsr-330存在于ClassPath中,复用
AutowiredAnnotationBeanPostProcessor的实现
Java通用注解注入原理
主要在CommonAnnotationBeanPostProcessor类中实现
注入注解
javax.xml.ws.WebServiceRefjavax.ejb.EJBjavax.annotation.Resource
生命周期回调注解
@PostConstruct@PreDestroy
自定义依赖注入注解
自定义依赖注入通常有两种方式
基于
AutowiredAnnotationBeanPostProcessor实现1.1. 扩展@Autowired注解(因为Autowired可以用来标注注解
@Target({...ElementType.ANNOTATION_TYPE})) 1.2. 重新定义一个AutowiredAnnotationBeanPostProcessor类型的Bean,使用@Order注解提升原本的优先级(提升优先级是必须的,否则会使默认的@Autowired、@Inject、@Resource等注入注解失效)自定义实现
2.1. 生命周期处理
实现
InstantiationAwareBeanPostProcessor接口实现
MergedBeanDefinitionPostProcessor接口2.2. 元数据处理
InjectedElement
InjectionMetdata
基于AutowiredAnnotationBeanPostProcessor的实现方式示例如下:
创建自定义注入注解
@Target({ElementType.METHOD, ElementType.FIELD, ElementType.TYPE})
@Retention(RetentionPolicy.RUNTIME)
public @interface MyInject {
    boolean require() default true;
}修改AutowiredAnnotationBeanPostProcessor配置
public class DiAutoInjectConfig {
    @Bean(name = AnnotationConfigUtils.AUTOWIRED_ANNOTATION_PROCESSOR_BEAN_NAME)
    public AutowiredAnnotationBeanPostProcessor myInjectAnnotationBeanPostProcessor() {
        AutowiredAnnotationBeanPostProcessor processor = new AutowiredAnnotationBeanPostProcessor();
        Set<Class<? extends Annotation>> autowiredAnnoTypes = new LinkedHashSet<>();
        autowiredAnnoTypes.addAll(Arrays.asList(MyInject.class, Autowired.class, Inject.class, Resources.class));
        processor.setAutowiredAnnotationTypes(autowiredAnnoTypes);
        return processor;
    }
}
自定义注解的使用
public class DiQualifierDemo {
    @MyInject
    private User primaryUser;

    @Bean
    @Primary
    public User primaryUser() {
        SuperUser superUser = new SuperUser();
        superUser.setId(0L);
        superUser.setName("super user");
        superUser.setAddr(new City[]{City.BEIJING, City.SHANGHAI});
        superUser.setLifeCity(Arrays.asList(City.BEIJING));
        return superUser;
    }

    @Bean
    public User user1() {
        return createUser(1L);
    }

    public static void main(String[] args) {
        AnnotationConfigApplicationContext context = new AnnotationConfigApplicationContext();
        context.register(DiAutoInjectConfig.class);
        context.register(DiQualifierDemo.class);
        context.refresh();

        DiQualifierDemo demo = context.getBean(DiQualifierDemo.class);
        System.out.println("使用自定义注解注入的bean: " + demo.primaryUser);
        //打印结果为
        //使用自定义注解注入的bean: SuperUser{addr=[BEIJING, SHANGHAI], lifeCity=[BEIJING]}
        context.close();
    }
}也可以重新注册AutowiredAnnotationBeanPostProcessor
    /**
 * 优先级需要高于{@link AutowiredAnnotationBeanPostProcessor} 的默认值(Ordered.LOWEST_PRECEDENCE - 2)
 * 这时容器中相当于有两个AutowiredAnnotationBeanPostProcessor,一个是默认的,一个是这里配置的
 */
@Order(Ordered.LOWEST_PRECEDENCE - 3)
@Bean
public AutowiredAnnotationBeanPostProcessor myInjectAnnotationBeanPostProcessor(){
        AutowiredAnnotationBeanPostProcessor processor=new AutowiredAnnotationBeanPostProcessor();
        processor.setAutowiredAnnotationType(MyInject.class);
        return processor;
}如果使用这种方式重新注册,则可以通过getBeansOfType()API按类型获取到所有的Bean,并打印出结果
Map<String, AutowiredAnnotationBeanPostProcessor> processors=context.getBeansOfType(AutowiredAnnotationBeanPostProcessor.class);
        processors.forEach((k,v)->System.out.println(k));
//打印结果如下:
//org.springframework.context.annotation.internalAutowiredAnnotationProcessor
//myInjectAnnotationBeanPostProcessor
SpringIoC依赖来源
自定义Bean,如UserRepository
容器内建的Bean对象,如Environment类
容器内部依赖,如UsesrRepository内部依赖的BeanFactory
| 来源 | 配置方式 |
|---|---|
SpringBeanDefinition | <bean id="user".../> |
@Bean public User user(){...} | |
BeaenDefinitionBuilder | |
| 单例对象 | 通过API实现 |
| 非Spring容器管理的对象 |
依赖查找的来源
SpringBeanDefinition对象,可以通过①xml配置②@Bean配置③BeanDefinitionBuilder创建- 单例对象,可以通过API注入
依赖注入的来源
在依赖查找的基础上增加了
- 非Spring容器管理的对象,即游离对象
综上,很多Bean可以通过@Autowire等注解进行依赖注入,但不能通过getBean()进行依赖查找。以下代码可以说明
public class DependencySourceDemo {
    //注入在postProcessProperties方法执行,早于setter注入,早于@postConstruct
    @Autowired
    private BeanFactory beanFactory;
    @Autowired
    private ResourceLoader resourceLoader;
    @Autowired
    private ApplicationContext applicationContext;
    @Autowired
    private ApplicationEventPublisher applicationEventPublisher;

    public static void main(String[] args) {
        AnnotationConfigApplicationContext context = new AnnotationConfigApplicationContext();
        context.register(DependencySourceDemo.class);
        context.refresh();

        DependencySourceDemo demo = context.getBean(DependencySourceDemo.class);

        context.close();
    }

    @PostConstruct
    public void init() {
        System.out.println("beanFactory==applicationContext: " + (beanFactory == applicationContext));
        System.out.println("resourceLoader==applicationContext: " + (resourceLoader == applicationContext));
        System.out.println("applicationEventPublisher==applicationContext: " + (applicationEventPublisher == applicationContext));
        //以上注入的Bean可以正常获取到
    }

    @PostConstruct
    public void initSearch() {
        testGetBean(ResourceLoader.class);
        testGetBean(ApplicationContext.class);
        testGetBean(ApplicationEventPublisher.class);
        //以上方法无法获取到对应的bean
    }

    private <T> T testGetBean(Class<T> beanType) {
        T bean = null;
        try {
            bean = beanFactory.getBean(beanType);
        } catch (NoSuchBeanDefinitionException e) {
            System.err.println(e.getMessage());
        }
        return null;

    }
}
//打印结果如下
beanFactory==applicationContext: false
resourceLoader==applicationContext: true
applicationEventPublisher==applicationContext: true
No qualifying bean of type 'org.springframework.core.io.ResourceLoader' available
No qualifying bean of type 'org.springframework.context.ApplicationContext' available
No qualifying bean of type 'org.springframework.context.ApplicationEventPublisher' available
Spring容器管理和游离的对象
| 来源 | 是否SpringBean对象 | 是否可生命周期管理 | 配置元信息 | 使用场景 |
|---|---|---|---|---|
| SpringBeanDefinition | ✔️ | ✔️ | ✔️ | 依赖查找、依赖注入 |
| 单例对象 | ✔️ | ❌ | ❌ | 依赖查找、依赖注入 |
| ResolvableDependency | ❌ | ❌ | ❌ | 依赖注入 |
| 外部化配置对象(@Value) | ❌ | ❌ | ❌ | 依赖注入 |
Spring Bean Definition作为依赖来源
SpringBeanDefinition的要素
- 元数据:BeanDefinition
- 注册:BeanDefinitionRegistry#registerBeanDefinition
- 类型:lazy or not
- 顺序:生命周期顺序、注册顺序
单例对象作为依赖来源
要素:
- 外部普通Java对象(不一定是POJO)
- 注册:SingletonBeanRegistry#registerSingleton
限制:
- 无法进行生命周期管理
- 无法实现延迟初始化
非Spring容器管理对象作为依赖来源
要素
- 注册:ConfigurableListableBeanFactory#registerResolvableDependency
限制
- 无生命周期管理
- 无法实现延迟初始化的Bean
- 无法通过依赖查找
可以使用此API将其他类注册为非容器管理的对象,示例代码如下:
public class InjectNoSpringBeanDemo {
    @Autowired
    private String str;

    @PostConstruct
    public void init() {
        System.out.println(this.str);
    }

    public static void main(String[] args) {
        AnnotationConfigApplicationContext context = new AnnotationConfigApplicationContext();
        context.register(InjectNoSpringBeanDemo.class);
        //使用回调的方式注册
        context.addBeanFactoryPostProcessor(beanFactory -> beanFactory.registerResolvableDependency(String.class, "i am resolvable dependency"));
        context.refresh();
        context.close();
    }
}
外部化配置作为依赖来源
要素:
- 类型:非Spring对象依赖来源
限制
SpringIoC配置元信息
- Bean定义配置
- 基于XML文件
- 基于properties文件
- 基于Java注解
- 基于JavaAPI
- 基于groovy的配置
- IoC容器配置
- 基于XML文件
- 基于Java注解
- 基于JavaAPI
- 外部化属性配置
- 基于Java注解
SpringIoC容器
BeanFactory和ApplicationContext谁才是SpringIoC容器?
ApplicationContext就是BeanFactory,源码中是继承关系ApplicationContext extends ListableBeanFactory... ,BeanFactory是一个基本的容器,也是Spring底层的IoC容器,只有一个容器需要具备的基本功能,ApplicationContext在BeanFactory的基础上提供了更多功能(ApplicationContext是一个超集),是具备应用特性的IoC容器。
BeanFactory的基本类继承关系如下
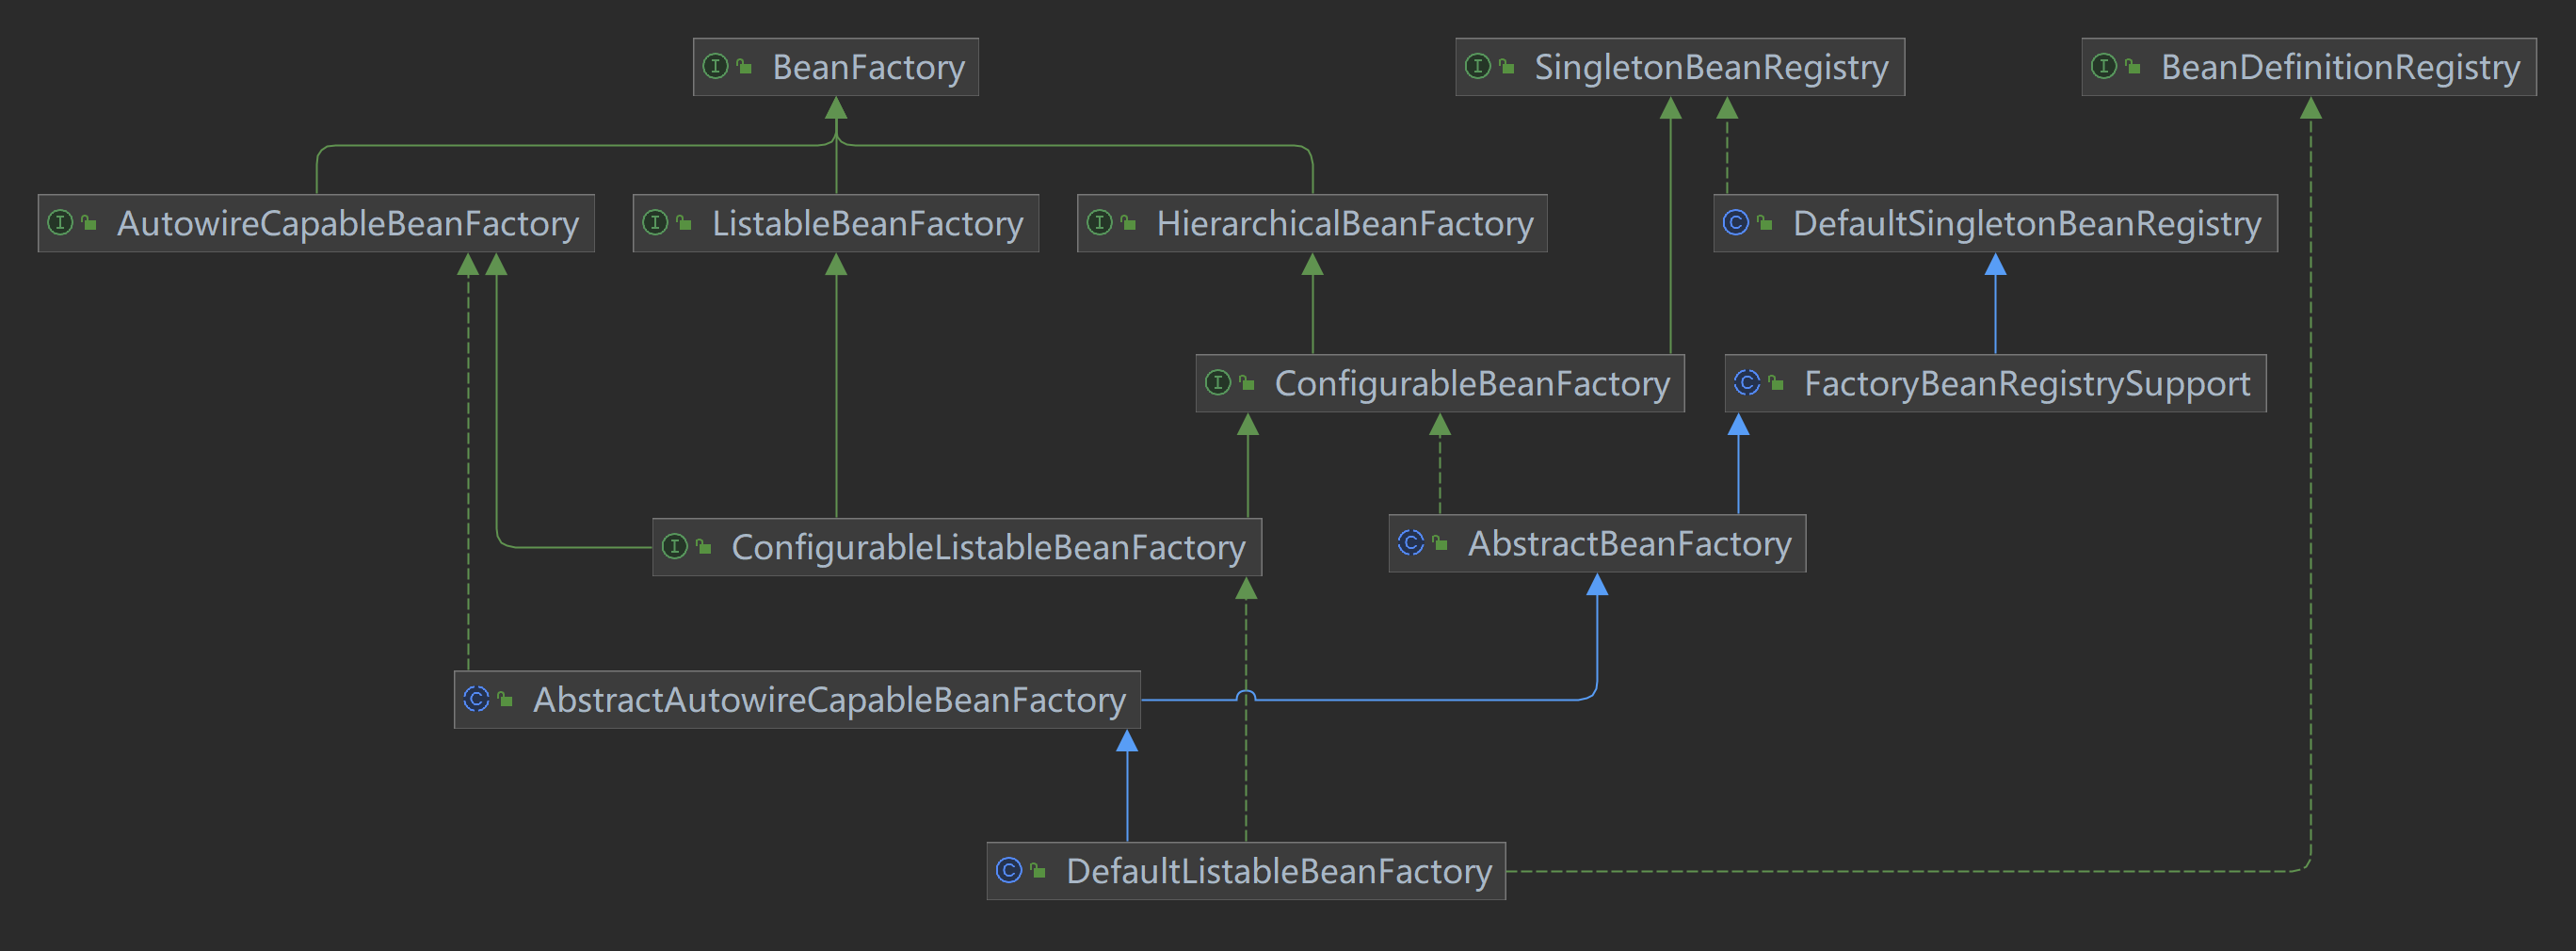
图:BeanFactory继承关系类图
Spring应用上下文
ApplicationContext除了IoC容器的角色,还提供了:
- 面向切面(AOP)
- 配置元信息(configuration metadata)
- 资源管理(Resources)
- 事件(Evnets)
- 国际化(i18n)
- 注解(Annotations),如ComponentScan
- Environment对象(EnvironmentAbstraction)
ApplicationContext的继承关系如下:
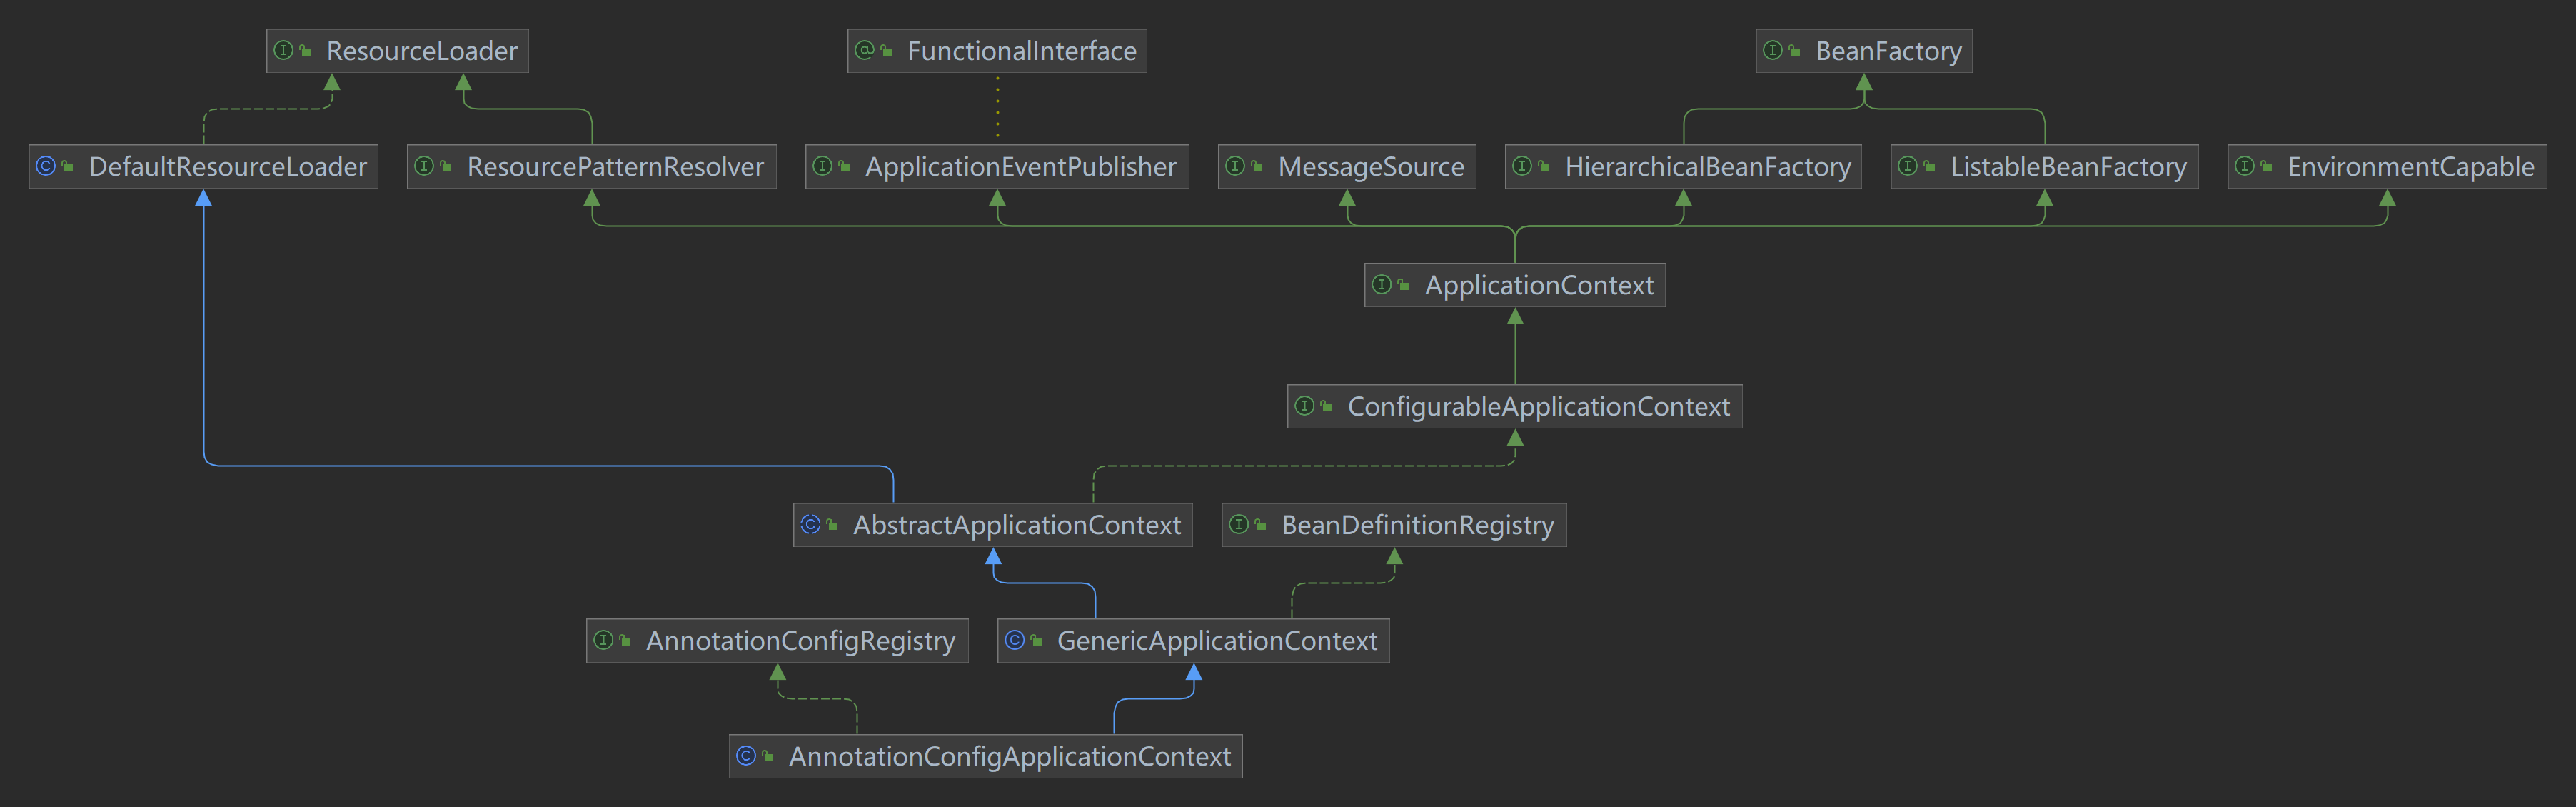
图:Context继承关系类图
使用Spring IoC容器
具体代码见:
最简单的容器使用方式thinking.ioc.overview.container.IocContainerDemo
基于注解的容器使用thinking.ioc.overview.container.AnnotationAppContextContainer
SpringIoC容器生命周期
启动AbstractApplicationcontext.refresh();
运行
停止AbstractApplicationContext.closee();
Bean
SpringBean基础
定义SpringBean
BeanDefinition是Spring中定义的Bean的配置元信息,包含
- bean的类名
- bean的行为配置元素,如作用域、自动绑定的模式、生命周期回调等
- 其他bean的引用(依赖)
- 配置设置,如bean的属性(Properties)
Beandefinition元信息
| 属性 | 说明 |
|---|---|
| Class | bean的类全名,不能是抽象类、接口 |
| Name | bean的标识符(名称或ID) |
| Scope | bean的作用域,如singleton、prototype |
| Constructor arguments | bean的构造器注入参数 |
| Properties | bean的setter注入参数 |
| Autowiring mode | bean自动绑定模式,如byName |
| Lazy initialization mode | bean的延迟初始化模式,是否延迟初始化 |
| Initialization method | bean的初始化回调方法名称 |
| Destruction method | bean的销毁回调方法名称 |
beanDefinition构建方式包括:
- 通过
BeanDefinitionBuilder构建 - 通过
AbstractBeanDefinition及其派生类,如GenericBeanDefinition类
beanDefinition只是bean的定义内容,并不是bean的最终状态
命名SpringBean
每个Bean拥有一个或多个标识符,这些标识符在Bean所在的容器内部必须是唯一的。通常,一个Bean仅有一个标识符,如果需要额外的标识符,可以使用别名(alias)扩充,在name属性使用半角逗号或半角分号(,|: )来间隔。
在基于XML的配置元信息中,可用id或name属性来规定Bean的标识符,通常Bean的表示父有字母构成,允许使用特殊字符,Spring没有明确规定Bean标识符的格式,建议使用驼峰命名。
Bean的名称非必须指定,未指定时Spring容器会自动生成唯一名称,具体生成方式可以通过BeanDefinitionReaderUtils.generateBeanName() 方法查阅
Spring的Bean生成器在接口BeanNameGenerator中定义,框架内建两种实现,默认实现(见类AnnotationnBeanNameGenerator )和基于注解扫描的方式实现(见类DefaultBeanNameGenerator)
别名的价值:
- 复用现有的BeanDefinition
- 具有更多场景化的命名方法。如:同一个Bean,在不同子系统中使用不同的名称
注册SpringBean
如何将BeanDefinition注册到容器:
XML配置元信息
<bean name="".../>Java注解配置元信息
@Controller,@Component,@Bean,@Import,这种方式在springboot中非常常见JavaAPI配置元信息
命名方式:
BeanDefinitionRegistry#registerBeanDefinition(String,BeanDefinition)非命名方式:
BeanDefinitionReaderUtils#registerWithGeneratedName(AbstracctBeanDefinition,BeanDefinitionRegistry)配置类方式:
AnnotatedBeanDefinitionReader#register(Class...)
注册外部Bean的方法
public static void main(String[]args){
        AnnotationConfigApplicationContext context=new AnnotationConfigApplicationContext();
        context.register(BeanRegistryDemo.class);
        context.refresh();
        //注册外部bean
        ConfigurableListableBeanFactory beanFactory=context.getBeanFactory();
        DefaultUserFactory registryBean=new DefaultUserFactory();
        beanFactory.registerSingleton("userFactory",registryBean);
        //获取刚注册的bean
        UserFactory userFactory=beanFactory.getBean("userFactory",UserFactory.class);
        System.out.println(userFactory);
        System.out.println(registryBean==userFactory);//输出为true
        context.close();
        }
实例化SpringBean
常规方式
构造器(配置元信息: XML、Java注解、Java API)
<!--构造器注入-->
<bean id="user1" class="top.sunyog.thinking.ioc.overview.domain.User">
    <constructor-arg name="id" value="1001L"/>
    <constructor-arg name="name" value="constructor-name"/>
</bean>
        <!--setter注入-->
<bean id="user2" class="top.sunyog.thinking.ioc.overview.domain.User">
<property name="id" value="1002L"/>
<property name="name" value="setter name"/>
</bean>
静态工厂方法(配置元信息:XML、JavaAPI)
<bean id="user3" class="top.sunyog.thinking.ioc.overview.domain.User" factory-method="createUser"/>Bean工厂方法(配置元信息:XML、JavaAPI)
通过FactoryBean(配置元信息: XML、Java注解、Java API)
特殊方式(官方文档没有)
通过Java传统API,即ServiceLoaderFactoryBean(XML、Java注解、JavaAPI)
通过AutowireCapableBeanFactory#createBean方法
通过BeanDefinitionRegistry#registerBeanDefinition方法
初始化SpringBean
Bean的初始化方法定义可使用以下三种
@PostConstruct注解标注方法
实现InitializingBean接口的afterPropertiesSet()方法
自定义初始化方法,如:
xml配置
<bean init-method="".../>Java注解
@Bean(initMethod="")JavaAPI
AbstractBeanDefinition#setInitMethodName(String)(此方法在5.1之后被重构到BeanDefinition类里了)
如果以上三种在同一个bean中被定义,则他们的执行顺序是:@PostConstruct标注 ==> 实现InitializingBean接口 ==> 自定义初始化方法
延迟初始化SpringBean
两种方式:
基于XML配置<bean lazy-init="true" .../>
Java注解@Lazy
当某个Bean被定义为延迟初始化时,Spring容器返回的对象与非延迟的区别在哪?
答:
延迟加载和非延迟加载在Bean的定义过程中是没有区别的,唯一的区别是非延迟的Bean在容器启动时就已经创建完成具体是在BeanFactory#preInstantiateSingletons 方法中创建。而延迟加载的Bean是在使用该Bean的时候才被加载,即调用BeanFactory#getBean方法时创建
销毁SpringBean
@PreDestroy标注方法
实现DisposableBean接口的destroy方法
自定义销毁方法
XML配置
<bean destroy="" .../>Java注解
@Bean(destroy="")JavaAPI中的
AbstractBeanDefinition#setDestroyMethodName(String)
以上三种方法的执行顺序:@PreDestroy-->实现DisposableBean-->自定义
一般通过ApplicationContext#close方法可销毁(Bean随着容器的关闭而销毁)
垃圾回收SpringBean
Bean的垃圾回收的方式(GC)
- 关闭Spring容器(容器上下文)
- 执行GC
- SpringBean覆盖的finaliz()方法被回调
SpringBean作用域
SpringBean作用域包括以下5种类型。后三种为支持模板引擎(如Theamleaf)而引入的新作用域,类似于jsp,重点关注singleton和prototype
| 来源 | 说明 |
|---|---|
| singleton | Spring默认作用域,一个BeanFactory有且仅有一个 |
| prototype | 原型作用域,每次依赖查找和依赖注入生成新的Bean对象 |
| request | 将SpringBean存储在ServletRequest上下文中 |
| session | 将SpringBean存储在HttpSession中 |
| application | 将SpringBean存储在ServletContext中 |
singleton作用域
在jvm种一个静态变量对应一个ClassLoader,而在Spring中一个单例对象对应一个Spring应用上下文,即在同一个应用上下文中只有一个单例对象。无论在依赖查找还是依赖注入,单例bean都是同一个对象。
prototype作用域
原型作用域,每次使用该Bean时都会创建一个新的对象,无论是在依赖注入还是依赖查找,都是这种情况。
另外,对于prototype作用域,Spring容器没有办法管理prototypeBean的完整生命周期,也没办法记录实例的存在,销毁回调方法将不会执行。官方文档建议可以利用BeanPostProcessor#postProcessAfterInitialization 进行清扫工作,但这种方式不建议使用。
因为,bean创建成功后一般都需要在其他地方使用,添加BeanPostProcessor 是在bean初始化之后调用这个方法,这时候原型bean大部分时间是不能销毁的,更好的方法是通过让容器类实现DisposableBean 接口的destroy方法。
以下代码可以让原型bean的销毁方法被执行,如果没有继承DisposableBean接口,则只有单例bean的销毁方法执行
public class BeanScopeDemo implements DisposableBean {
    @Autowired
    private BeanFactory beanFactory;
    @Autowired
    private User singletonUser;
    @Autowired
    @Qualifier("singletonUser")
    private User singleton2;

    @Autowired
    private User prototypeUser;
    @Autowired
    @Qualifier("prototypeUser")
    private User prototype2;

    @Autowired
    private Map<String, User> userList;

    @Bean
    @Qualifier("singletonUser")
    public User singletonUser() {
        User user = new User();
        user.setId(System.nanoTime());
        user.setName("单例user");
        return user;
    }

    @Bean
    @Scope(BeanDefinition.SCOPE_PROTOTYPE)
    @Qualifier("prototypeUser")
    public User prototypeUser() {
        User user = new User();
        user.setId(System.nanoTime());
        user.setName("原型user");
        return user;
    }

    public static void main(String[] args) {
        AnnotationConfigApplicationContext context = new AnnotationConfigApplicationContext();
        context.register(BeanScopeDemo.class);
        context.refresh();

        testLookupBean(context);
        testInjectionBean(context);
        context.close();
    }

    private static void testInjectionBean(AnnotationConfigApplicationContext context) {
        BeanScopeDemo component = context.getBean(BeanScopeDemo.class);
        //原型模式bean对象的销毁方法不会被执行
        System.out.println("单例对象: " + component.singletonUser);
        System.out.println("单例对象: " + component.singleton2);
        System.out.println("原型对象: " + component.prototypeUser);
        System.out.println("原型对象: " + component.prototype2);

        component.userList.forEach((k, v) -> System.out.println("集合bean,包含: " + v));
    }

    private static void testLookupBean(AnnotationConfigApplicationContext context) {
        User singletonUser = context.getBean("singletonUser", User.class);
        User singleton1 = context.getBean("singletonUser", User.class);
        User singleton2 = context.getBean("singletonUser", User.class);
        User prototypeUser = context.getBean("prototypeUser", User.class);
        User prototype1 = context.getBean("prototypeUser", User.class);
        User prototype2 = context.getBean("prototypeUser", User.class);

        //单例对象获取到的都是同一个对象
        System.out.println("单例bean对象: " + singletonUser);
        System.out.println("单例bean对象: " + singleton1);
        System.out.println("单例bean对象: " + singleton2);
        //原型模式获取到的对象每次都不同
        System.out.println("原型bean对象: " + prototypeUser);
        System.out.println("原型bean对象: " + prototype1);
        System.out.println("原型bean对象: " + prototype2);

    }

    @Override
    public void destroy() throws Exception {
        System.out.println("\n当前类中注入的原型bean正在被销毁中...");
        //销毁注入的bean
        this.prototypeUser.destroy();
        this.prototype2.destroy();
        //销毁注入的bean集合
        this.userList.forEach((k, v) -> {
            if (beanFactory.isPrototype(k)) {
                v.destroy();
            }
        });
        System.out.println("当前类中注入的原型bean已销毁完成");
    }
}这种实现DisposableBean接口的方式也存在问题,即只适用于依赖注入,对于依赖查找过程中创建的原型bean就无能为力了。
而实现BeanPostProcessor#postProcessAfterInitialization 的方式可以对依赖注入和查找都有效,但这种方式是在原型bean被使用之前调用这时又不是调用销毁方法的最佳时间。此方法的代码样例如下:
    AnnotationConfigApplicationContext context=new AnnotationConfigApplicationContext();
        context.register(BeanScopeDemo.class);
        context.getBeanFactory().addBeanPostProcessor(new BeanPostProcessor(){
@Override
public Object postProcessAfterInitialization(Object bean,String beanName)throws BeansException{
        BeanDefinition bd=context.getBeanDefinition(beanName);
        if(ObjectUtils.nullSafeEquals(bd.getScope(),BeanDefinition.SCOPE_PROTOTYPE)){
        System.out.println("原型bean,初始化后回调");
        }
        return bean;
        }
        });
request作用域
通过如下方法配置request作用域,这里需要保证引入了spring-mvc的依赖
- xml配置文件:
<bean class="..." scope="request"/> - Java注解:
@RequestScope或@Scope(WebApplicationContext.SCOPE_REQUEST)
底层通过RequestScopeAPI实现,继承自AbstractRequestAttributeSccope
获取一个request作用域的bean,实际获取的对象是一个CGLIB代理的对象
session作用域
session作用域的配置方式和request相同
- xml配置:
<bean class="..." scope="sesskon"/> - Java注解配置:
@SessionScope或@Scope(WebApplicationContext.SCOPE_SESSION)
底层通过SessionScopeAPI实现
application作用域
配置:
- XML配置:
<bean class="..." scope="application"/> - Java注解:
@ApplicatioinScope或@Scope(WebApplicationContext.SCOPE_APPLICATION)
底层通过ApplicationScopeAPI实现
注意:request、session、application三个作用域属于spring-mvc中提供的作用域,一般应用于jsp等模板引擎中,现在很少使用。
websocket作用域
自定义Bean的作用域
自定义作用域的实现需要两步
实现
org.springframework.beans.factory.config.Scope基于xml或Java配置,注册Scope
- 基于Java配置实现API
org.springframework.beans.factory.config.ConfigurableBeanFactory#registerScope - 基于xml配置实现
<bean class="org.springframework.beans.factory.config.ConfigurableBeanFactory"> <property name="scopes"> <map> <entry key="..."/> </map> </property> </bean>- 基于Java配置实现API
线程内作用域(一个线程内部使用同一个bean对象)实现举例:
继承Scope接口
public class ThreadLocalScore implements Scope {
    public static final String SCOPE_NAME = "thread-local";
    private final NamedThreadLocal<Map<String, Object>> threadLocal = new NamedThreadLocal<Map<String, Object>>("thread-local-scope") {
        @Override
        protected Map<String, Object> initialValue() {
            return new HashMap<>();
        }
    };

    private Map<String, Object> getContext() {
        return threadLocal.get();
    }

    /**
     * getBean方法调用
     */
    @Override
    public Object get(String name, ObjectFactory<?> objectFactory) {
        Object obj = this.getContext().get(name);
        if (obj == null) {
            obj = objectFactory.getObject();
            this.getContext().put(name, obj);
        }
        return obj;
    }

    @Override
    public Object remove(String name) {
        return this.getContext().remove(name);
    }

    /**
     * 销毁回调函数
     */
    @Override
    public void registerDestructionCallback(String name, Runnable callback) {

    }

    @Override
    public Object resolveContextualObject(String key) {
        return this.getContext().get(key);
    }

    @Override
    public String getConversationId() {
        return String.valueOf(Thread.currentThread().getId());
    }
}
注册作用域
public class ThreadLocalScopeDemo {
    @Bean
    @Scope(ThreadLocalScore.SCOPE_NAME)
    public User getUser() {
        User user = new User();
        user.setId(System.nanoTime());
        user.setName("thread-local-scope-bean");
        return user;
    }

    public static void main(String[] args) {
        AnnotationConfigApplicationContext context = new AnnotationConfigApplicationContext();
        context.getBeanFactory().registerScope(ThreadLocalScore.SCOPE_NAME, new ThreadLocalScore());
        context.register(ThreadLocalScopeDemo.class);
        context.refresh();
        //测试同一个线程
        for (int i = 0; i < 3; i++) {
            User bean = context.getBean("getUser", User.class);
            System.out.printf("[线程ID: %s], [Bean详情: %s]\n", Thread.currentThread().getId(), bean);
        }
        //测试多个线程
        for (int i = 0; i < 3; i++) {
            Thread thread = new Thread() {
                @Override
                public void run() {
                    User bean = context.getBean("getUser", User.class);
                    System.out.printf("[线程ID: %s], [Bean详情: %s]\n", Thread.currentThread().getId(), bean);
                }
            };
            thread.start();
            //强制线程执行完成
            try {
                thread.join();
            } catch (InterruptedException e) {
                throw new RuntimeException(e);
            }
        }

        context.close();
    }
}
RefreshScope作用域
RefreshScope是spring cloud中提供的一种作用域,提供Bean的动态刷新功能,它依赖于spring-cloud-commons,内部也是基于自定义作用域实现的。
Bean的生命周期
在Spring中Bean的生命周期包含以下几个阶段
- SpringBean元信息配置
- SpringBean元信息解析
- SpringBean注册
- SpringBeanDefinition合并
- SpringBeanClass加载
- SpringBean实例化前
- SpringBean实例化
- SpringBean实例化后
- SpringBean属性赋值前阶段
- SpringBeanAware接口回调
- SpringBean初始化前
- SpringBean初始化
- SpringBean初始化后
- SpringBean初始化完成阶段
- SpringBean销毁前
- SpringBean销毁
- SpringBean的垃圾收集
元信息配置
Spring中设定的Bean的具体元信息,见Spring Bean基础☞BeanDefinition元信息。元信息的配置可以使用1️⃣ 资源配置、2️⃣注解配置、3️⃣API配置三种方式中的任意一种。
这里代码演示基于资源的元数据配置
- 定义配置文件,其中内置的配置(如
user.(class))写法需要参考org.springframework.beans.factory.support.PropertiesBeanDefinitionReader中的注释说明
user.id=1
# 类的配置必须加括号
user.(class)=top.sunyog.thinking.ioc.overview.domain.SuperUser
user.addr=BEIJING,SHANGHAI
user.lifeCity=BEIJING- 读取并解析配置文件
public static void main(String[]args){
        DefaultListableBeanFactory registry=new DefaultListableBeanFactory();

        PropertiesBeanDefinitionReader beanDefinitionReader=new PropertiesBeanDefinitionReader(registry);
final String location="META-INF/default.properties";
        //指定字符编码
        EncodedResource encodedResource=new EncodedResource(new ClassPathResource(location),StandardCharsets.UTF_8);
        int beanCount=beanDefinitionReader.loadBeanDefinitions(encodedResource);
        System.out.println("读取到Bean的个数: "+beanCount);

        //通过beanId查找
        BeanFactory beanFactory=registry;
        User userBean=beanFactory.getBean(User.class);
        System.out.println(userBean);
        }
元信息解析
针对Bean的配置方式不同,存在不同的bean解析方式,这里主要是1️⃣对资源方式的BeanDefinition解析、2️⃣ 对注解的BeanDefinition解析,两种方式
针对资源的解析通过BeanDefinitionReader实现,同时针对xml配置文件,还设有专门的XML解析器BeanDefinitionParser
针对注解的解析通过AnnotatedBeanDefinitionReader实现,示例代码如下:
public class BeanMetadataParseDemo {
    public static void main(String[] args) {
        DefaultListableBeanFactory beanFactory = new DefaultListableBeanFactory();
        AnnotatedBeanDefinitionReader reader = new AnnotatedBeanDefinitionReader(beanFactory);
        int beforeRegistryCount = beanFactory.getBeanDefinitionCount();
        //注册当前类为bean
        reader.registerBean(BeanMetadataParseDemo.class);

        int afterRegistryCount = beanFactory.getBeanDefinitionCount();
        System.out.printf("共注册bean的个数为: %d \n", (afterRegistryCount - beforeRegistryCount));
        String[] beanNames = beanFactory.getBeanNamesForType(BeanMetadataParseDemo.class);
        System.out.printf("已注册bean的名称为: %s \n", Arrays.toString(beanNames));
    }
}
打印结果如下:
共注册bean的个数为: 1
已注册bean的名称为: [beanMetadataParseDemo]关于Bean的名称:普通的Class作为Component 注册到Spring容器后,通常Bean的名称为类名首字母改小写(如:BeanMetadataParseDemo 类型的bean名称默认为beanMetadataParseDemo)。Bean名称的生成在BeanNameGenerator#generateBeanName 中实现,其中注解配置的Bean名称的生成在AnnotationBeanNameGenerator 类中实现。可以通过AnnotatedBeanDefinitionReader#setBeanNameGenerator方法对默认的Bean名称生成器进行替换。
单例Bean的注册
bean的注册主要在DefaultListableBeanFactory#registerBeanDefinition(beanName,beanDefinition)方法中实现。其主要的执行流程为:
BeanDefinition合并的主要工作就是将BeanDefinition从GenericBeanDefinition转换为RootBeanDefinition。在合并过程中,需要从: one:当前BeanFactory和2️⃣层次BeanDefinition中查找Bean。
如果没有设置bean的parent属性,则这个BeanDefinition中的内容会直接被复制到RootBeanDefinition ;而如果设置了parent属性(继承配置),则会将parent中的属性和当前bean中的属性共同复制到RootBeanDefinition 。具体的功能在AbstractBeanFactory#getMergedBeanDefinition中实现,具体的工作流程图如下:
图:BeanDefinition合并流程图
注:上图中的入参说明: - beanName:bean的名称
- bd:全称为beanDefinition,实际最长出现的是
GenericBeanDefinition这个类 - containingBd:容器化的bean,如果通过以下方式定义一个bean,则会产生容器化的bean,一般情况下此入参为空。
<!-- 称为containing bean -->
<bean id="containingBd" class="...">
    <property name="...">
        <!-- 称为innerBean -->
        <bean id="simpleBean" class="..."></bean>
    </property>
</bean>
SpringBean类加载阶段
SpringBean的类加载,使用的是Java提供的ClassLoader类加载机制,同时支持JavaSecurity安全控制机制(Java本身就支持),主要的工作在AbstractBeanfactory#resolveBeanClass 中实现。同时,在ConfigurableBeanFactory中也提供了临时的ClassLoader,但不常用。
该方法的方法调用时序图如下:
SpringBean实例化前
这是一个非主流的生命周期,通过实现InstantiationAwareBeanPostProcessor接口的postProcessBeforeInstantiation() 方法实现对bean的生命周期进行管理。具体实现方式如下:
public class BeanLifecycleInstantiationDemo {
    public static void main(String[] args) {
        DefaultListableBeanFactory beanFactory = new DefaultListableBeanFactory();
        //添加bean后置处理器
        beanFactory.addBeanPostProcessor(new MyInstantiation());
        XmlBeanDefinitionReader reader = new XmlBeanDefinitionReader(beanFactory);
        ClassPathResource resource = new ClassPathResource("META-INF/dependency-lookup-context.xml");
        int loadBdCount = reader.loadBeanDefinitions(resource);
        System.out.printf("共读取到beanDefinition %d 条\n", loadBdCount);
        System.out.printf("其中super-user对象为:%s \n", beanFactory.getBean("super-user"));
    }

    static class MyInstantiation implements InstantiationAwareBeanPostProcessor {
        /**
         * 初始化前执行此方法,当bean名称为superUser时覆盖原来的对象
         */
        @Override
        public Object postProcessBeforeInstantiation(Class<?> beanClass, String beanName) throws BeansException {
            if (ObjectUtils.nullSafeEquals(beanName, "super-user")) {
                return new SuperUser();
            }
            return InstantiationAwareBeanPostProcessor.super.postProcessBeforeInstantiation(beanClass, beanName);
        }
    }
}
在添加后置处理器之前进行依赖查找获取到的bean是
其中super-user对象为:SuperUser{addr=[BEIJING, SHANGHAI], lifeCity=[SHANGHAI, SHENZHEN]}添加后置处理器之后结果为:
其中super-user对象为:SuperUser{addr=null, lifeCity=null}InstantiationAwareBeanPostProcessor#postProcessBeforeInstantiation 方法在AbstractAutowireCapableBeanFactory#createBean方法中被调用,这里贴出部分源码
    protected Object createBean(String beanName,RootBeanDefinition mbd,@Nullable Object[]args){
        ...
        Object bean=resolveBeforeInstantiation(beanName,mbdToUse);
        if(bean!=null){
        return bean;
        }
        ...
        }

protected Object resolveBeforeInstantiation(String beanName,RootBeanDefinition mbd){
        Object bean=null;
        ...
        Class<?> targetType=determineTargetType(beanName,mbd);
        if(targetType!=null){
        bean=applyBeanPostProcessorsBeforeInstantiation(targetType,beanName);
        if(bean!=null){
        bean=applyBeanPostProcessorsAfterInitialization(bean,beanName);
        }
        }
        ...
        return bean;
        }

//调用InstantiationAwareBeanPostProcessor#postProcessBeforeInstantiation
protected Object applyBeanPostProcessorsBeforeInstantiation(Class<?> beanClass,String beanName){
        for(BeanPostProcessor bp:getBeanPostProcessors()){
        if(bp instanceof InstantiationAwareBeanPostProcessor){
        InstantiationAwareBeanPostProcessor ibp=(InstantiationAwareBeanPostProcessor)bp;
        Object result=ibp.postProcessBeforeInstantiation(beanClass,beanName);
        if(result!=null){
        return result;
        }
        }
        }
        return null;
}可以看出,如果此方法的返回值是null,回正常执行后续bean的创建工作;相反,如果返回值非空,则直接执行后置处理器中的初始化后置方法postProcessAfterInitialization()
SpringBean的实例化阶段
传统实例化方式,通过实例化策略InstantiationStrategy实现;构造器注入主要在ConstructorResolver#autowireConstructor方法中实现。
SpringBean实例化的方法调用时序图如下:
图:SpringBean实例化方法调用时序图
其中,`AbstractBeanFactory#doGetBean`方法的简要流程为 SpringBean实例化后
和Spring Bean实例化前阶段一样,实例化后阶段的控制也通过InstantiationAwareBeanPostProcessor 接口实现,只是需要实现的方法变成了postProcessAfterInstantiation()。这个方法 的返回值时boolean类型,通过这个返回值可以控制Bean的后续操作:
- 返回false可以跳过后续的属性赋值工作
- 返回ture表示按正常流程操作
以下代码用于控制super-user对象创建完成后设定id为10086,并跳过属性赋值。
static class MyInstantiation implements InstantiationAwareBeanPostProcessor {
    @Override
    public boolean postProcessAfterInstantiation(Object bean, String beanName) throws BeansException {
        if (ObjectUtils.nullSafeEquals(beanName, "super-user") && bean instanceof SuperUser) {
            ((SuperUser) bean).setId(10086L);
            return false;
        }
        return true;
    }
}
SpringBean属性赋值前
在SpringBean属性赋值前,还可以对Spring Bean进行一些操作(主要是针对PropertyValues 进行操作)。通过实现InstantiationAwareBeanPostProcessor#postProcessProperties 方法完成。在spring5.1之前的版本中使用的是InstantiationAwareBeanPostProcessor#postProcessPropertyValues ,此方法在5.1版本被弃用。样例代码如下:
/*此方法将所有的SuperUser类型的Bean的属性重新配置*/
@Override
public PropertyValues postProcessProperties(PropertyValues pvs,Object bean,String beanName)throws BeansException{
final MutablePropertyValues mpvs;
        if(pvs instanceof MutablePropertyValues){
        mpvs=((MutablePropertyValues)pvs);
        }else{
        mpvs=new MutablePropertyValues();
        }

        if(bean instanceof SuperUser){
        mpvs.add("addr",null);
        mpvs.add("lifeCity",null);
        mpvs.add("name",null);
        mpvs.add("id",10011L);
        }

        return mpvs;
}在实际应用中,实例化后和属性赋值前这两个阶段所需要完成的工作性质相似,但postProcessAfterInstantiation() 方法如果需要修改配置的某一个属性,需要返回false,但如果返回了false则后续的属性赋值会被跳过,配置内容将失效;而postProcessProperties() 方法可以单独修改某一项配置,后续的属性赋值正常进行,相对于postProcessAfterInstantiation(),postProcessProperties() 方法更适合这种场景。
postProcessAfterInstantiation()方法更适合针对整个bean进行的配置之外的操作,或者完全修改原配置的操作。
在Spring源码层面InstantiationAwareBeanPostProcessor#postProcessAfterInstantiation 和InstantiationAwareBeanPostProcessor#postProcessProperties方法在AbstractAutowireCapableBeanFactory#populateBean 中被调用,populateBean方法的作用是将RootBeanDefinition中bean的依赖填充到BeanWrapper。
注:调用populateBean之前,在doCreateBean()方法中已经完成了BeanWrapper和Bean的对象创建工作,需要通过populateBean 方法完成依赖填充工作。这里贴出populateBean方法的部分代码
protected void populateBean(String beanName,RootBeanDefinition mbd,@Nullable BeanWrapper bw){
        ...

        InstantiationAwareBeanPostProcessor ibp=(InstantiationAwareBeanPostProcessor)bp;
        if(!ibp.postProcessAfterInstantiation(bw.getWrappedInstance(),beanName)){
        return;
        }
        ...

        InstantiationAwareBeanPostProcessor ibp=(InstantiationAwareBeanPostProcessor)bp;
        PropertyValues pvsToUse=ibp.postProcessProperties(pvs,bw.getWrappedInstance(),beanName);
        if(pvsToUse==null){
        ...
        pvsToUse=ibp.postProcessPropertyValues(pvs,filteredPds,bw.getWrappedInstance(),beanName);
        }
        ...

        //属性赋值
        if(pvs!=null){
        applyPropertyValues(beanName,mbd,bw,pvs);
        }
        }
可以看出,此方法的流程可简单表述为
SpringBeanAware接口回调
org.springframework.beans.factory.Aware接口是一个标记接口,具体的功能在它的子接口中实现,包括:
- BeanNameAware
- BeanClassLoaderAware
- BeanFactoryAware
- EnvironmentAware
- EmbeddedValueResolverAware
- ResourceLoaderAware
- ApplicationEventPublisherAware
- MessageSourceAware
- ApplicationContextAware
以上这些接口完全按照1-9的顺序执行对应的默认方法 ,其中的前3个属于BeanFactory中调用的Aware,在AbstractAutowireCapableBeanFactory#invokeAwareMethods 中使用;后6个属于ApplicationContext中调用的Aware,在ApplicationContextAwareProcessor#invokeAwareInterfaces中使用。
AbstractAutowireCapableBeanFactory#doCreateBean方法中,populateBean()执行完成后,进入initializeBean() 方法,而Aware接口的调用也在这个方法中,这里贴出initializeBean()方法的部分代码
protected Object initializeBean(String beanName,Object bean,@Nullable RootBeanDefinition mbd){
        ...
        //执行Beanfactory相关的Aware接口
        invokeAwareMethods(beanName,bean);

        Object wrappedBean=bean;
        if(mbd==null||!mbd.isSynthetic()){
        //执行BeanPostProcessor#postProcessBeforeInitialization
        wrappedBean=applyBeanPostProcessorsBeforeInitialization(wrappedBean,beanName);
        }

        invokeInitMethods(beanName,wrappedBean,mbd);

        if(mbd==null||!mbd.isSynthetic()){
        //执行执行BeanPostProcessor#postProcessAfterInitialization
        wrappedBean=applyBeanPostProcessorsAfterInitialization(wrappedBean,beanName);
        }
}其中的invokeAwareMethod()方法实现如下:
    private void invokeAwareMethods(String beanName,Object bean){
        if(bean instanceof Aware){
        if(bean instanceof BeanNameAware){
        ((BeanNameAware)bean).setBeanName(beanName);
        }
        if(bean instanceof BeanClassLoaderAware){
        ClassLoader bcl=getBeanClassLoader();
        if(bcl!=null){
        ((BeanClassLoaderAware)bean).setBeanClassLoader(bcl);
        }
        }
        if(bean instanceof BeanFactoryAware){
        ((BeanFactoryAware)bean).setBeanFactory(AbstractAutowireCapableBeanFactory.this);
        }
        }
}而BeanPostProcessor有一个特殊的实现类ApplicationContextAwareProcessor ,这个实现类是Spring的内置类,它在AbstractApplicationContext#prepareBeanFactory 方法中被添加到BeanFactory中。其中的ApplicationContextAwareProcessor#invokeAwareInterfaces方法实现如下:
    private void invokeAwareInterfaces(Object bean){
        if(bean instanceof EnvironmentAware){
        ((EnvironmentAware)bean).setEnvironment(this.applicationContext.getEnvironment());
        }
        if(bean instanceof EmbeddedValueResolverAware){
        ((EmbeddedValueResolverAware)bean).setEmbeddedValueResolver(this.embeddedValueResolver);
        }
        if(bean instanceof ResourceLoaderAware){
        ((ResourceLoaderAware)bean).setResourceLoader(this.applicationContext);
        }
        if(bean instanceof ApplicationEventPublisherAware){
        ((ApplicationEventPublisherAware)bean).setApplicationEventPublisher(this.applicationContext);
        }
        if(bean instanceof MessageSourceAware){
        ((MessageSourceAware)bean).setMessageSource(this.applicationContext);
        }
        if(bean instanceof ApplicationContextAware){
        ((ApplicationContextAware)bean).setApplicationContext(this.applicationContext);
        }
}以上两个方法invokeAwareMethods()和invokeAwareInterfaces()解释了为什么Aware接口是按照1-9的顺序执行的
注:只要使用Spring内置的上下文启动容器,都会将ApplicationContextAwareProcessor 注入到容器中,但如果通过BeanFactory启动容器(如DefaultListableBeanfactory),则不会注册这个后置处理器。
SpringBean初始化前
这里主要是调用各种BeanPostProcessor的postProcessBeforeInitialization()方法
SpringBean初始化
SpringBean的初始化主要是顺序调用以下几个方法:
@PostConstruct标注的方法- 实现
InitializingBean#afterPropertiesSet()方法 - 自定义的初始化方法
其中,第一个方法,即@PostConstruct标注的方法需要Spring引入注解支持才能调用,他是在CommonAnnotationBeanPostProcessor 中引入的,所以说这个方法在AbstractAutowireCapableBeanFactory#invokeInitMethods 之前已经执行完成。而后两个方法都是在AbstractAutowireCapableBeanFactory#invokeInitMethods中调用的。具体的方法代码如下:
protected void invokeInitMethods(String beanName,Object bean,@Nullable RootBeanDefinition mbd)
        throws Throwable{
        ...
        if(System.getSecurityManager()!=null){
        AccessController.doPrivileged((PrivilegedExceptionAction<Object>)()->{
        ((InitializingBean)bean).afterPropertiesSet();
        return null;
        }
        }else{
        ((InitializingBean)bean).afterPropertiesSet();
        }
        ...
        invokeCustomInitMethod(beanName,bean,mbd);
        }
SpringBean初始化后
SpringBean初始化之后的操作,主要就是执行BeanPostProcessor#postProcessAfterInitialization 方法。具体的调用逻辑可以查看Spring源码AbstractAutowireCapableBeanFactory#initializeBean
SpringBean初始化完成
SpringBean初始化完成阶段的工作主要是调用SmartInitializingSingleton#afterSingletonsInstantiated 这个方法,此方法需要Spring4.1+版本的支持。注意,SmartInitializingSingleton 接口在ApplicationContext上下文容器中会自动回调,具体的调用是在AbstractApplicationContext#finishBeanFactoryInitialization 中。如果使用的是一般的BeannFactory这个回调不会被执行,需要手动调用DefaultListableBeanFactory#preInstantiateSingletons ,此方法的功能是将已注册的BeanDefinition初始化为SpringBean。
具体的实现方法为,让Bean类实现SmartInitializingSingleton接口,代码样例如下:
public class UserHolder implements SmartInitializingSingleton {
    @Override
    public void afterSingletonsInstantiated() {
        System.out.println("方法调用: SmartInitializingSingleton#afterSingletonsInstantiated");
    }
}
SpringBean销毁前
通过DestructionAwareBeanPostProcessor#postProcessBeforeDestruction方法回调,实现Spring Bean销毁前的操作。具体的实现步骤如下:
beanFactory.addBeanPostProcessor(new DestructionAwareBeanPostProcessor(){
@Override
public void postProcessBeforeDestruction(Object bean,String beanName)throws BeansException{
        if(ObjectUtils.nullSafeEquals(beanName,"user")){
        System.out.println("--->销毁前准备: DestructionAwareBeanPostProcessor#postProcessBeforeDestruction回调");
        }
        }
        });
通过这种方式定义销毁前的操作会产生一个问题 ,就是@PreDestroy注解定义的销毁方法会先执行,之后才会执行DestructionAwareBeanPostProcessor#postProcessBeforeDestruction。
这时因为@PreDestroy定义的销毁方法是在CommonAnnotationBeanPostProcessor 这个后置处理器中被执行的,而后置处理器的执行顺序是注册顺序。所以,造成这种现象的原因是DestructionAwareBeanPostProcessor 的注册顺序太靠后了,需要提前。可以通过以下方式提前注册DestructionAwareBeanPostProcessor
public class BeanLifecycleDestroyDemo {
    public static void main(String[] args) {
        String location = "classpath:/META-INF/dependency-lookup-context.xml";
        ClassPathXmlApplicationContext context = new ClassPathXmlApplicationContext(location);
        //获取到BeanPostProcessor列表
        List<BeanPostProcessor> processors =
                ((AbstractBeanFactory) context.getBeanFactory()).getBeanPostProcessors();

        String destroyBeanName = "user";
        //将DestructionAwareBeanPostProcessor添加到CommonAnnotationBeanPostProcessor之前
        //CommonAnnotationBeanPostProcessor在列表中的下标是3
        processors.add(3, new DestructionAwareBeanPostProcessor() {
            @Override
            public void postProcessBeforeDestruction(Object bean, String beanName) throws BeansException {
                if (ObjectUtils.nullSafeEquals(beanName, "user")) {
                    System.out.println("--->销毁前准备: DestructionAwareBeanPostProcessor#postProcessBeforeDestruction回调");
                }
            }
        });

        ConfigurableListableBeanFactory beanFactory = context.getBeanFactory();
        User userBean = beanFactory.getBean(destroyBeanName, User.class);
        System.out.println(userBean);
        //手动销毁bean
        beanFactory.destroyBean(destroyBeanName, userBean);
//        context.close();
    }
}
源码分析
Spring Bean的销毁工作主要在DisposableBeanAdapter#destroy方法中实现,该方法顺序调用: one:DestructionAwareBeanPostProcessor#destroy、2️⃣DisposableBean#destroy、3️⃣this#invokeCustomDestroyMethod 即自定义的销毁方法。这里贴出部分源码:
    public void destroy(){
        //DestructionAwareBeanPostProcessor接口回调
        if(!CollectionUtils.isEmpty(this.beanPostProcessors)){
        for(DestructionAwareBeanPostProcessor processor:this.beanPostProcessors){
        processor.postProcessBeforeDestruction(this.bean,this.beanName);
        }
        }
        //DisposableBean接口回调
        if(this.invokeDisposableBean){
        ((DisposableBean)this.bean).destroy();
        }
        //自定义销毁方法
        if(this.destroyMethod!=null){
        invokeCustomDestroyMethod(this.destroyMethod);
        }else if(this.destroyMethodName!=null){
        Method methodToInvoke=determineDestroyMethod(this.destroyMethodName);
        if(methodToInvoke!=null){
        invokeCustomDestroyMethod(ClassUtils.getInterfaceMethodIfPossible(methodToInvoke));
        }
        }
}此方法在AbstractBeanFactory#destroyBean和AbstractAutowireCapableBeanFactory#destroyBean等方法中都有调用。
SpringBean销毁
这里说的bean销毁是指在Spring容器中被销毁,并不意味着这个对象在JVM中被销毁。SpringBean的销毁可以通过两种方式实现:
- 上下文容器关闭,即
ApplicationContext#close - 调用
ConfigurableBeanFactory#destroyBean方法
销毁方法的执行顺序为:
@PreDestroy标注的方法- 实现DisposableBean接口的destroy方法
- 自定义的销毁方法
之所以是这种顺序是因为,以上三种销毁方法在DisposableBeanAdapter#destroy方法中被调用,调用顺序为如下图,@PreDestroy 标注的方法在InitDestroyAnnotationBeanPostProcessor#postProcessBeforeDestruction方法被调用。
SpringBean的垃圾收集
Spring Bean的垃圾收集通过以下方式进行
- 关闭Spring容器
- 执行GC
- Spring Bean覆盖的finalize()方法被回调
SpringBean的生命周期大合集
通过一个例子可以看到SpringBean的生命周期及各种回调的执行顺序,以下是样例代码
Bean对象类
public class LifecycleBean implements BeanNameAware, EnvironmentAware, InitializingBean, SmartInitializingSingleton, DisposableBean {
    private Long id;
    private String name;

    public LifecycleBean() {
        printLifecycle("构造方法执行中...", 1);
    }

    public LifecycleBean(Long id, String name) {
        this.id = id;
        this.name = name;
    }

    public void setId(Long id) {
        printLifecycle("setter方法执行中", 1);
        this.id = id;
    }

    public void setName(String name) {
        printLifecycle("setter方法执行中", 1);
        this.name = name;
    }

    public static void printLifecycle(String msg, int version) {
        final String msgFormat = "[版本号: %d] [纳秒: %d] : [%s]\n";
        System.out.printf(msgFormat, version, System.nanoTime(), msg);
    }

    @Override
    public void setBeanName(String name) {
        printLifecycle("BeanFactory管理的Aware接口回调中...", 4);
    }

    @Override
    public void setEnvironment(Environment environment) {
        printLifecycle("ApplicationContext管理的Aware接口回调中...", 5);
    }

    @PostConstruct
    public void annoInitialization() {
        printLifecycle("@PostConstruct方法执行中...", 7);
    }

    @Override
    public void afterPropertiesSet() throws Exception {
        printLifecycle("InitializingBean#afterPropertiesSet方法执行中", 8);
    }

    public void customInitMethod() {
        printLifecycle("自定义初始化方法执行中...", 9);
    }

    @Override
    public void afterSingletonsInstantiated() {
        printLifecycle("SmartInitializingSingleton#afterSingletonsInstantiated执行中...", 11);
    }

    @PreDestroy
    public void annoDestroy() {
        printLifecycle("@PreDestroy方法执行中", 13);
    }


    @Override
    public void destroy() throws Exception {
        printLifecycle("DisposableBean#destroy方法执行中", 14);
    }

    public void customDestroy() {
        printLifecycle("自定义销毁方法执行中...", 15);
    }

    @Override
    protected void finalize() throws Throwable {
        printLifecycle("JVM GC执行中...", 16);
        super.finalize();
    }
}
主类
public class BeanAllLifecycleDemo {
    @Bean(initMethod = "customInitMethod", destroyMethod = "customDestroy")
    public LifecycleBean lifecycleBean() {
        LifecycleBean res = new LifecycleBean();
        res.setId(1L);
        res.setName("demo");
        return res;
    }

    public static void main(String[] args) throws InterruptedException {
        AnnotationConfigApplicationContext context = new AnnotationConfigApplicationContext();
        context.register(BeanAllLifecycleDemo.class);
        DefaultListableBeanFactory beanFactory = (DefaultListableBeanFactory) context.getBeanFactory();
        beanFactory.addBeanPostProcessor(new MyInstantiation());
        beanFactory.addBeanPostProcessor(new MyPostProcessor());
        beanFactory.addBeanPostProcessor(new MyDestructionAwareProcessor());
        context.refresh();

        context.close();
        //JVM gc
        System.gc();
        Thread.sleep(5000);
        System.gc();
    }


    static class MyInstantiation implements InstantiationAwareBeanPostProcessor {
        @Override
        public Object postProcessBeforeInstantiation(Class<?> beanClass, String beanName) throws BeansException {
            if (ObjectUtils.nullSafeEquals(beanClass, LifecycleBean.class)) {
                LifecycleBean.printLifecycle("InstantiationAwareBeanPostProcessor#postProcessBeforeInstantiation方法执行中...", 0);
            }
            return InstantiationAwareBeanPostProcessor.super.postProcessBeforeInstantiation(beanClass, beanName);
        }

        @Override
        public boolean postProcessAfterInstantiation(Object bean, String beanName) throws BeansException {
            if (ObjectUtils.nullSafeEquals(bean.getClass(), LifecycleBean.class)) {
                LifecycleBean.printLifecycle("InstantiationAwareBeanPostProcessor#postProcessAfterInstantiation方法执行中...", 2);
            }
            return InstantiationAwareBeanPostProcessor.super.postProcessAfterInstantiation(bean, beanName);
        }

        @Override
        public PropertyValues postProcessProperties(PropertyValues pvs, Object bean, String beanName) throws BeansException {
            if (ObjectUtils.nullSafeEquals(bean.getClass(), LifecycleBean.class)) {
                LifecycleBean.printLifecycle("InstantiationAwareBeanPostProcessor#postProcessProperties方法执行中...", 3);
            }
            return InstantiationAwareBeanPostProcessor.super.postProcessProperties(pvs, bean, beanName);
        }
    }

    static class MyPostProcessor implements BeanPostProcessor {
        @Override
        public Object postProcessBeforeInitialization(Object bean, String beanName) throws BeansException {
            if (ObjectUtils.nullSafeEquals(bean.getClass(), LifecycleBean.class)) {
                LifecycleBean.printLifecycle("BeanPostProcessor#postProcessBeforeInitialization方法执行中...", 6);
            }
            return BeanPostProcessor.super.postProcessBeforeInitialization(bean, beanName);
        }

        @Override
        public Object postProcessAfterInitialization(Object bean, String beanName) throws BeansException {
            if (ObjectUtils.nullSafeEquals(bean.getClass(), LifecycleBean.class)) {
                LifecycleBean.printLifecycle("BeanPostProcessor#postProcessAfterInitialization方法执行中...", 10);
            }
            return BeanPostProcessor.super.postProcessAfterInitialization(bean, beanName);
        }
    }

    static class MyDestructionAwareProcessor implements DestructionAwareBeanPostProcessor {
        @Override
        public void postProcessBeforeDestruction(Object bean, String beanName) throws BeansException {
            if (ObjectUtils.nullSafeEquals(bean.getClass(), LifecycleBean.class)) {
                LifecycleBean.printLifecycle("DestructionAwareBeanPostProcessor#postProcessBeforeDestruction", 12);
            }
        }
    }
}
执行结果
[版本号: 0] [纳秒: 25194614397400] : [InstantiationAwareBeanPostProcessor#postProcessBeforeInstantiation方法执行中...]
[版本号: 1] [纳秒: 25194627017400] : [构造方法执行中...]
[版本号: 1] [纳秒: 25194627216200] : [setter方法执行中]
[版本号: 1] [纳秒: 25194627399200] : [setter方法执行中]
[版本号: 2] [纳秒: 25194630111600] : [InstantiationAwareBeanPostProcessor#postProcessAfterInstantiation方法执行中...]
[版本号: 3] [纳秒: 25194630286700] : [InstantiationAwareBeanPostProcessor#postProcessProperties方法执行中...]
[版本号: 4] [纳秒: 25194634200300] : [BeanFactory管理的Aware接口回调中...]
[版本号: 6] [纳秒: 25194634386900] : [BeanPostProcessor#postProcessBeforeInitialization方法执行中...]
[版本号: 5] [纳秒: 25194634550800] : [ApplicationContext管理的Aware接口回调中...]
[版本号: 7] [纳秒: 25194634743800] : [@PostConstruct方法执行中...]
[版本号: 8] [纳秒: 25194634882200] : [InitializingBean#afterPropertiesSet方法执行中]
[版本号: 9] [纳秒: 25194635566600] : [自定义初始化方法执行中...]
[版本号: 10] [纳秒: 25194635696200] : [BeanPostProcessor#postProcessAfterInitialization方法执行中...]
[版本号: 11] [纳秒: 25194640314300] : [SmartInitializingSingleton#afterSingletonsInstantiated执行中...]
[版本号: 12] [纳秒: 25194647677000] : [DestructionAwareBeanPostProcessor#postProcessBeforeDestruction]
[版本号: 13] [纳秒: 25194647904300] : [@PreDestroy方法执行中]
[版本号: 14] [纳秒: 25194648042200] : [DisposableBean#destroy方法执行中]
[版本号: 15] [纳秒: 25194648164300] : [自定义销毁方法执行中...]
[版本号: 16] [纳秒: 25194662439700] : [JVM GC执行中...]在singleton作用域模式下,Spring Bean的创建在ApplicationContext#refresh方法中完成,此方法的调用时序图如下:
按照SpringBean的生命周期大合集 中标注的17个版本号,其中前12个为初始化生命周期(版本号对应0-11),后5个为销毁生命周期(版本号对应12-16)。在初始化生命周期对应时序图中的方法调用关系如下图:
| 版本号 | 回调时机 |
|---|---|
| 0️⃣ | AbstractAutowareCapableBeanFactory#resolveBeforeInstantiation |
| 1️⃣ | AbstractAutowareCapableBeanFactory#createBeanInstance |
| 2️⃣3️⃣ | AbstractAutowareCapableBeanFactory#populateBean |
| 4️⃣5️⃣6️⃣7️⃣8️⃣9️⃣🔟 | AbstractAutowareCapableBeanFactory#initializeBean |
11 | SmartInitializingSingleton#afterSinigletonInstantiated |
12、13、14、15 | DisposableBeanAdapter#destroy |
AbstractAutowireCapableBeanFactory的populateBean方法代码逻辑如下:
protected void populateBean(String beanName,RootBeanDefinition mbd,@Nullable BeanWrapper bw){
        ...
        //InstantiationAwareBeanPostProcessor#postProcessAfterInstantiation
        for(BeanPostProcessor bp:getBeanPostProcessors()){
        if(bp instanceof InstantiationAwareBeanPostProcessor){
        InstantiationAwareBeanPostProcessor ibp=(InstantiationAwareBeanPostProcessor)bp;
        if(!ibp.postProcessAfterInstantiation(bw.getWrappedInstance(),beanName)){
        return;
        }
        }
        }

        ...autowire
        //InstantiationAwareBeanPostProcessor#postProcessProperties
        for(BeanPostProcessor bp:getBeanPostProcessors()){
        if(bp instanceof InstantiationAwareBeanPostProcessor){
        InstantiationAwareBeanPostProcessor ibp=(InstantiationAwareBeanPostProcessor)bp;
        ibp.postProcessProperties(pvs,bw.getWrappedInstance(),beanName);
        //注意,从Spring5.1开始此方法已不建议使用
        ibp.postProcessPropertyValues(pvs,filteredPds,bw.getWrappedInstance(),beanName);
        }
        ...
        }
        ...
        }
AbstractAutowireCapableBeanFactory的initializeBean方法代码逻辑如下:
protected Object initializeBean(String beanName,Object bean,@Nullable RootBeanDefinition mbd){
        //BeanFactory管理的Aware接口回调
        invokeAwareMethods(beanName,bean);
        //初始化前回调,包括ApplicationContext管理的Aware接口回调
        wrappedBean=applyBeanPostProcessorsBeforeInitialization(wrappedBean,beanName);
        //自定义初始化方法(3种形式)
        invokeInitMethods(beanName,wrappedBean,mbd);
        //初始化后回调
        wrappedBean=applyBeanPostProcessorsAfterInitialization(wrappedBean,beanName);

        return wrappedBean;
}正常情况下,singleton作用域的Spring Bean随着容器的关闭而销毁,即调用ApplicationContext#close方法时容器销毁。而close() 方法的调用逻辑伪代码如下:
public class AbstractApplicationContext {
    @Override
    public void close() {
        synchronized (...){
            doClose();
            ...
        }
    }

    protected void doClose() {
        // Destroy all cached singletons in the context's BeanFactory.
        destroyBeans();
        ...
    }

    protected void destroyBeans() {
        //DefaultListableBeanFactory#destroySingletons
        getBeanFactory().destroySingletons();
    }
}

public class DefaultListableBeanFactory extends DefaultSingletonBeanRegistry {
    @Override
    public void destroySingleton(String beanName) {
        //DefaultSingletonBeanRegistry#destroySingletons
        super.destroySingleton(beanName);
		...
    }
}

public class DefaultSingletonBeanRegistry {
    public void destroySingleton(String beanName) {
		...
        DisposableBean disposableBean;
        synchronized (this.disposableBeans) {
            disposableBean = (DisposableBean) this.disposableBeans.remove(beanName);
        }
        destroyBean(beanName, disposableBean);
    }

    protected void destroyBean(String beanName, @Nullable DisposableBean bean) {
		...
        if (bean != null) {
            try {
                //DisposableBeanAdapter#destroy
                bean.destroy();
            }
			...
        }

		...
    }
}

public class DisposableBeanAdapter {
    @Override
    public void destroy() {
        //DestructionAwareBeanPostProcessor#postProcessBeforeDestruction
        //包括@PreDestroy定义的销毁函数
        if (!CollectionUtils.isEmpty(this.beanPostProcessors)) {
            for (DestructionAwareBeanPostProcessor processor : this.beanPostProcessors) {
                processor.postProcessBeforeDestruction(this.bean, this.beanName);
            }
        }
        //DisposableBean#destroy
        if (this.invokeDisposableBean) {
            ((DisposableBean) this.bean).destroy();
        }
        //@Bean(destroyMethod = "...")自定义销毁函数
        invokeCustomDestroyMethod(this.destroyMethod);
    }
}
简单的方法调用时序图如下:
以上本章所述,没有@PostConstruct和@PreDestroy 两个注解标注的初始化和销毁方法的调用位置,是因为这两个方法都是在InitDestroyAnnotationBeanPostProcessor 中完成调用,其中,初始化方法在postProcessBeforeInitialization中被执行,销毁方法在postProcessBeforeDestruction 中被执行。在InitDestroyAnnotationBeanPostProcessor的子类CommonAnnotationBeanPostProcessor 的构造函数中,@PostConstruct被注册为initAnnotationType,@PreDestroy被注册为destroyAnnotationType ,也是因此这两个注解成为了初始化、销毁回调。
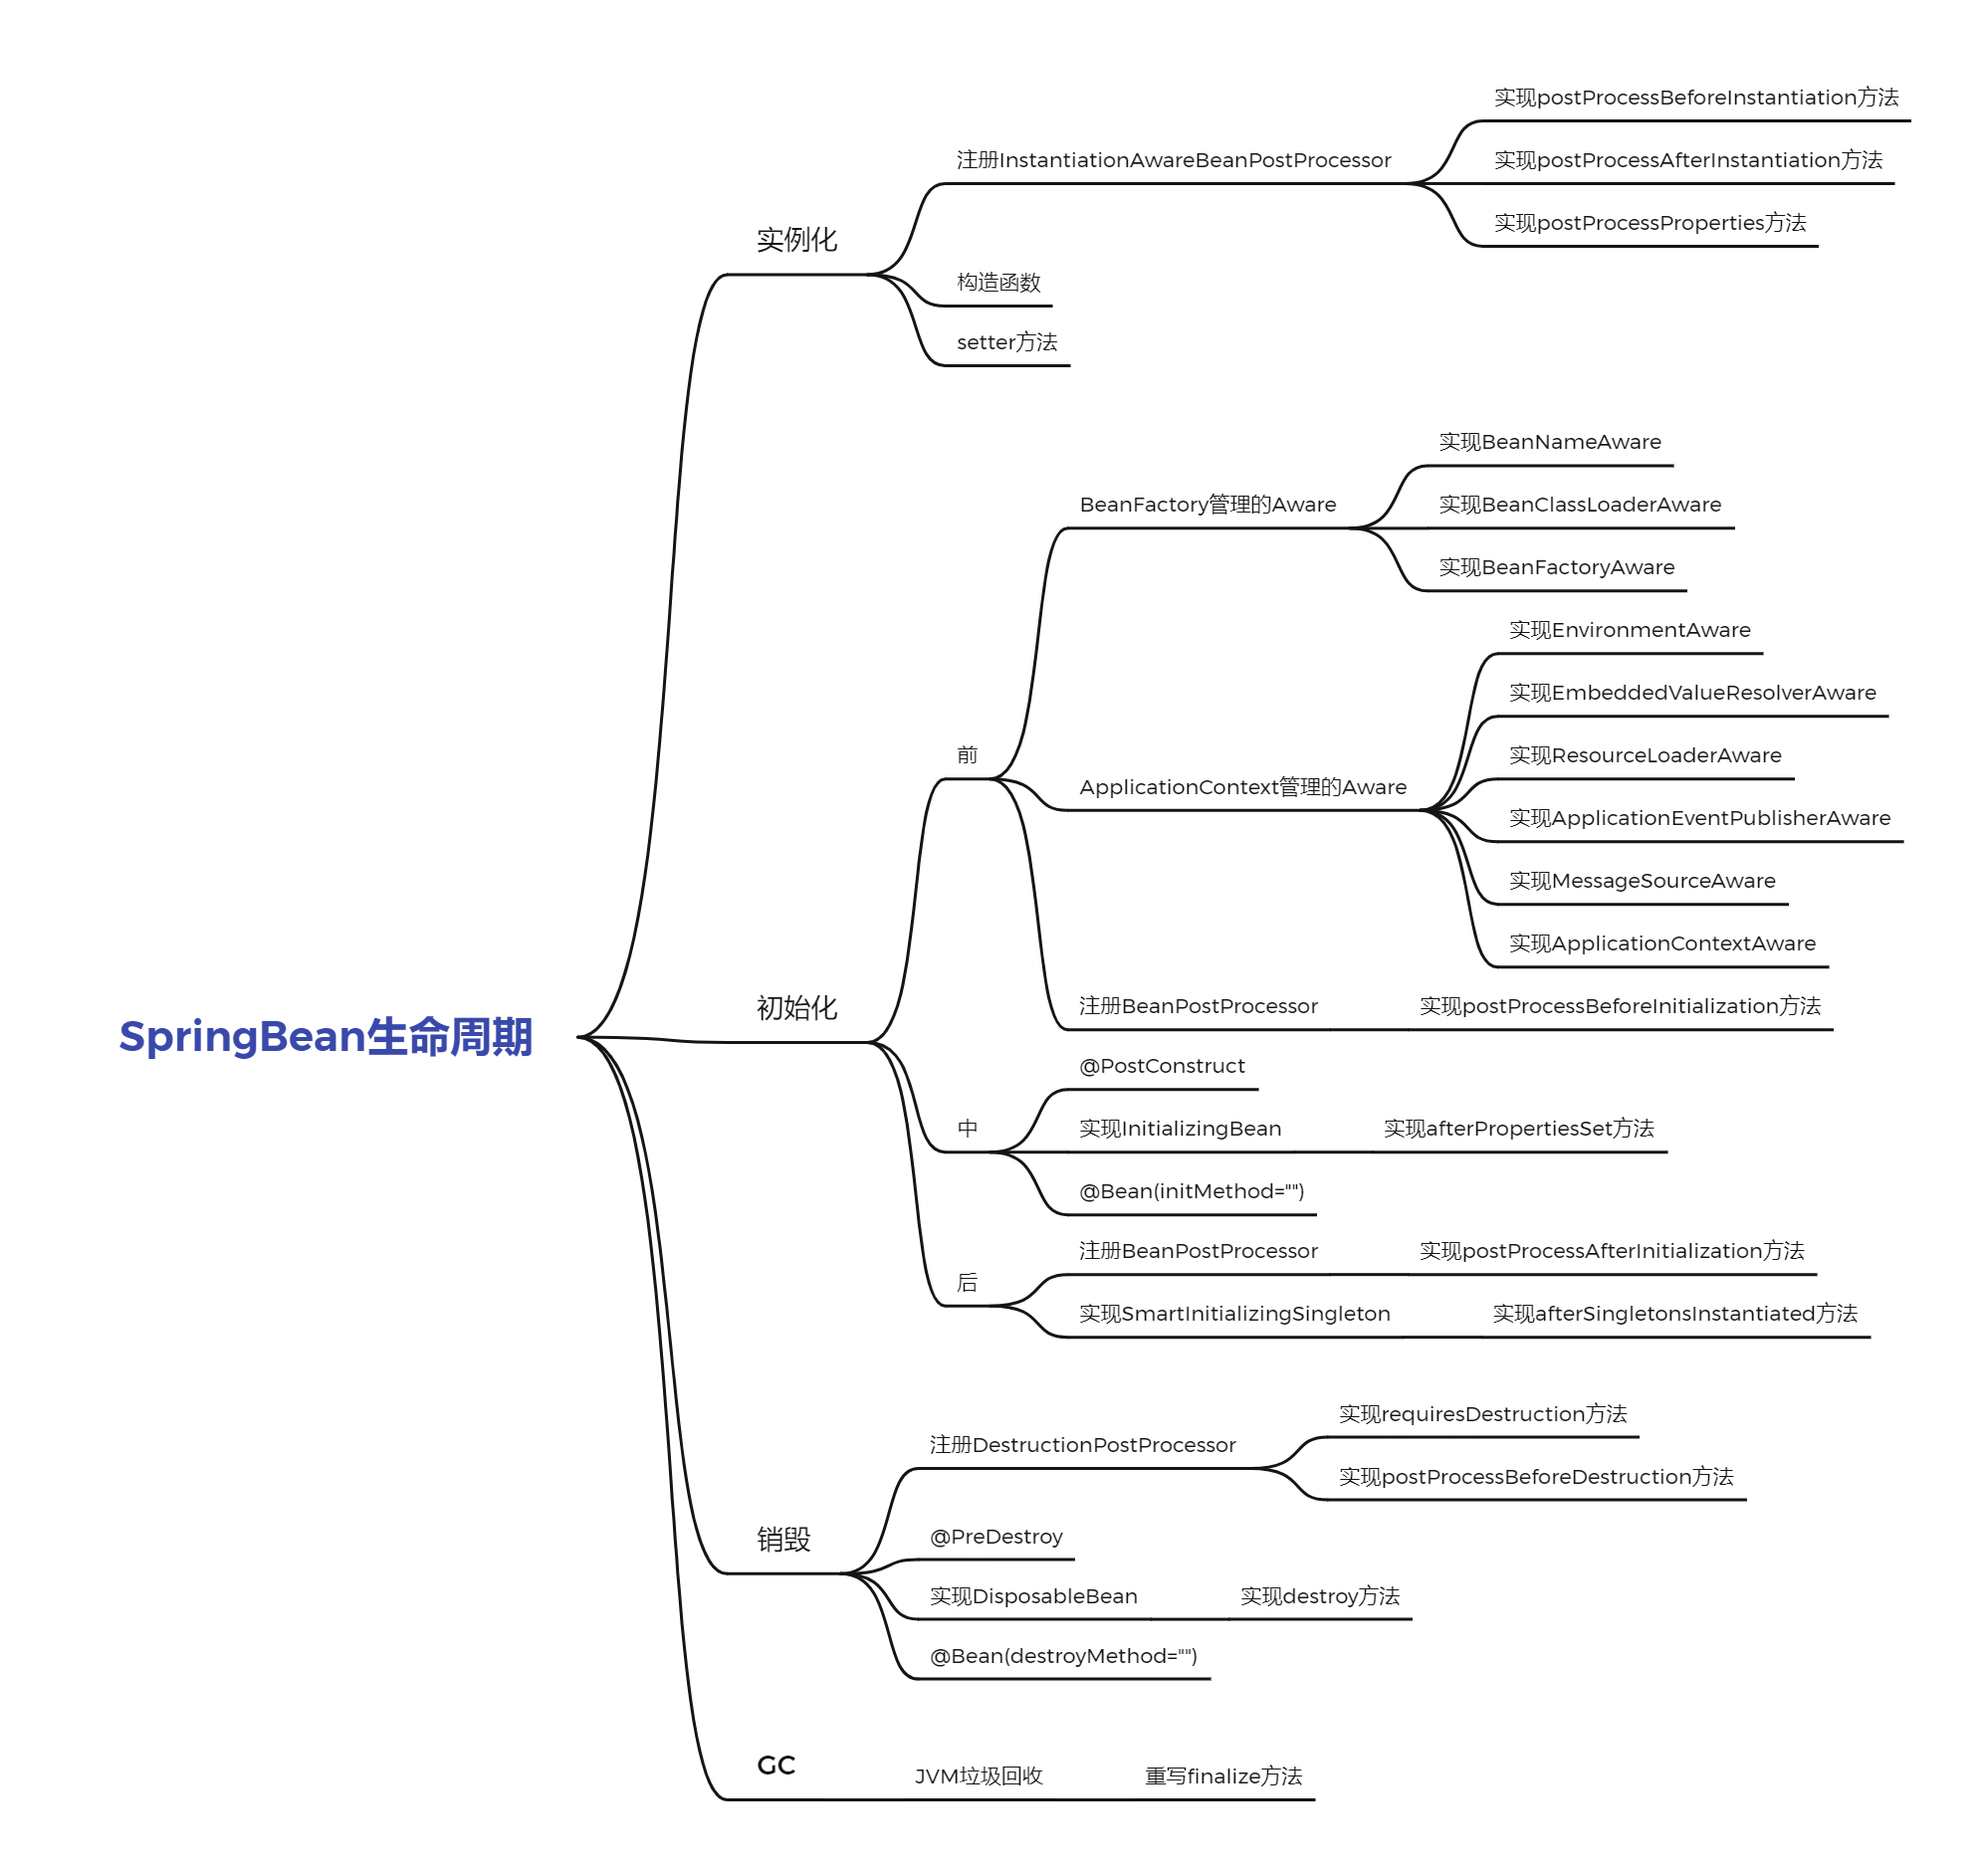
SpringBean的整个生命周期可以简单划分为4阶段、25个关键点。4阶段分别为实例化、初始化、销毁、GC;25个关键点见下图:
Bean的作用域对生命周期的影响
以上这些生命周期是针对单例作用域而言(@Scope("singleton")),特殊情况是当设置了延迟初始化(@Lazy )时,SmartInitializingSingleton#afterSingletonInstanted方法将不会被调用,因为这个方法是在preInstantiateSingleton() 方法中被调用,这个方法只有在上下文容器的refresh()方法被调用时执行一次。
如果bean的作用域改为prototype ,则所有销毁生命周期将失效,即原型作用域没有销毁相关的生命周期,SmartInitializingSingleton#afterSingletonInstanted 方法也不会被调用,因为这个方法只针对单例bean,而且只在上下文容器refresh()方法被调用时执行一次。
依赖查找、依赖注入的Bean会被缓存吗?
单例Bean会:DefaultSingletonBeanRegistry#singletonObjects属性中缓存
原型Bean不会:每次查找或注入时按BeanDefinition创建
其他Scope Bean
- request:每个ServletRequest内部缓存,生命周期维持在每次HTTP请求
- session:每个HttpSession内部缓存,生命周期维持在一个用户的HTTP绘画
- application:当前servlet应用内部缓存
Spring配置元信息
- Spring配置元信息
- Spring Bean配置元信息
- Spring Bean属性元信息
- Spring容器配置元信息
- 基于XML文件装载SpringBean配置元信息
- 基于Properties文件装载SpringBean配置元信息
- 基于Java注解装载SpringBean配置元信息
- Spring Bean配置元信息底层实现
- 基于XML文件装载SpringIoC容器配置元信息
- 基于Java注解装载SpringIoC容器配置元信息
- 基于Extensible XML authoring扩展SpringXML元素
- ExtensibleXML authoring扩展原理
- 基于Properties文件装载外部化配置
- 基于YAML文件装载外部化配置
Spring配置元信息
SpringBean配置元信息--BeanDefinition
Spring Bean属性元信息--PropertyValues
Spring容器配置元信息--没有API
Spring外部化配置元信息--PropertySource
SpringProfile元信息--@Profile
SpringBean配置元信息
GenericBeanDefinition--通用型BeanDefinition
RootBeanDefinition--无parent的BeanDefinition或合并后的BeanDefinition
AnnotatedBeanDefinition--注解标注的BeanDefinition
AnnotatedBeanDefinition是一个接口,其中包含了AnnotationMetadata和MethodMetadata的信息。AnnotationMetadata 有两种表现,一种是基于Java反射的操作StandardAnnotationMetaData ,另一种是基于ASM字节码的方式操作的AnnotationMetadataReadingVistor 类(这个类在5.2中被弃用,使用SimpleAnnotationMetadataReadingVisitor替换)。
以上各类的继承关系如下图所示
Spring Bean属性元信息
Bean属性元信息-PropertyValues
- 可修改的实现-
MutablePropertyValues - 元素成员-
PropertyValue
Bean属性上下文存储-AttributeAccessor
Bean元信息元素-BeanMetadataElement
Spring容器配置元信息
Spring的XML配置元信息--beans元素相关
| beans元素属性 | 默认值 | 使用场景 |
|---|---|---|
| profile | null | SpringProfiles配置值 |
| default-lazy-init | default | 当outter beans的default-lazy-init属性存在时,继承该值,否则为false |
| default-merge | default | 同上 |
| default-autowire | default | 当outter beans的default-autowire属性存在时,继承该值,否则为no |
| default-autowire-candidates | null | 默认SpringBeans名称pattern |
| default-init-method | null | 默认SpringBeans自定义初始化方法 |
| default-destroy-method | null | 默认SpringBeans自定义销毁方法 |
beans元素相关的属性在源码中的BeanDefinitionParserDelegate类中读取
Spring的XML配置元信息--应用上下文相关
| XML元素 | 使用场景 |
|---|---|
<context:annotation-config /> | 激活注解驱动 |
<context:component-scan /> | Spring @Component以及自定义注解扫描 |
<context:load-time-weaver /> | 激活Spring LoadTimeWeaver |
<context:mbean-export /> | 暴露SpringBeans作为JMX Beans,Spring的JMX支持 |
<context:mbean-server /> | 将当前平台作为MBeanServer,Spring的JMX支持 |
<context:property-placeholder /> | 加载外部化配置资源作为Spring属性配置 |
<context:property-override /> | 利用外部化配置资源覆盖Spring属性值 |
基于XML资源装载Spring Bean配置元信息
Spring Bean配置元信息,底层通过XmlBeanDefinitionReader实现
| XML 元素 | 使用场景 |
|---|---|
| <beans:beans /> | 单XML资源下的多个SpringBeans配置 |
| <beans:bean /> | 单个Spring Bean定义(BeanDefinition)配置 |
| <beans:alias /> | 为Spring Bean定义(BeanDefinition)别名 |
| <beans:import /> | 加载Spring Bean配置 |
基于Properties资源装载Spring Bean的配置元信息
Spring Bean配置元信息,底层通过PropertiesBeanDefinitionReader实现
| Properties属性名 | 使用场景 |
|---|---|
| (class) | Bean的类全称限定名 |
| (abstract) | 是否为抽象的BeanDefinition |
| (parent) | 指定parent BeanDefiniton名称 |
| (lazy-init) | 是否为延迟初始化 |
| (ref) | 应用其他bean的名称 |
| (scope) | 设置bean的scope属性 |
| $ | n表示第n+1个构造函数参数 |
基于注解的Spring Bean配置元信息
基于注解的Spring Bean配置元信息,底层通过AnnotationBeanDefinitionReader实现,从Spring3.0开始支持
| Spring注解 | 场景说明 | 起始版本 |
|---|---|---|
| @Repository | 数据仓储 | 2.0 |
| @Component | 通用组件 | 2.5 |
| @Service | 服务模式 | 2.5 |
| @Controller | web控制器 | 2.5 |
| @Configuration | 配置类 | 3.0 |
其中@Component注解的类通过ClassPathScanningCandidateComponentProvider 这个类被扫描,如果在构造函数中传入useDefaultFilters=false则只会扫描@Component 标注的类,否则会扫描@Component、@Repository、@Service、@Controller这些注解。
SpringBean的依赖注入注解
| Java注解 | 使用说明 | 起始版本 |
|---|---|---|
| @Autowired | Bean的依赖注入,支持多种以来查找方式 | 2.5 |
| @Qualifier | 细粒度的@Autowired以来查找 | 2.5 |
| @Resource | jdk提供的依赖注入注解,类似于@Autowired | 2.5 |
| @Inject | jsr330标准提供的依赖注入注解,类似于A、@Autowired |
以上@Autowired、@Inject注解在AutowiredAnnotationBeanPostProcessor类中实现了注入功能,而@Resource、@EJB 等注解在CommonAnnotationBeanPostProcessor中实现注入
Spring Bean条件装配注解
| Spring注解 | 场景说明 | 起始版本 |
|---|---|---|
| @Profile | 配置化条件装配 | 3.1 |
| @Conditional | 编程条件装配 | 4.0 |
在Spring4.0之后,@Profile基于@Conditional注解实现,@Profile注解的源码如下:
@Target({ElementType.TYPE, ElementType.METHOD})
@Retention(RetentionPolicy.RUNTIME)
@Documented
//基于conditional注解
@Conditional(ProfileCondition.class)
public @interface Profile {
    /**
     * The set of profiles for which the annotated component should be registered.
     */
    String[] value();

}使用Conditional注解需要传入一个org.springframework.context.annotation.Condition的实现类
SpringBean生命周期回调注解
| Spring注解 | 场景说明 | 起始版本 |
|---|---|---|
| @PostConstruct | 替换<bean initMethod="" /> | 2.5 |
| @PreDestroy | 替换<bean destroyMethod="" /> | 2.5 |
SpringBean配置元信息的底层实现
XmlBeanDefinitionReader负责对xml文件配置的bean进行解析与注册,通过Resource和BeanDefinitionDocumentReader 实现底层功能。BeanDefinitionParserDelegate负责BeanDefinition的解析,BeanDefinitionRegistry负责BeanDefinition的注册。
PropertiesBeanDefinitionReader负责对properties文件配置的bean进行解析与注册,也是通过Resource 获取资源,通过java.util.Properties存储信息。和XmlBeanDefinitionReader 不同,它自己内部实现了对BeanDefinition的解析工作,通过BeanDefinitionRegistry进行BeanDefinition的注册。
AnnotatedBeanDefinitionReader负责基于Java注解配置的bean进行解析与注册。与XmlBeanDefinitionReader 和PropertiesBeanDefinitionReader不同,AnnotationBeanDefinitionReader没有实现BeanDefinitionReader 接口,也不需要通过资源读取配置,而是通过配置类实现。它的底层实现也相对复杂,包括:
- 条件评估--
ConditionEvaluator - Bean范围解析--
ScopeMetadataResolver - BeanDefinitin解析--内部实现
- BeanDefinition处理--
AnnotationConfigUtils#processCommonDefinitionAnnotations - BeanDefinition注册--
BeanDefinitionRegistry
基于XML资源装载SpringIoC容器配置元信息
SpringIoC容器相关xml配置
| 命名空间 | 所属模块 | Schema资源URL |
|---|---|---|
| beans | spring-beans | https://www.springframework.org/schema/beans/spring-beans.xsd |
| context | spring-context | https://www.springframework.org/schema/context/spring-context.xsd |
| aop | spring-aop | https://www.springframework.org/schema/aop/spring-aop.xsd |
| tx | spring-tx | https://www.springframework.org/schema/tx/spring-tx.xsd |
| util | spring-beans | https://www.springframework.org/schema/util/spring-util.xsd |
| tool | spring-beans | https://www.springframework.org/schema/tool/spring-tool..xsd |
以上所有xsd文件,可以在spring对应的依赖中的META-INF/spring.schemas文件中查到
基于Java注解装载SpringIoC容器配置元信息
Spring IoC容器装配注解
| Spring注解 | 场景说明 | 起始版本 |
|---|---|---|
| @ImportResource | 替换XML元素 import | 3.0 |
| @Import | 导入Configuration class | 3.0 |
| @ComponentScan | 扫描指定的包下标注Spring模式注解的类 | 3.1 |
以上注解的使用方法如下:
@ImportResource("classpath:/META-INF/dependency-lookup-context.xml")
@Import(SuperUser.class)
public class AnnotatedSpringContextMetadataDemo {
    public static void main(String[] args) {
        AnnotationConfigApplicationContext context = new AnnotationConfigApplicationContext();
        context.register(AnnotatedSpringContextMetadataDemo.class);

        context.refresh();
        Map<String, User> userBeans = context.getBeansOfType(User.class);
        for (Map.Entry<String, User> entry : userBeans.entrySet()) {
            System.out.printf("user bean name= %s, content= %s \n", entry.getKey(), entry.getValue());
        }

        context.close();
    }
}
代码执行结果
user bean name= top.sunyog.thinking.ioc.overview.domain.SuperUser, content= SuperUser{addr=null, lifeCity=null, user=User{id=null, name='null'}}
user bean name= user, content= User{id=100, name='test name'}
user bean name= user-1, content= User{id=200, name='test name 2'}
user bean name= super-user, content= SuperUser{addr=[BEIJING, SHANGHAI], lifeCity=[SHANGHAI, SHENZHEN], user=User{id=200, name='test name 2'}}
Spring IoC配置属性注解
| Spring注解 | 场景说明 | 起始版本 |
|---|---|---|
| @PorpertySource | 配置属性抽象PropertySource注解 | 3.1 |
| @PropertySources | @PropertySource的集合 | 4.0 |
以上注解的使用方式如下:
@PropertySource("classpath:/META-INF/default.properties")
public class AnnotatedSpringContextMetadataDemo {
    //参数2中的user.name默认为系统用户
    @Bean
    public User propertiesUser(@Value("${user.id}") Long uId, @Value("${user.name}") String uName) {
        return new User(uId, uName);
    }
}
基于Extensible XML authoring扩展SpringXML元素
实现步骤:
- 编写XML schema文件:定义XML结构
- 自定义NamespaceHandler实现命名空间绑定
- 自定义BeanDefinitionParser实现,xml元素与Bean Definition解析
- 注册XML扩展:命名空间与XML Schema映射
ExtensibleXML authoring扩展原理
触发时机为AbstractApplicationContext#obtainFreshBeanFactory ,经过一系列调用,到BeaDefinitionParserDelegate#parseCustomElement方法,parseCustomElement()方法的核心流程为:
Extensible XML authoring的缺点很明显:
- 高度复杂,需要熟悉XML Schema、spring.handlers、spring.schemas以及SpringAPI
- 嵌套元素支持较弱
- XML处理性能差
- XML框架移植性差,很难适配高性能XML框架,如JAXB
基于Properties资源装载外部化配置
注解驱动方式
@PropertySource
@PropertySources
API方式
org.springframework.core.env.PropertySource
org.springframework.core.env.PropertySources
基于注解的方式引入properties配置文件示例
@PropertySource("classpath:/META-INF/default.properties")
public class PropertySourceMetaDemo {
    @Bean
    public String userId(@Value("${user.id}") String userId) {
        return userId;
    }
}
其中default.properties配置文件内容为
user.id=1基于API修改properties配置
@PropertySources({
        @PropertySource("classpath:/META-INF/default.properties")
})
public class PropertySourceMetaDemo {
    @Bean
    public String userId(@Value("${user.id}") String userId) {
        return userId;
    }

    public static void main(String[] args) {
        AnnotationConfigApplicationContext context = new AnnotationConfigApplicationContext();
        context.register(PropertySourceMetaDemo.class);

        Map<String, Object> propertiesMap = new HashMap<>(4);
        propertiesMap.put("user.id", 10001L);
        MapPropertySource source = new MapPropertySource("propertiesMapProperties", propertiesMap);
        context.getEnvironment().getPropertySources().addFirst(source);

        context.refresh();
        System.out.println(context.getBean("userId"));
    }
}
基于YML资源装载外部化配置
相关API
YamlProcessor及其子类YamlMapFactoryBean和YamlPropertiesFactoryBean
简单的实现方式如下:
编写yaml文件
user:
  id: 100100
  name: yamlUser
编辑xml配置文件
<?xml version="1.0" encoding="UTF-8"?>
<beans xmlns="http://www.springframework.org/schema/beans"
       xmlns:xsi="http://www.w3.org/2001/XMLSchema-instance"
       xsi:schemaLocation="http://www.springframework.org/schema/beans http://www.springframework.org/schema/beans/spring-beans.xsd">
    <bean id="yamlBean" class="org.springframework.beans.factory.config.YamlMapFactoryBean">
        <property name="resources" value="classpath:/META-INF/user.yaml"/>
    </bean>
</beans>
启动容器获取yaml配置
public class YamlSourceMetaDemo {
    public static void main(String[] args) {
        ClassPathXmlApplicationContext context = new ClassPathXmlApplicationContext("classpath:/META-INF/bean-meta-context.xml");
        context.refresh();
        Map<String,Object> yamlBean = context.getBean("yamlBean", Map.class);
        System.out.println(yamlBean);
    }
}
//打印结果为
{user={id=100100, name=yamlUser}}
类似于properties文件,可以使用@PropertySource注解的方式引入,只不过稍微复杂一些。步骤如下
实现
PropertySourceFactory接口public class YamlSourceFactory implements PropertySourceFactory { @Override public PropertySource<?> createPropertySource(String name, EncodedResource resource) throws IOException { YamlPropertiesFactoryBean factoryBean = new YamlPropertiesFactoryBean(); factoryBean.setResources(resource.getResource()); Properties properties = factoryBean.getObject(); //返回读取到的properties PropertySource res = new PropertiesPropertySource("yamlProperties",properties); return res; } }引入YAML配置
//必须配置factory属性
@PropertySource(name = "yamlProperties", value = "classpath:/META-INF/user.yaml",factory = YamlSourceFactory.class)
public class YamlSourceMetaDemo {
    @Bean
    public User yamlUser(@Value("${user.id}") Long userId,@Value("${user.userName}")String userName){
        return new User(userId,userName);
    }

    public static void main(String[] args) {
        AnnotationConfigApplicationContext context = new AnnotationConfigApplicationContext();
        context.register(YamlSourceMetaDemo.class);

        context.refresh();
        System.out.println(context.getBean("yamlUser"));
    }
}
Spring的配置元信息
Spring配置元信息包含
- Bean配置元信息。用于解析BeanDefinition
- IoC容器配置元信息。用于控制IoC容器行为,如注解驱动、AOP
- 外部化配置。资源抽象(如Properties、YAML文件)控制PropertySource
- SprinigProfile。提供条件配置(如开发环境、生产环境)
Spring基础设施
Spring资源管理
- 引入动机
- Java标准资源管理
- Spring资源接口
- Spring内建Resource实现
- SpringResource接口扩展
- Spring资源加载器
- Spring通配路径资源加载其
- Spring通配路径资源扩展
- 依赖注入SpringResource
- 依赖注入ResourceLoader
Spring资源管理的引入动机
Java标准资源管理强大,但扩展复杂,资源存储方式并不统一。
Java标准资源管理
| 职责 | 说明 |
|---|---|
| 面向资源 | 文件系统、artifact(jar、war、ear文件)、远程资源(HTTP、FTP) |
| API整合 | java.lang.ClassLoader#getResource、java.io.File、java.net.URL |
| 资源定位 | java.net.URL或java.net.URI |
| 流式存储 | java.net.URLConnection |
| 协议扩展 | java.net.URLStreamHandler或java.net.URLStreamHandlerFactory |
jdk1.8基于java.net.URLStreamHandler扩展了以下协议
| 协议 | 实现类 |
|---|---|
| file | sun.net.www.protocol.file.Handler |
| ftp | sun.net.www.protocol.ftp.Handler |
| http | sun.net.www.protocol.http.Handler |
| https | sun.net.www.protocol.https.Handler |
| jar | sun.net.www.protocol.jar.Handler |
| mailto | sun.net.www.protocol.mailto.Handler |
| netdoc | sun.net.www.protocol.netdooc.Handler |
基于java.net.URLStreamHandler扩展的协议,实现类必须是Handler,jdk的实现如上表所示,jdk的实现是一种默认实现,可以指定自定义的扩展,需要通过如下方式实现
#通过Java properties指定扩展包名,类名必须是Handler,如果有多个包,通过|分割
-Djava.protocol.handler.pkgs=实现类包名|实现类包名2在java.net.URL#getURLStreamHandler方法中可以看到,通过protocolPathProp这个属性保存了这个key。
Java标准资源管理扩展的步骤是什么?
有以下三种常见的方式
简易实现:
- 实现URLStreamHandler并放置在
sun.net.www.protocol.${protocol}.Handler包下
自定义实现:
实现
URLStreamHandler//Handler类 package top.sunyog.thinking.resource.xtp; import java.io.IOException; import java.net.URL; import java.net.URLConnection; import java.net.URLStreamHandler; public class Handler extends URLStreamHandler { @Override protected URLConnection openConnection(URL u) throws IOException { return new XtpConnection(u); } } //XtpConnection类 package top.sunyog.thinking.resource.xtp; import org.springframework.core.io.ClassPathResource; import java.io.IOException; import java.io.InputStream; import java.net.URL; import java.net.URLConnection; public class XtpConnection extends URLConnection { private ClassPathResource resource; @Override public void connect() throws IOException { } public XtpConnection(URL url) { super(url); this.resource = new ClassPathResource(url.getPath()); } @Override public InputStream getInputStream() throws IOException { return this.resource.getInputStream(); } } //启动类 public class ProtocolHandlerApp { public static void main(String[] args) throws IOException { String local="xtp:///META-INF/default.properties"; URL url = new URL(local); InputStream stream = url.openStream(); try (InputStreamReader reader=new InputStreamReader(stream); BufferedReader bfr = new BufferedReader(reader)){ bfr.lines().forEach(System.out::print); } } }启动jar包时,添加以下启动参数
#注意参数值
-DJava.protocol.handler.pkgs=top.sunyog.thinking.resource
高级实现:
- 实现
URLStreamHandlerFactory,并传递到URL中
Spring资源接口
Spring内置的资源接口
- 输入流:
org.springframework.core.io.InputStreamSource - 只读资源:
org.springframework.core.io.Resource - 可写资源:
org.springframework.core.io.WritableResource - 编码资源(类):
org.springframework.core.io.support.EncodedResource - 上下文资源(主要针对servlet引擎):
org.springframework.core.io.ContextResource
Spring内置的Resource实现
| 资源来源 | 资源协议 | 实现类 |
|---|---|---|
| Bean定义 | 无 | org.springframework.beans.factory.support.BeanDefinitioResource |
| 数组 | 无 | org.springframework.core.io.ByteArrayResource |
| 类路径 | classpath:/ | org.springframework.core.io.ClassPathResource |
| 文件系统 | file:/ | org.springframework.core.io.FileSystemResource |
| URL | URL支持的协议 | org.springframework.core.io.UrlResource |
| ServletContext | 无 | org.springframework.web.context.support.ServletContextResource |
Resource和ResourceLoader
Spring内置的resource扩展类图如下
Spring资源加载器
ClassLoader和Resource的简单使用方式如下
public class EncodedFileSystemResourceDemo {
    public static void main(String[] args) throws IOException {
        String userDir = System.getProperty("user.dir");
        //获取资源路径~/spring-thinking-core/src/main/java/.......
        Path path = Paths.get(userDir, "spring-thinking-core", "src", "main", "java", "top", "sunyog", "thinking", "resource", "EncodedFileSystemResourceDemo.java");

        //可以通过ResourceLoader创建resource
        FileSystemResourceLoader resourceLoader = new FileSystemResourceLoader();
        Resource resource = resourceLoader.getResource(path.toString());
        //也可以直接创建resource
        //FileSystemResource resource = new FileSystemResource(path);

        EncodedResource encodedResource = new EncodedResource(resource, StandardCharsets.UTF_8);
        //获取resource中的内容
        try (Reader reader = encodedResource.getReader();
             BufferedReader br = new BufferedReader(reader)) {
            br.lines().forEach(System.out::println);
        }
    }
}
通配路径资源
以下两者配合,共同完成路径匹配工作
通配路径加载器
ResourcePatternResolver接口,典型的实现类PathMatchingResourcePatternResolver路径匹配器
PathMatcher接口,Spring中唯一的实现类AntPathMatcher
以下代码将读出D:/Activities/code/yaos/yaos-demo/spring-thinking-core/src/main/java/top/sunyog/thinking/resource/ 文件夹下所有以.java结尾的文件内容
public class CustomResourcePathPatternResolverDemo {
    public static void main(String[] args) throws IOException {
        //读取当前包中的所有.java
        //注意,这里必须是/,不能是\\
        String location = "/D:/Activities/code/yaos/yaos-demo/spring-thinking-core/src/main/java/top/sunyog/thinking/resource/*.java";
        PathMatchingResourcePatternResolver resolver = new PathMatchingResourcePatternResolver(new FileSystemResourceLoader());
        Resource[] resources = resolver.getResources(location);
        for (Resource resource : resources) {
            ResourceUtil.printResource(resource);
            System.out.println(resource.getFilename() + "----");
        }
    }
}


public class ResourceUtil {
    public static void printResource(Resource resource) throws IOException {
        EncodedResource encodedResource = new EncodedResource(resource, StandardCharsets.UTF_8);
        try (Reader reader = encodedResource.getReader();
             BufferedReader br = new BufferedReader(reader)) {
            br.lines().forEach(System.out::println);
        }
    }
}
自定义通配路径资源扩展
自定义方式为:
- 实现
org.springframework.util.PathMatcher - 通过
PathMatchingResourcePatternResolver#setPathMatcher方法重置PathMatcher
通过以下修改,可以读出D:/Activities/code/yaos/yaos-demo/spring-thinking-core/src/main/java/top/sunyog/thinking/resource/ 文件夹下所有以Util.java结尾的文件内容
public class CustomResourcePathPatternResolverDemo {
    public static void main(String[] args) throws IOException {
        String location = "/D:/Activities/code/yaos/yaos-demo/spring-thinking-core/src/main/java/top/sunyog/thinking/resource/*.java";
        PathMatchingResourcePatternResolver resolver = new PathMatchingResourcePatternResolver(new FileSystemResourceLoader());
        resolver.setPathMatcher(new MyPathMatcher());
        Resource[] resources = resolver.getResources(location);
        for (Resource resource : resources) {
            ResourceUtil.printResource(resource);
            System.out.println(resource.getFilename() + "----");
        }
    }

    static class MyPathMatcher implements PathMatcher {
        //匹配传入的真实路径,在这个示例中是main方法中的location
        @Override
        public boolean isPattern(String path) {
            return path.endsWith("*.java");
        }

        //匹配所有符合pattern的文件路径,在这里就是各种.java文件,其中只有*Util.java符合条件
        @Override
        public boolean match(String pattern, String path) {
            return path.endsWith("Util.java");
        }

        @Override
        public boolean matchStart(String pattern, String path) {
            return false;
        }

        @Override
        public String extractPathWithinPattern(String pattern, String path) {
            return null;
        }

        @Override
        public Map<String, String> extractUriTemplateVariables(String pattern, String path) {
            return null;
        }

        @Override
        public Comparator<String> getPatternComparator(String path) {
            return null;
        }

        @Override
        public String combine(String pattern1, String pattern2) {
            return null;
        }
    }
}
资源的依赖注入
可以基于@Value实现资源的注入,如
//文件路径根据文件位置修改
@Value("classpath:/META-INF/default.properties")
private Resource resource;

//可以注入集合
@Value("classpath:/META-INF/*.properties")
private Resource[]resources;
对ResourceLoader的注入有三种方式
- 实现
ResourceLoaderAware - 使用
@Autowired注入ResourceLoader - 注入
ApplicationContext作为ResourceLoader,这时需要转换类型
代码示例如下:
public class ResourceLoaderInjectDemo implements ResourceLoaderAware {
    private ResourceLoader awareResourceLoader;
    @Autowired
    private ResourceLoader autowiredResourceLoader;
    @Autowired
    private AbstractApplicationContext abstractApplicationContext;

    public static void main(String[] args) {
        AnnotationConfigApplicationContext context = new AnnotationConfigApplicationContext();
        context.register(ResourceLoaderInjectDemo.class);
        context.refresh();

        ResourceLoaderInjectDemo bean = context.getBean(ResourceLoaderInjectDemo.class);
        System.out.println(bean.awareResourceLoader);
        System.out.println(bean.autowiredResourceLoader);
        System.out.println(bean.abstractApplicationContext);
        System.out.println(bean.awareResourceLoader == bean.autowiredResourceLoader);
        System.out.println(bean.awareResourceLoader == bean.abstractApplicationContext);
        context.close();
    }

    @Override
    public void setResourceLoader(ResourceLoader resourceLoader) {
        this.awareResourceLoader = resourceLoader;
    }
}
打印结果为:
org.springframework.context.annotation.AnnotationConfigApplicationContext@377dca04, started on Thu Jun 15 16:16:36 CST 2023
org.springframework.context.annotation.AnnotationConfigApplicationContext@377dca04, started on Thu Jun 15 16:16:36 CST 2023
org.springframework.context.annotation.AnnotationConfigApplicationContext@377dca04, started on Thu Jun 15 16:16:36 CST 2023
true
true可以看出,以上三种方式注入的是同一个对象,这是因为在ApplicationContextAwareProcessor#invokeAwareInterfaces 方法中注入的是相同的对象,对应源码如下
private void invokeAwareInterfaces(Object bean){
        if(bean instanceof EnvironmentAware){
        ((EnvironmentAware)bean).setEnvironment(this.applicationContext.getEnvironment());
        }
        if(bean instanceof EmbeddedValueResolverAware){
        ((EmbeddedValueResolverAware)bean).setEmbeddedValueResolver(this.embeddedValueResolver);
        }

        //注意set对象
        if(bean instanceof ResourceLoaderAware){
        ((ResourceLoaderAware)bean).setResourceLoader(this.applicationContext);
        }
        if(bean instanceof ApplicationEventPublisherAware){
        ((ApplicationEventPublisherAware)bean).setApplicationEventPublisher(this.applicationContext);
        }
        if(bean instanceof MessageSourceAware){
        ((MessageSourceAware)bean).setMessageSource(this.applicationContext);
        }
        //注意set对象
        if(bean instanceof ApplicationContextAware){
        ((ApplicationContextAware)bean).setApplicationContext(this.applicationContext);
        }
        }
Spring国际化
Spring国际化使用场景
Spring国际化接口
层次性MessageSource
Java国际化标准实现
Java文本格式化
MessageSource开箱即用实现
MessageSource内建的Bean
扩展资料(Spring Boot中的MessageSource)
Spring国际化使用场景
- 普通国际化文案
- Bean Validation校验国际化文案
- Web站点页面渲染
- web MVC错误消息提示
Spring国际化接口
国际化接口org.springframework.context.MessageSource
主要概念包括
- 文案模板编码(code)
- 文案模板参数(args)
- 区域(Locale)
包括两个默认的实现
org.springframework.context.support.ResourceBundleMessageSource
org.springframework.context.support.ReloadableResourceBundleMessageSource
Spring层次性国际化接口
org.springframework.context.HierarchicalMessageSource
Java国际化标准实现
核心接口java.util.ResourceBundle
Properties资源实现java.util.PropertyResourceBundle
列表实现java.util.ListReourceBoundle
ResourceBundle核心特性
- key-value设计
- 层次性设计
- 缓存设计
- 字符编码控制--
java.util.ResourceBundle.Control(@since jdk1.6) - Control SPI扩展--
Java.util.spi.ResourceBundleControlProvider(@since jdk1.8)
Java文本国际化
核心接口java.text.MessageFormat(是非线程安全接口,需要每次使用时临时创建)
基本用法:
- 设置消息模式
new MessageFormat(...) - 格式化
format(new Object[]{...})
消息格式模式
- 格式元素:
{参数索引(formatType, (formatStyle))} - FormatType:消息格式类型,可选项,可在
number、date、time、choice四种类型任选其一 - FormatStyle:消息风格,可选项,包括
short、medium、long、full、integer、currenncy、percent
public static void main(String[]args){
        String msgPattern="时间: {1,time} 日期: {1,date,full} 消息: {2} 序号: {0,number,integer}.";
        String msg=MessageFormat.format(msgPattern,7,new Date(),"i am test");
        System.out.println(msg);
        }
高级特性:
- 重置消息格式模式
- 重置
java.util.Locale - 重置
java.text.Format
public static void main(String[]args){
        MessageFormat messageFormat=new MessageFormat("hello i am {0}");
        String msg=messageFormat.format(new Object[]{"i am test"});
        System.out.println(msg);

        //重置pattern
        String msgPattern="时间: {1,time} \t日期: {1,date,full} \t消息: {2} \t序号: {0,number,integer}.";
        messageFormat.applyPattern(msgPattern);
        Object[]objArray={7,new Date(),"i am test"};
        msg=messageFormat.format(objArray);
        System.out.println(msg);

        //重置Locale
        messageFormat.setLocale(Locale.ENGLISH);
        messageFormat.applyPattern(msgPattern);//注意,重置locale后需要重新设置pattern
        System.out.println(messageFormat.format(objArray));

        //重置format
        messageFormat.setFormat(1,new SimpleDateFormat("yyyy-MM-dd HH:mm:ss"));
        System.out.println(messageFormat.format(objArray));
        }
MessageSource实现
- 基于ResourceBundle+MessageFormat组合实现
ResourceBundleMessageSource - 可重载Properties+MessageFormat组合实现
ReloadableResourceBundleMessageSource,除了支持.properties文件还支持.xml文件
Spring中国际化相关的Bean
预注册Bean名称为"messageSource"(AbstractApplicationContext.MESSAGE_SOURCE_BEAN_NAME),类型为MessageSource ,在AbstractApplicationContext#initMessageSource方法中注册。默认内建实现为DelegatingMessageSource
在Spring boot场景下,提供了默认的MessageSource类型的Bean,在MessageSourceAutoConfiguration自动配置类中实现。可以自定义默认的MessageSource Bean,自定义的优先级高于自动装配的优先级。自定义的实现方式为:
@EnableAutoConfiguration
public class SpringBootMessageSourceDemo {
    //配置messageSource
    @Bean
    public MessageSource messageSource() {
        return new ReloadableResourceBundleMessageSource();
    }


    public static void main(String[] args) {
        SpringApplicationBuilder builder = new SpringApplicationBuilder(SpringBootMessageSourceDemo.class);
        ConfigurableApplicationContext context = builder.web(WebApplicationType.NONE).run(args);
        ConfigurableListableBeanFactory beanFactory = context.getBeanFactory();
        //查询messageSource
        if (beanFactory.containsBean(AbstractApplicationContext.MESSAGE_SOURCE_BEAN_NAME)) {
            MessageSource ms = context.getBean(AbstractApplicationContext.MESSAGE_SOURCE_BEAN_NAME, MessageSource.class);
            System.out.println(ms);
            BeanDefinition bd = beanFactory.getBeanDefinition(AbstractApplicationContext.MESSAGE_SOURCE_BEAN_NAME);
            System.out.println(bd);
        }
        context.close();
    }
}以上配置完成后,对应的bean(messageSource)变成了org.springframework.context.support.ReloadableResourceBundleMessageSource 类型,默认情况下的bean是org.springframework.context.support.ResourceBundleMessageSource ,以上两种情况,需要resource目录下存在messages.properties 配置文件,如果没有此文件,则对应的bean的变成了Empty MessageSource即是空的MessageSource
动态更新message的实现
实现步骤:
- 定位资源位置(properties文件)
- 读取资源,初始化Properties对象(可以基于
ResourceLoaderAware实现) - 实现
AbstractMessageSource#resolveCode方法 - 监听资源文件(通过Java NIO
WatchService实现) - 使用线程池处理文件变化
- 重新装载properties对象
全部实现代码如下:
public class DynamicResourceMsgSource extends AbstractMessageSource implements ResourceLoaderAware {
    //资源位置
    private final String resourcePath = "/META-INF/msg.properties";
    //默认编码方式
    private final String ENCODING = "UTF-8";
    //
    private ResourceLoader resourceLoader;
    //保存properties文件中读取的内容
    private Properties messageProperties;

    public DynamicResourceMsgSource() {
        //1.定位资源位置
        //2.读取资源
        this.messageProperties = this.loadMessageProperties(this.getMessagePropertiesResource());
        //4.监听资源文件
        listeningMessageProperties();
    }

    //4.监听资源变化
    private void listeningMessageProperties() {
        Resource resource = this.getMessagePropertiesResource();
        if (resource.isFile()) {
            try {
                Path resourcePath = resource.getFile().toPath();
                WatchService watchService = FileSystems.getDefault().newWatchService();
                //监听整个目录
                resourcePath.getParent().register(watchService, StandardWatchEventKinds.ENTRY_MODIFY);
                //异步处理资源变化
                processMessagePropertiesChange(watchService);
            } catch (IOException e) {
                throw new RuntimeException(e);
            }
        }
    }

    //5.线程池处理文件变化
    private void processMessagePropertiesChange(WatchService watchService) {
        //生成一个单线程
        ExecutorService executorService = Executors.newSingleThreadExecutor();
        executorService.submit(() -> {
            while (true) {
                WatchKey watchKey = null;
                try {
                    watchKey = watchService.take();
                    if (watchKey.isValid()) {
                        for (WatchEvent<?> event : watchKey.pollEvents()) {
                            //获取目录路径
                            Path dirPath = (Path) watchKey.watchable();
                            Path fileRelativePath = (Path) event.context();
                            Path filePath = dirPath.resolve(fileRelativePath);
//                            System.out.println("变化的文件是: " + filePath);
                            File file = filePath.toFile();
                            //6.重新装载properties文件内容
                            Properties properties = loadMessageProperties(new FileSystemResource(file));
                            this.messageProperties.clear();
                            this.messageProperties.putAll(properties);
                        }
                    }
                } catch (InterruptedException e) {
                    throw new RuntimeException(e);
                } finally {
                    if (watchKey != null) {
                        watchKey.reset();
                    }
                }
            }
        });
    }

    //3.实现AbstractMessageSource接口
    @Override
    protected MessageFormat resolveCode(String code, Locale locale) {
        String property = this.messageProperties.getProperty(code);
        if (StringUtils.hasText(property)) {
            return new MessageFormat(property, locale);
        }
        return null;
    }

    //2.读取资源
    private Properties loadMessageProperties(Resource resource) {
        EncodedResource encodedResource = new EncodedResource(resource, this.ENCODING);
        Properties properties = new Properties();
        try (Reader reader = encodedResource.getReader()) {
            properties.load(reader);

        } catch (IOException e) {
            throw new RuntimeException(e);
        }
        return properties;
    }

    //1.定位资源
    private Resource getMessagePropertiesResource() {
        ResourceLoader resourceLoader = this.getResourceLoader();
        Resource resource = resourceLoader.getResource(resourcePath);
        return resource;
    }

    //setter
    @Override
    public void setResourceLoader(ResourceLoader resourceLoader) {
        this.resourceLoader = resourceLoader;
    }

    //getter
    public ResourceLoader getResourceLoader() {
        return this.resourceLoader == null ? new DefaultResourceLoader() : this.resourceLoader;
    }

    public static void main(String[] args) throws InterruptedException {
        DynamicResourceMsgSource msgSource = new DynamicResourceMsgSource();
        for (int i = 0; i < 10000; i++) {
            //循环打印当前properties内容
            String msg = msgSource.getMessage("name", new Object[]{}, Locale.getDefault());
            System.out.println(i + "name property is :" + msg);
            Thread.sleep(5000L);
        }
    }
}执行此段程序时,修改/META-INF/msg.properties文件后需要重新编译,可以看到,编译后打印内容随之变化。部分打印内容如下:
18name property is :hostname
19name property is :hostname
#此时修改properties文件内容,并重新编译
20name property is :tiny host name
21name property is :tiny host name
Spring国际化消息实现原理
国际化消息的注册在 AbstractApplicationContext#refresh中的 initMessageSource()方法中实现,具体的执行逻辑流程图如下:
消息的获取通过 AbstractApplicationContext#getMessage方法完成,该方法的主要步骤如下:
Spring校验
Spring校验使用场景
Validator接口设计
Errors接口设计
Errors文案来源
自定义Validator
Hibernate Validator框架
Spring校验的使用场景
- Spring常规校验(Validator)
- Spring数据绑定(DataBinder)
- Spring Web参数绑定(WebDataBinder)
- Spring WebMVC/WebFlux处理方法参数校验
Validator接口设计
接口职责:Spring内部校验器接口,通过编程的方式校验目标对象
核心方法:
- supports(Class):校验目标类能否校验
- validate(Object,Errors):校验目标对象,并将校验失败的内容输出至Errors对象
配套组件:
- 错误收集器
org.springframework.validation.Errors - Validator工具类
org.springframework.validation.ValidationUtils
Errors接口设计
接口职责:数据绑定和校验错误收集接口,与Java bean和其属性有强关联性
和新方法:
- regect方法(重载):收集出错误文案
- rejectValue方法(重载):收集对象字段中的错误文案
配套组件
- Java Bean错误描述:
org.springframework.validatioin.ObjectError - Java Bean属性错误描述:
org.springframework.validatioin.FieldError
Errors不能直接输出文案,它保存的时code和args,需要通过MessageSource接口输出文案
Errors文案来源
Errors文案生成步骤
- 选择
Errors实现,如org.springframework.validation.BeanPropertyBindingResoult - 调用
reject()或rejectValue()方法 - 获取
Errors对象中ObjectError或FieldError - 将
ObjectError或FieldError中的code和args,关联MessageSource实现,如ResourceBundleMessageSource
简单步骤如下:
public class ErrorMessageDemo {
    public static void main(String[] args) {
        User user = new User(1L, "name");

        BeanPropertyBindingResult errors = new BeanPropertyBindingResult(user, "user");
        //reject方法会产生ObjectError对象; rejectValue会产生FieldError对象
        //增加一条校验规则,所有属性不能为空
        errors.reject("user.properties.not.null");
        errors.rejectValue("name", "name required");

        List<ObjectError> objectErrors = errors.getGlobalErrors();
        List<FieldError> fieldErrors = errors.getFieldErrors();
        List<ObjectError> allErrors = errors.getAllErrors();

        //新增MessageSource
        StaticMessageSource ms = new StaticMessageSource();
        ms.addMessage("name required", Locale.getDefault(), "name属性不能为空");
        ms.addMessage("user.properties.not.null", Locale.getDefault(), "所有属性不能为空");

        for (ObjectError error : allErrors) {
            String msg = ms.getMessage(error.getCode(), error.getArguments(), Locale.getDefault());
            System.out.println(msg);
        }
    }
}
自定义Validator
自定义Validator的自定义方式如下:
public class ValidatorDemo {
    public static void main(String[] args) {
//        User user = new User(1L,"test");
        User user = new User();
        BeanPropertyBindingResult errors = new BeanPropertyBindingResult(user, "user");
        UserValidator validator = new UserValidator();
        System.out.println("是否可用: " + validator.supports(user.getClass()));

        validator.validate(user, errors);

        StaticMessageSource ms = new StaticMessageSource();
        ms.addMessage("name required", Locale.getDefault(), "name属性不能为空");
        ms.addMessage("id required", Locale.getDefault(), "id不能为空");

        for (ObjectError error : errors.getAllErrors()) {
            String msg = ms.getMessage(error.getCode(), error.getArguments(), Locale.getDefault());
            System.out.println(msg);
        }
    }

    static class UserValidator implements Validator {
        @Override
        public boolean supports(Class<?> clazz) {
            return ObjectUtils.nullSafeEquals(clazz, User.class);
        }

        @Override
        public void validate(Object target, Errors errors) {
            User user = (User) target;
            ValidationUtils.rejectIfEmptyOrWhitespace(errors, "name", "name required");
            ValidationUtils.rejectIfEmptyOrWhitespace(errors, "id", "id required");

        }
    }
}
Hibernate Validator框架
Bean Validator与Validator适配
核心组件为:org.springframework.validation.beanvalidation.LocalValidatorFactoryBean
依赖Bean Validation:JSR-303、JSR-349 provider,如@Validate和@Validated
Bean方法参数校验:org.springframework.validation.beanvalidation.MethodValidationPostProcessor
HibernateValidator使用方式为
public class SpringBeanValidationDemo {
    public static void main(String[] args) {
        ClassPathXmlApplicationContext context = new ClassPathXmlApplicationContext("classpath:/META-INF/validation-context.xml");

        Validator bean = context.getBean(Validator.class);
        System.out.println(bean instanceof LocalValidatorFactoryBean);
        UserHandler uh = context.getBean(UserHandler.class);
        ValidUser user = new ValidUser();
//        user.setName("a");
        uh.handler(user);

        context.close();
    }

    @Component
    @Validated
    static class UserHandler {
        public void handler(@Valid ValidUser user) {
            System.out.println(user);
        }
    }


    static class ValidUser {
        @NotNull
        private String name;

        public String getName() {
            return name;
        }

        public void setName(String name) {
            this.name = name;
        }

        @Override
        public String toString() {
            return "ValidUser{" +
                    "name='" + name + '\'' +
                    '}';
        }
    }
}
Spring数据绑定
Spring数据绑定的使用场景
Spring数据绑定组件
Spring数据绑定元数据
Spring数据绑定控制参数
Spring底层JavaBeans替换实现
BeanWrapper的使用场景
Java Beans的属性操作
DataBinder数据校验
Spring数据绑定的使用场景
- Spring BeanDefinition到Bean示例创建
- Spring数据绑定(DataBinder)
- SpringWeb参数绑定(WebDataBinder)
Spring数据绑定组件
标准组件(用于将properties绑定到对应的对象上):org.springframework.validation.DataBinder
Web组件:
org.springframework.web.bind.WebDataBinderorg.springframework.web.bind.ServletRequestDataBinderorg.springframework.web.bind.support.WebRequestDataBinderorg.springframework.web.bind.support.WebExchangeDataBinder(since5.0)
DataBinder核心属性
| 属性 | 说明 |
|---|---|
| target | 关联目标Bean |
| objectName | 目标Bean名称 |
| bindingResult | 属性绑定结果 |
| typeConverter | 类型转换器 |
| conversionService | 类型转换服务 |
| messageCodesResolver | 校验错误文案code处理器 |
| validators | 关联的Bean Validator实例集合 |
DataBinder#bind(PropertyValues)绑定方法,将PropertiesValues(k-v)内容映射到关联Bean中的属性上。
Spring数据绑定元数据
DataBinder元数据-PropertiesValues
| 特征 | 说明 |
|---|---|
| 数据来源 | BeanDefinition,主要来源于配置 |
| 数据结构 | 由一个或多个PropertyValue组成 |
| 成员结构 | PropertyValue包含属性名称、属性值(原始值、类型转换后的值) |
| 常见实现 | MutablePropertyVallues |
| Web扩展实现 | ServletConfigPropertyValues,ServletRequestParameterPropertyValues |
| 相关生命周期 | InstantiationAwareBeanPostProcessor#postProcessProperties |
Spring数据绑定控制参数
DataBinder绑定特殊场景分析
- 当PropertyValues中包含名称x的PropertyValue,目标对象B不存在属性x,当bind方法执行时,会发生什么?忽略未知属性
- 当PropertyValues中包含名称x的PropertyValue,目标对象中存在属性x,当bind方法执行时如何避免B的树形x不被绑定?
- 当PropertyValues中包含名称为x.y的PropertyValue,目标对象B中存在x属性(嵌套y属性),当bind方法执行时,会发生什么?**支持嵌套属性 **
DataBinder绑定控制参数表
| 参数名称 | 说明 |
|---|---|
| ignoreUnkownFields | 是否忽略未知字段,默认true |
| ignoreInvalidFields | 是否忽略非法字段,默认false |
| autoGrowNestedPaths | 是否自动增加嵌套路径,默认true |
| allowedFields | 绑定字段白名单 |
| disallowedFields | 绑定字段黑名单 |
| requiredFields | 必须绑定字段 |
Spring底层Java Beans替换实现
核心实现:java.beans.BeanInfo
- 属性(Property):
java.beans.PropertyEditor - 方法(Method)
- 事件(Event)
- 表达式(Expression)
Spring替换实现:org.springframework.beans.BeanWrapper
- 属性(Property):
java.beans.PropertyEditor - 嵌套属性路径(netsted path),如:
user.name
BeanWrapper的使用场景
BeanWrapper简单说明
- Spring底层JavaBeans基础设施的中心化接口
- 通常不会直接使用,间接用于BeanFactory和DataBinder
- 提供标准javaBeans分析和操作,能够单独或批量存储JavaBean的属性(properties)
- 支持嵌套路径(netsted path)
- 实现类为:
org.springframework.beans.BeanWrapperImpl
扩展:JavaBeans属性操作
API说明:
| API | 说明 |
|---|---|
java.beans.Introspector | java beans内省API |
java.beans.BeanInfo | java beans元信息API |
java.beans.BeanDescriptor | Java Beans信息描述符 |
java.beans.PropertyDescriptor | javabeans属性描述 |
java.beans.MethodDescriptor | java beans 方法描述符 |
java.beans.EventSetDescriptor | java beans 事件集合描述符 |
使用方法如下:
public class JavaBeansDemo {
    public static void main(String[] args) throws IntrospectionException {
        BeanInfo bf = Introspector.getBeanInfo(User.class, Object.class);
        //属性描述符
        //所有的类都继承自Object,因此所有的bean都存在一个class属性.
        //可以使用重载的方法去掉class属性 BeanInfo bf= Introspector.getBeanInfo(User.class,Object.class);
        PropertyDescriptor[] pds = bf.getPropertyDescriptors();
        for (PropertyDescriptor pd : pds) {
//            System.out.println(pd.getReadMethod());
            System.out.println(pd);
        }
        //包含getter\setter\hashcode\equals方法
        MethodDescriptor[] mds = bf.getMethodDescriptors();
        for (MethodDescriptor md : mds) {
            System.out.println(md);
        }
    }
}
DataBinder和BeanWrapper的关系
DataBinder#bind方法生成BeanPropertyBindingResult对象
BeanPropertyBindingResult关联BeanWrapper
Spring类型转换
Spring类型转换的实现
使用场景
基于Java Beans接口的类型转换
Spring内建PropertyEditor扩展
自定义PropertyEditor扩展
Spring PropertyEditor的设计缺陷
Spring 3通用类型转换接口
Spring内建类型转换器
Converter接口的局限性
GenericConverter接口
优化GenericConverter接口
扩展Spring类型转换器
统一类型转换服务
Spring类型转换的实现
基于JavaBeans接口的类型转换实现,基于java.beans.PropertyEditor接口扩展
Spring3.0+通用类型转换实现
使用场景
| 场景 | 基于JavaBeans接口的类型转换实现 | Spring3.0+通用类型转换实现 |
|---|---|---|
| 数据绑定 | yes | yes |
| BeanWrapper | yes | yes |
| Bean属性类型转换 | yes | yes |
| 外部化属性类型转换 | no | yes |
基于JavaBeans接口的类型转换
核心职责:将String类型的内容转化为目标类型的对象
扩展原理:
- Spring框架将文本内容传递到PropertyEditor实现的
setAsText(String)方法 PropertyEditor#setAsTest(String)方法实现将String类型转化为目标类型的对象- 将目标类型的对象传入
PropertyEditor#setValue(Object)方法 PropertyEditor#setValue(Object)方法实现临时存储传入- Spring框架通过
PropertyEditor#getValue()获取类型转换后的对象
扩展示例:
public class StringToPropertiesEditor extends PropertyEditorSupport implements PropertyEditor {
    //1.实现setAsText方法
    @Override
    public void setAsText(String text) throws IllegalArgumentException {
        //2.将string转换为properties
        Properties properties = new Properties();
        try {
            properties.load(new StringReader(text));
        } catch (IOException e) {
            throw new RuntimeException(e);
        }
        //3.临时存储
        this.setValue(properties);

    }

    @Override
    public String getAsText() {
        Properties properties = (Properties) getValue();
        StringBuilder sb=new StringBuilder();
        for (Map.Entry<Object, Object> entry : properties.entrySet()) {
            sb.append(entry.getKey()).append("=").append(entry.getValue()).append(System.lineSeparator());
        }

        return sb.toString();
    }

    public static void main(String[] args) {
        String text="key=value";
        //模拟spring操作
        PropertyEditor editor=new StringToPropertiesEditor();
        editor.setAsText(text);
        //4.获取property对象
        System.out.println(editor.getValue());
        System.out.println(editor.getAsText());
    }
}
Spring内建PropertyEditor扩展
Spring内建PropertyEditor扩展位于 org.springframework.beans.propertyeditors 包下,具体实现如下
| 转换场景 | 实现类 |
|---|---|
| String👉Byte数组 | ByteArrayPropertyEditor |
| String🤜Char | CharacterEditor |
| String🤜Char数组 | CharArrayPropertyEditor |
| String🤜Charset | CharsetEditor |
| String🤜Class | ClassEditor |
| String🤜Currency | CurrencyEditor |
自定义PropertyEditor扩展
扩展模式:扩展java.beans.PropertyEditorSupport类
扩展方式:
实现 org.springframework.beans.PropertyEditorResistrar
- 实现
registerCustomEditors(PropertyEditorRegistry)方法 - 向
org.springframework.beans.PropertyEditorRegistry注册自定义PropertyEditor实现- 通用类型实现:
registerCustomEditor(Class,PropertyEditor) - Java beans属性类型实现:
registerCustomEditor(Class,String,PropertyEditor)
- 通用类型实现:
- 将
PropertyEditorResistrar实例注册为SpringBean
具体的实现代码如下:
实现类:
public class CustomizedPropertyEditorRegistrar implements PropertyEditorRegistrar {
    @Override
    public void registerCustomEditors(PropertyEditorRegistry registry) {
        registry.registerCustomEditor(User.class, "context", new StringToPropertiesEditor());
    }
}
xml配置文件:
<?xml version="1.0" encoding="UTF-8"?>
<beans xmlns="http://www.springframework.org/schema/beans"
       xmlns:xsi="http://www.w3.org/2001/XMLSchema-instance"
       xsi:schemaLocation="http://www.springframework.org/schema/beans http://www.springframework.org/schema/beans/spring-beans.xsd">
    <!-- 4.配置为spring bean -->
    <bean class="top.sunyog.thinking.convert.CustomizedPropertyEditorRegistrar"/>

    <bean id="user" class="top.sunyog.thinking.ioc.overview.domain.User">
        <property name="id" value="1024"/>
        <property name="name" value="converter"/>
        <!-- 设置待转换类型的属性 -->
        <property name="context">
            <!-- 设置properties属性 -->
            <value>
                id=1024
                name=context-converter
            </value>
        </property>
    </bean>
</beans>
Java启动类
public class CustomizedConvertorDemo {
    public static void main(String[] args) {
        ConfigurableApplicationContext context = new ClassPathXmlApplicationContext("classpath:/META-INF/convert-property-editor.xml");
        ConfigurableListableBeanFactory beanFactory = context.getBeanFactory();
        User user = beanFactory.getBean("user", User.class);
        System.out.println(user);

        context.close();
    }
}
Spring PropertyEditor的设计缺陷
违反单一职责原则:
java.beans.PropertyEditor接口职责太多,除了类型转换还包括Java beans 事件和JavaGUI交互,如PropertyEditorSupport#paintValue方法
java.beans.PropertyEditor实现类局限:
- 来源类型只能是String类型
java.beas.PropertyEditor实现缺少类型安全
- 除了实现类命名可以表达语义,实现类无法感知目标转换类型
Spring3 通用类型转换接口
类型转换接口org.springframework.core.convert.converter.Converter<S,T>
- 泛型参数S:来源类型,T:目标类型
- 核心方法:
T convert(S)
通用类型转换接口org.springframework.core.conver.converter.GenericConverter
- 核心方法:
convert(Object source,TypeDescriptor sourceType,typeDescriptor targetType) - 配对类型:
org.springframework.core.convert.converter.GenericConverter.ConvertiblePair - 类型描述:
org.springframework.core.convert.TypeDescriptor
Spring内置类型转换器
| 转换场景 | 实现类所在包名 |
|---|---|
| 日期、时间相关 | org.springframework.format.datetime |
| Java8日期、时间相关 | org.springframework.format.datetime.standard |
| 通用实现 | org.springframework.core.convert.support |
Converter接口的局限性
局限一:缺少SourceType和TargetType的前置判断
- 应对:增加
org.springframework.core.convert.converter.ConditionalConverter
局限二:仅能转换单一类型的SourceType和TargetType,缺少复合类型的支持
- 应对:使用
org.springframework.core.convert.converter.GenericConverter代替
GenericConverter接口说明
| 核心要素 | 说明 |
|---|---|
| 使用场景 | 用于“复合”类型转换场景,如Collection、Map、数组等 |
| 转换范围 | Set<convertiblePair> getConvertibleTypes() |
| 配对类型 | org.springframework.core.convert.converter.GenericConverter.ConvertiblePair |
| 转换方法 | convert(Object,TypeDescriptor,TypeDescriptor) |
| 类型描述 | org.spring framework.core.convert.TypeDescriptor |
优化GenericConverter接口
GenericConverter接口的局限性:
- 缺少SourceType和TargetType前置判断
- 单一类型转换实现复杂
GenericConverter优化接口--ConditionalGenericConverter
- 复合类型转换:
org.springframework.core.convert.converter.GenericConverter - 类型条件判断:
org.springframework.core.convert.converter.ConditionalConverter
扩展Spring类型转换器
实现转换器接口:
- org.springframework.core.convert.converter.Converter
- org.springframework.core.convert.converter.ConverterFactory
- org.springframework.core.convert.converter.GenericConverter
注册转换器实现:
- 通过
ConversionServiceFactoryBeanSpring Bean - 通过
org.springframework.core.convert.ConversionServiceAPI
通过ConversionServiceFactoryBean配置自定义的类型转换器的步骤为:
自定义转换器
public class PropertiesToStringConverter implements ConditionalGenericConverter {
    @Override
    public boolean matches(TypeDescriptor sourceType, TypeDescriptor targetType) {
        boolean sourceEq = Properties.class.equals(sourceType.getObjectType());
        boolean targetEq = String.class.equals(targetType.getObjectType());
        return sourceEq && targetEq;
    }

    @Override
    public Set<ConvertiblePair> getConvertibleTypes() {
        return Collections.singleton(new ConvertiblePair(Properties.class,String.class));
    }

    @Override
    public Object convert(Object source, TypeDescriptor sourceType, TypeDescriptor targetType) {
        Properties properties = (Properties) source;
        StringBuilder sb = new StringBuilder();
        for (Map.Entry<Object, Object> entry : properties.entrySet()) {
            sb.append(entry.getKey()).append(" = ").append(entry.getValue()).append(" ,");
        }
        return sb.toString();
    }
}
配置转换器和FactoryBean
<beans>
	<bean class="top.sunyog.thinking.convert.PropertiesToStringConverter" id="my-converter"/>
    <!-- bean 的名称不能为空 -->
    <bean id="conversionService" class="org.springframework.context.support.ConversionServiceFactoryBean">
        <property name="converters" ref="my-converter"/>
    </bean>
</beans>
配置待转换的bean属性
<beans>
	<util:properties id="context-properties">
        <prop key="id">123</prop>
        <prop key="name">test name</prop>
    </util:properties>

    <bean id="user" class="top.sunyog.thinking.ioc.overview.domain.User">
        ...省略其他属性
        <property name="contextStr" ref="context-properties"/>
    </bean>
</beans>
User类修改
public class User {
    //...省略其他属性
    private String contextStr;
    //省略getter、setter方法
}
启动容器,获取User类型的Bean并打印出结果如下
User{id=1024, name='converter', context={name=context-converter, id=1024}, contextStr='name = test name ,id = 123 ,'}统一类型转换服务
统一类型转换服务接口:org.springframework.core.convert.ConversionService
| 实现类型 | 说明 |
|---|---|
| GenericConversionService | 通用ConversionService模板实现,不内置转化器实现 |
| DefaultConversionService | 基础ConversionService实现,内置常用转化器 |
| FormattingConversionService | 通用Formatter+GenericConversionService实现,不内置转化器和Formatter实现 |
| DefaultFormattingConversionService | DefaultConversionService+格式化实现(如JSR-354 Money & Currency,JSR-0 Date-Time) |
类型转换器底层接口:org.springframework.beans.TypeConverter
- 起始版本:Spring2.0
- 核心方法:
convertIfNecessary()重载方法 - 抽象实现:
org.springframework.beans.TypeConverterSupport - 简单实现:
org.springframework.beans.SimpleTypeConverter
类型转换器底层抽象实现:org.springframework.beans.TypeConverterSupport
- 扩展实现:
PropertyEditorRegistrySupport - 委派实现:
TypeConverterDelegate
类型转换委派实现:org.springframework.beans.TypeConverterDelegate
- 构造来源:
org.springframework.beans.AbstractNestablePropertyAccessor的实现org.springframework.beans.BeanWrapperImpl - 依赖:
java.beans.PropertyEditor,内部默认的实现为PropertyEditorRegistrySupport#regisgerDefaultEditors - 可选依赖:
org.springframework.core.convert.ConversionService
Spring泛型处理
Java泛型基础
泛型类型--在类型上参数化的泛型类或接口
泛型的使用场景:
- 编译时强类型检查
- 避免类型强转
- 实现通用算法
泛型类型擦写:
- 将泛型类型中的所有类型参数替换为“边界”,如果类型参数是无界单独,则将其替换为Object。因此生成的字节码只包含普通类、接口和方法
- 必要时插入类型转换以保证类型安全
- 生成桥方法以保留扩展泛型类型中的多态
泛型擦写中的问题:
可以将泛型对象赋值给一个无泛型约束的对象,这时泛型控制将会失效,效果如下代码
public class JavaGenericEraseDemo {
    public static void main(String[] args) {
        Collection<String> coll = new ArrayList<>();
        coll.add("hello");
        coll.add("how");
        //泛型控制生效
//        coll.add(1);
        Collection temp = coll;
        //泛型控制失效
        temp.add(1);

        System.out.println(coll);
        System.out.println(temp);
    }
}
Java5类型相关接口
Java类型接口
| 接口或派生类 | 说明 |
|---|---|
| java.lang.Class | Java类API,如java.lang.String |
| java.lang.reflect.GenericArrayType | 泛型数组类型 |
| java.lang.reflect.ParameterizedType | 泛型参数类型 |
| java.lang.reflect.TypeVariable | 泛型类型变量,如Collection<E> 中的E |
| java.lang.reflect.WildcardType | 泛型通配类型 |
Java泛型反射API
| 类型 | API |
|---|---|
| 泛型信息(Generics Info) | Java.lang.Class#getGenericInfo() |
| 泛型参数(Parameters) | java.lang.reflect.ParameterizedType |
| 泛型父类(Super Classes) | java.lang.Class#getGenericSuperclass() |
| 泛型接口(Interfaces) | java.lang.Class#getGenericInterfaces() |
| 泛型声明(Generics Declaration) | java.lang.reflect.GenericDeclaration |
Spring泛型类型辅助类
核心API:org.springframework.core.GenericTypeResolver(since:Spring2.5.2)
处理类型(Type)相关方法:resolveReturnType()和resolveType()
处理反省参数类型(ParameterizedType)相关方法:
resolveReturnTypeArgumentresolveTypeArgumentresolveTypeArguments
处理泛型类型变量(TypeVariable)相关方法:getTypeVariableMap()
public class GenericTypeResolverDemo {
    public static void main(String[] args) throws NoSuchMethodException {
        Method method = GenericTypeResolverDemo.class.getMethod("toString");
        //查询返回值类型
        Class<?> returnType = GenericTypeResolver.resolveReturnType(method, GenericTypeResolverDemo.class);
        System.out.println(returnType);
        //获取返回值的泛型参数类型
        Class<?> genericReturnType = GenericTypeResolver.resolveReturnTypeArgument(method, String.class);
        System.out.println(genericReturnType);//返回值为空,因为常规类型(如:String)不具备泛型参数类型

        Method getMethod = GenericTypeResolverDemo.class.getMethod("getStrings");
        //获取返回值list类型的泛型参数
        Class<?> returnTypeArgument = GenericTypeResolver.resolveReturnTypeArgument(getMethod, List.class);
        System.out.println(returnTypeArgument);

        Map<TypeVariable, Type> typeVariableMap = GenericTypeResolver.getTypeVariableMap(StringList.class);
        typeVariableMap.entrySet().forEach(e -> {
            System.out.println(e.getKey() + " = " + e.getValue());
        });
    }

    @Override
    public String toString() {
        return super.toString();
    }

    public List<Integer> getStrings() {
        return null;
    }

    class StringList extends ArrayList<String> {
    }
}
Spring泛型集合类型和辅助类
核心API:org.springframework.core.GenericCollectionTypeResolver(since:Spring2.0~Spring4.3,已弃用)
替换实现:org.springframework.core.ResolvableType
处理Collection相关API:getCollection*Type
处理Map相关API:getMapKey*Type和getMapValue*Type
Spring方法参数封装
核心API:org.springframework.core.MethodParameter
元信息:
- 关联的方法-Method
- 关联的构造器-Constructor
- 构造器或方法参数索引-parameterIndex
- 构造器或方法参数类型-parameterType
- 构造器或方法参数泛型-genericParameterType
- 构造器或方法参数名称-parameterName
- 所在的类-containingClass
Spring 4.2泛型优化实现
核心API:org.springframework.core.ResolvableType(since Spring4.0)
- 用于扮演
GenericTypeResolver和GenericCollectionTypeResolver的替代者 - 工厂方法:
for*方法 - 转换方法:
as*方法 - 处理方法:
resolve*方法
public class ResolvableTypeDemo {
    public static void main(String[] args) {
        //工厂方法创建
        ResolvableType resolvableType = ResolvableType.forClass(GenericTypeResolverDemo.StringList.class);
        Class<?> resolve = resolvableType.asCollection().resolve();
        System.out.println(resolve);
        Class<?> aClass = resolvableType.asCollection().resolveGeneric(0);
        System.out.println(aClass);
    }
}
ResolvableType的局限
局限一:ResolvableType无法处理泛型擦写
局限二:ResolvableType无法处理非具体化的ParameterizedType
Java5反射中Type类型的派生类或接口
java.lang.Classjava.lang.reflect.GenericArrayTypejava.lang.reflect.ParameterizedTypejava.lang.reflect.TypeVariablejava.lang.reflect.WildcardType
Spring事件
- Java事件/监听器编程模型
- 面向接口的事件/监听器设计模式
- 面型注解的事件/监听器设计模式
- Spring标准事件
- 基于接口的Spring事件监听器
- 基于注解的Spring事件监听器
- 注册Spring ApplicationEventListener
- Spring事件发布器
- Spring层次上下文事件传播
- Spring内部事件
- Spring4.2 Payload事件
- 自定义Spring事件
- 依赖注入ApplicationEventPublisher
- 依赖查着ApplicationEventPublisher
- ApplicationEeventPublisher底层实现
- 同步和异步Spring事件广播
- Spring4.1事件异常处理
- Spring事件/监听器实现原理
- 扩展内容(SpringBoot、SpringCloud事件)
Java事件/监听器编程模型
设计模式--观察者模式
- 消息发送者对象--java.util.Observable
- 观察者--java.util.Observer
标准化接口
- 事件对象--java.util.EventObject
- 事件监听器--java.util.EventListener
观察者模式(事件监听)使用方法如下
public class ObservableDemo {
    public static void main(String[] args) {
        Observable observable = new EventObservable();
        Observer observer = new EventObserver();
        observable.addObserver(observer);
        observable.notifyObservers("hello event");
    }

    static class EventObservable extends Observable {
        @Override
        public void notifyObservers(Object arg) {
            this.setChanged();
            super.notifyObservers(new EventObject(arg));
            this.clearChanged();
        }
    }

    static class EventObserver implements Observer, EventListener {
        @Override
        public void update(Observable o, Object event) {
            EventObject e = (EventObject) event;
            System.out.println("收到事件: " + e);
        }
    }
}
面向接口的事件/监听器设计模式
场景举例:
| Java技术规范 | 事件接口 | 监听器接口 |
|---|---|---|
| Java Beans | Java.beans.PropertyChangeEveent | java.beans.PropertyChangeListener |
| Java AWT | java.awt.event.MouseEvent | java.awt.event.MouseListener |
| Java Swing | javax.swing.event.MenuEvent | java.swing.event.MenuListener |
| Java Perference | java.util.prefs.PreferenceChangeEvent | java.util.prefs.PreFerenceChangeListener |
注意,所有的事件都继承自 java.util.EventObject,所有的监听器都继承自 java.util.EventListener
面向注解的事件/监听器设计模式
| Java技术规范 | 事件注解 | 监听器注解 |
|---|---|---|
| Servlet 3.0+ | @javax.servlet.annotation.WebListener | |
| JPA 1.0+ | @java.persistence.PostPersist | |
| Java Common | @PostConstruct | |
| EJB 3.0+ | @javax.ejb.PrePassivate | |
| JSF 2.0+ | @javax.faces.event.ListenerFor |
Spring标准事件
Spring标准事件ApplicationEvent(抽象类),扩展了Java标准事件EventObject,新增事件发生时间戳属性 timestamp
Spring的应用上下文的ApplicationEvent扩展为 ApplicationContextEvent (抽象类),具体实现类包括:ContextClosedEvent、ContextRefreshedEvent、ContextStartedEVent、ContextStoppedEvent等
基于接口的Spring事件监听器
扩展接口为 org.springframework.context.ApplicationListener是 Java.util.EventListener的扩展
- 设计特点:单一类型事件处理
- 处理方法:
onApplicationEvent(ApplicationEvent) - 事件类型:
org.springframework.context.ApplicationEvent
使用方式如下:
public class SpringApplicationEventDemo {
    public static void main(String[] args) {
        GenericApplicationContext context = new GenericApplicationContext();

        //添加事件监听
        context.addApplicationListener(new ApplicationListener<ApplicationEvent>() {
            @Override
            public void onApplicationEvent(ApplicationEvent event) {
                System.out.println("接收到事件: " + event);
            }
        });

        context.refresh();
        context.start();
        context.close();
    }
}
基于注解的Spring事件监听器
Spring注解:@org.springframework.context.event.EventListener
| 特性 | 说明 |
|---|---|
| 设计特点 | 支持多ApplicationEvent类型,无需接口约束 |
| 注解目标 | 方法 |
| 是否支持异步执行 | 支持 |
| 是否支持泛型类事件 | 支持 |
| 是否支持顺序控制 | 配合 @Order控制,支持 |
使用方式如下:
@EnableAsync
public class SpringApplicationEventDemo {
    public static void main(String[] args) {
        AnnotationConfigApplicationContext context = new AnnotationConfigApplicationContext();
        context.register(SpringApplicationEventDemo.class);
        //添加事件监听(基于接口)
        context.addApplicationListener(new ApplicationListener<ApplicationEvent>() {
            @Override
            public void onApplicationEvent(ApplicationEvent event) {
                SpringApplicationEventDemo.printLog("接收到事件: ", event);
            }
        });

        context.refresh();
        context.start();
        context.close();
    }

    @EventListener
    public void onAppRefreshEvent(ContextRefreshedEvent event) {
        this.printLog("@EventListener事件(refresh): ", event);
    }

    //支持异步
    @Async
    @EventListener
    public void onAppEvent(ApplicationEvent event) {
        this.printLog("@EventListener事件: ", event);
    }

    private static void printLog(String msg, ApplicationEvent event) {
        System.out.printf("[线程: %s]: %s [%s]\n", Thread.currentThread().getName(), msg, event.getClass());
    }
}@EventListener注解标注的方法,在 EventListenerMethodProcessor#processBean 方法中被读取,并注册到 SimpleApplicationEventMulticaster.super.retrieverCache中
注册ApplicationEventListener
方式1:将ApplicationEventListener作为Spring Bean注册
方式2:通过ConfigurableApplicationContext API注册,配置方式见前一章
方式1的操作过程如下:
public class SpringApplicationEventDemo {
    public static void main(String[] args) {
        AnnotationConfigApplicationContext context = new AnnotationConfigApplicationContext();
        context.register(SpringApplicationEventDemo.class);
        //注册为Spring Bean
        context.register(MyEventListener.class);

        context.refresh();
        context.start();
        context.close();
    }


    static class MyEventListener implements ApplicationListener<ContextClosedEvent> {
        @Override
        public void onApplicationEvent(ContextClosedEvent event) {
            SpringApplicationEventDemo.printLog("Spring Bean方式自定义事件监听(close)", event);
        }
    }
}
Spring事件发布器
控制事件发布的方式有两种:
- 通过
ApplicationEventPublisher发布事件,可以通过依赖注入获取ApplicationEventPublisher,也可以通过实现ApplicationEventPublisherAware的方式获取 - 通过
ApplicationEventMulticaster(事件广播)发布事件,可以通过依赖注入、依赖查找获取到ApplicationEventMulticaster
Spring层次上下文事件传播
当Spring应用出现多层次Spring应用上下文(ApplicationContext)时,如Spring WebMVC、Spring Boot、Spring Cloud场景下,由于子ApplicationContext发起Spring事件可能会传递到Parent ApplicationContext(一直到Root)的过程。
可以通过定位Spring事件源(ApplicationContext)的方式进行处理
public class SpringHierarchicalEventDemo {
    public static void main(String[] args) {
        AnnotationConfigApplicationContext parentContext = new AnnotationConfigApplicationContext();
        parentContext.setId("parent-context");
        AnnotationConfigApplicationContext currentContext = new AnnotationConfigApplicationContext();
        currentContext.setId("son-context");
        currentContext.setParent(parentContext);

        parentContext.addApplicationListener(new ApplicationListener<ContextRefreshedEvent>() {
            @Override
            public void onApplicationEvent(ContextRefreshedEvent event) {
                System.out.printf("监听到 spring 应用上下文 [ID = %s]的 refresh事件\n", event.getApplicationContext().getId());

            }
        });

        parentContext.refresh();
        currentContext.refresh();

        currentContext.close();
        parentContext.close();
    }
}
打印结果如下:
#注意只有父context才注册了事件监听
监听到 spring 应用上下文 [ID = parent-context]的 refresh事件
监听到 spring 应用上下文 [ID = son-context]的 refresh事件
通过匹配容器名称的方式,可以避免此现象,代码样例为
AnnotationConfigApplicationContext parentContext=new AnnotationConfigApplicationContext();
        parentContext.setId("parent-context");

        parentContext.addApplicationListener(new ApplicationListener<ContextRefreshedEvent>(){
final String contextId="parent-context";
@Override
public void onApplicationEvent(ContextRefreshedEvent event){
        String currId=event.getApplicationContext().getId();
        if(ObjectUtils.nullSafeEquals(contextId,currId)){
        System.out.printf("监听到 spring 应用上下文 [ID = %s]的 refresh事件\n",event.getApplicationContext().getId());
        }
        }
        });
Spring内置事件
- Spring应用上下文就绪事件:ContextRefreshedEvent
- Spring应用上下文启动事件:ContextStartedEvent
- Spring应用上下文停止事件:ContextStoppedEvent
- Spring应用上下文关闭事件:ContextClosedEvent
Payload事件
org.springframework.context.PayloadApplicationEvent
使用场景:简化Spring事件发送,关注事件发生主体
发送方法:ApplicationEventPublisher#publishEvent(Object)
注意:这里不建议直接继承PayloadApplicationEvent,可以通过ApplicationEventPublisher#publishEvent(Object) 方法直接发布该类型的事件
自定义Spring事件
自定义步骤:
- 扩展
org.springframework.ocntext.ApplicationEvent - 实现
org.springframework.context.ApplicationListener - 注册自定义的
org.springframework.context.ApplicationListener实现 - 发布自定义的spring事件
代码示例:
public class CustomSpringEventDemo {
    public static void main(String[] args) {
        AnnotationConfigApplicationContext context = new AnnotationConfigApplicationContext();
        //3.注册自定义listener
        context.register(MyEventListener.class);

        context.refresh();
        //4.发布事件
        context.publishEvent(new MyEvent("hello event"));
        context.close();
    }

    //1.扩展ApplicationEvent
    static class MyEvent extends ApplicationEvent {
        public MyEvent(String source) {
            super(source);
        }
    }

    //2.实现ApplicationListener
    static class MyEventListener implements ApplicationListener<MyEvent> {
        @Override
        public void onApplicationEvent(MyEvent event) {
            System.out.printf("监听到事件[%s]: %s\n", event.getClass(), event.getSource());
        }
    }
}
执行结果如下:
监听到事件[class top.sunyog.thinking.event.CustomSpringEventDemo$MyEvent]: hello event依赖注入ApplicationEventPublisher
两种方式
ApplicationEventPublisherAware回调接口- 通过
@Autowired ApplicationEventPublisher
依赖查找ApplicationEventMulticaster
ApplicationEventMulticaster是Spring事件分发依赖接口,其依赖查找条件为
bean名称:
applicationEventMulticaster,名称保存于AbstractApplicationContext.APPLICATION_EVENT_MULTICASTER_BEAN_NAMEbean类型:
org.springframework.context.event.ApplicationEventMulticaster,常用子类SimpleApplicationEventMulticaster
ApplicationEventPublisher的底层实现
底层接口包括:
- 接口:
org.springframework.context.event.ApplicationEventMulticaster - 抽象类:
AbstractApplicationEventMulticaster - 实现类:
SimpleApplicationEventMulticaster
ApplicationEventPublisher和 ApplicatioinEventMulticaster之间没有直接联系,他们通过AbstractApplicationContext 联系起来,在 publishEvent()方法中调用了ApplicationEventMulticaster,而ApplicationContext 则是ApplicationEventPublisher的一个子接口。这里贴出部分源码:
public abstract class AbstractApplicationContext {
    private ApplicationEventMulticaster applicationEventMulticaster;

    protected void publishEvent(Object event, @Nullable ResolvableType eventType) {
		...
        getApplicationEventMulticaster().multicastEvent(applicationEvent, eventType);
    }

    public void refresh() {
        ...
        initApplicationEventMulticaster();
        onRefresh();
        registerListeners();
        ...
    }
}

public interface ApplicationContext extends ApplicationEventPublisher, ...{

        }
同步和异步Spring事件广播
同步、异步模式切换可以通过API和注解两种方法
基于API设置异步事件
SimpleApplicationEventMulticaster#setTaskExecutor(java.util.concurrent.Executor) ,默认模式为同步模式,可以手动修改为异步模式(传入java.util.concurrent.ThreadPoolExecutor)。
设计缺陷:非基于接口契约编程
修改异步方式:
public class AsyncEventHandlerDemo {
    public static void main(String[] args) {
        AnnotationConfigApplicationContext context = new AnnotationConfigApplicationContext();
        context.register(AsyncEventHandlerDemo.class);
        context.refresh();

        ApplicationEventMulticaster eventMulticaster = context.getBean(AbstractApplicationContext.APPLICATION_EVENT_MULTICASTER_BEAN_NAME, ApplicationEventMulticaster.class);
        if (eventMulticaster instanceof SimpleApplicationEventMulticaster) {
            SimpleApplicationEventMulticaster simpleMulticaster = (SimpleApplicationEventMulticaster) eventMulticaster;
            ExecutorService taskExecutor = Executors.newSingleThreadExecutor(new CustomizableThreadFactory("my-event-task"));
            simpleMulticaster.setTaskExecutor(taskExecutor);
        }

        context.publishEvent(new MyAsyncEvent("自定义事件"));

        context.close();
    }

    @EventListener
    public void myEventListener(MyAsyncEvent event) {
        System.out.printf("[线程: %s] %s\n", Thread.currentThread().getName(), event.getSource());
    }

    static class MyAsyncEvent extends ApplicationEvent {
        public MyAsyncEvent(Object source) {
            super(source);
        }
    }
}
基于注解设置异步事件
使用注解@org.springframework.context.event.EventListener 默认方式为同步,通过增加@org.springframework.scheduling.annotation.Async 注解可改为异步。注意这种方式需要应用程序引入异步注解支持,即`@EnableAsync``
**注意:**通过注解的方式切换为异步是局部的切换,只能保证被标注的 @EventListener方法是异步事件。而API的方式为全局切换。
Spring4.1事件异常处理
Spring3.0 错误处理接口org.springframework.util.ErrorHandler
使用场景:
- Spring事件(Events)
SimpleApplicationEventMulticaster(@sinceSpring4.1) - Spring本地调度(Scheduling),包括
org.springframework.scheduling.concurrent.ConcurrentTaskScheduler和org.springframework.scheduling.concurrent.ThreadPoolTaskScheduler
事件异常处理的代码实现如下:
public class AsyncEventHandlerDemo {
    public static void main(String[] args) {
        AnnotationConfigApplicationContext context = new AnnotationConfigApplicationContext();
        context.register(AsyncEventHandlerDemo.class);

        context.refresh();

        ApplicationEventMulticaster eventMulticaster = context.getBean(AbstractApplicationContext.APPLICATION_EVENT_MULTICASTER_BEAN_NAME, ApplicationEventMulticaster.class);
        if (eventMulticaster instanceof SimpleApplicationEventMulticaster) {
            SimpleApplicationEventMulticaster simpleMulticaster = (SimpleApplicationEventMulticaster) eventMulticaster;
            ExecutorService taskExecutor = Executors.newSingleThreadExecutor(new CustomizableThreadFactory("my-event-task"));
            simpleMulticaster.setTaskExecutor(taskExecutor);
            //添加异常处理
            simpleMulticaster.setErrorHandler(e -> {
                System.out.println(e.getMessage());
            });
        }

        context.publishEvent(new MyAsyncEvent("自定义事件"));

        context.close();
    }

    @EventListener
    public void myEventListener(MyAsyncEvent event) {
        System.out.printf("[线程: %s] %s\n", Thread.currentThread().getName(), event.getSource());
        //主动出错
        throw new RuntimeException("主动错误");
    }

    static class MyAsyncEvent extends ApplicationEvent {
        public MyAsyncEvent(Object source) {
            super(source);
        }
    }
}
Spring事件/监听器实现原理
SimpleApplicationEventMulticaster是“观察者模式的扩展”,其中:
- 被观察者:ApplicationListener
- 通知对象:ApplicationEvent
- 异常处理:ErrorHandler
- 泛型处理:ResolvableType
类继承关系
上图是事件广播器的类继承关系,其中 AbstractApplicaitionEventMulticaster.retrieverCache中使用 ConcurrentHashMap 存储了注册的 ApplicationListener
事件的发布流程
事件的发布通过 ApplicationEventPublisher#publishEvent方法实现,ApplicationContext通过继承 ApplcationEventPublisher 接口具备了事件发布的能力,具体的功能在 AbstractApplicationContext类里实现,其中的 applicationEventMulticaster 属性中保存了 SimpleApplicationEventMulticaster类对象,用于事件广播。
在容器上下文中,内置的事件发布工作发生在以下位置
| 引发方法 | 发布事件类型 | 注释 |
|---|---|---|
finishRefresh() | publishEvent(ContextRefreshEvent) | 容器上下文刷新事件 |
close() | publishEvent(ContextClosedEvent) | 容器上下文关闭事件 |
start() | publishEvent(ContextStartetdEvent) | 容器上下文启动事件 |
stop() | publishEvent(ContextStoppedEvent) | 容器上下文停止事件 |
publishEvent()方法的逻辑如下:
Spring注解
- Spring注解驱动编程发展历程
- Spring核心注解场景分类
- Spring注解编程模型
- Spring元注解(Meta-Annotations)
- Spring模式注解(Stereotype Annotations)
- Spring组合注解(Composed Annotaitons)
- Spring注解属性别名(Attribute Aliases)
- Spring注解属性覆盖(Attribute Overrides)
- Spring @Enable模块驱动
- Spring条件注解
- 扩展资料
Spring注解驱动编程发展历程
Spring Framework 1.X 启蒙时代(2003-2004年):@Transactional(since1.2)、@ManagedResource (since1.2)
Spring Framework 2.X 过渡时代:@Component(since2.5)、@Repository(since2.0)、@Service(since2.5)、@Controller(since2.5)
Spring Framework 3.X 黄金时代:@ComponentScan(since3.1)、@Bean(since3.0)、@Lazy(since3.0)、@Primary(since3.0)、@ImportResource(since3.0)
Spring Framework 4.X 完善时代:@Profile(since3.0,4.0重构)、@Condition(since4.0)
Spring Framework 5.X 当前(性能优化、编译优化):@Indexed(since5.0)
Spring核心注解场景分类
Spring模式注解
| Spring注解 | 场景说明 | 起始版本 |
|---|---|---|
| @Repository | 数据仓储模式注解 | 2.0 |
| @Component | 通用组件设计模式 | 2.5 |
| @Service | 服务模式注解 | 2.5 |
| @Controller | MVC控制器模式注解 | 2.5 |
| @Configuration | 配置类模式注解 | 3.0 |
装配注解
| Spring注解 | 场景说明 | 起始版本 |
|---|---|---|
| @ImportResource | 替换xml元素import | 2.5 |
| @Import | 导入Configuration类 | 2.5 |
| @ComponentScan | 扫描指定package下标注的模式注解的类 | 3.1 |
依赖注入注解
| Spring注解 | 场景说明 | 起始版本 |
|---|---|---|
| @Autowried | Bean依赖注入,支持多种依赖查着方式 | 2.5 |
| @Qualifier | 细粒度的@Autowired依赖查着 | 2.5 |
Spring注解编程模型
Spring注解编程模型包括:
- 元注解 Meta-Annotations
- 模式注解
- 组合注解
- 注解属性别名和覆盖
Spring元注解(Meta-Annotations)
元注解(注解的注解)举例:
java.lang.annotation.Documentedjava.lang.annotation.Inheritedjava.lang.annotation.Repeatable
元注解由Java提供
Spring模式注解(Stereotype Annotations)
模式注解用于声明这个类所扮演的角色,如Service。
@Component具有“派生性”,注解在包扫描(包括<context:component-scan>或@ComponentScan)路径下的类,派生了 @Component 的特性,即 @Service是 @Component的一种
在SpringBoot中还存在多层标注,即 @SpringBootConfiguration上标注了 @Configuration, @Configuration 上又标注了 @Component。
自定义@Component的过程
@Component
@Target(ElementType.TYPE)
@Documented
@Retention(RetentionPolicy.RUNTIME)
public @interface MyComponent {
}

@MyComponent
@Target(ElementType.TYPE)
@Documented
@Retention(RetentionPolicy.RUNTIME)
public @interface MyService {
}

@MyService
public class MyServiceComponent {
}

@ComponentScan(basePackages = {"top.sunyog.thinking.annotation"})
public class ComponentScanDemo {
    public static void main(String[] args) {
        AnnotationConfigApplicationContext context = new AnnotationConfigApplicationContext();
        context.register(ComponentScanDemo.class);

        context.refresh();
        //测试自定义Component注解知否生效
        MyServiceComponent bean = context.getBean(MyServiceComponent.class);
        System.out.println(bean);
        context.close();
    }
}
打印结果为:
top.sunyog.thinking.annotation.MyServiceComponent@40005471@Component原理
核心组件:org.springframework.context.annotation.ClassPathBeanDefinitionScanner
- 父类通用实现:org.springframework.context.annotation.ClasspathScanningCandidateComponentProvider
资源处理:org.springframework.core.io.support.ResourcePatternResolver
资源👉类元信息:org.springframework.core.core.type.classreading.MeatdataReaderFactory
类元信息:org.springframework.core.type.ClassMetadata
- ASM实现(字节码实现):org.springframework.core.type.classreading.ClassMetadataReadingVisitor
- 反射实现:org.springframework.core.type.StandardAnnotationMetadata
注解元信息:org.springframework.core.type.AnnotationMetadata
- ASM实现:org.springframework.core.type.classreading.AnnotationMetadataReaedingVisitor
- 反射实现:org.springframework.core.type.StandardAnnotationMetadata
@ComponentScan相关的方法调用流程如下:
Spring组合注解(Composed Annotaitons)
Spring组合注解就是Spring允许模式注解与其他Spring功能性注解的任意组合(合并),常用于SpringBoot中。
如 @SpringBootApplication具有 @SpringBootConfiguration、@EnableAutoConfiguration、@ComponentScan三者的功能:
@Target(ElementType.TYPE)
@Retention(RetentionPolicy.RUNTIME)
@Documented
@Inherited
@AutoConfigurationPackage
@Import(AutoConfigurationImportSelector.class)
public @interface EnableAutoConfiguration {
    ...
}

@Target(ElementType.TYPE)
@Retention(RetentionPolicy.RUNTIME)
@Documented
@Inherited
@SpringBootConfiguration
@EnableAutoConfiguration
@ComponentScan(excludeFilters = {@Filter(type = FilterType.CUSTOM, classes = TypeExcludeFilter.class),
        @Filter(type = FilterType.CUSTOM, classes = AutoConfigurationExcludeFilter.class)})
public @interface SpringBootApplication {
    ...
}
Spring内部使用 AnnotationAttributes存储注解中的内容。
Spring注解属性别名(Attribute Aliases)
显性别名。以下代码说明,default属性和basePackages属性是相同的(一个是另一个的别名)
public @interface ComponentScan {

    @AliasFor("basePackages")
    String[] value() default {};

    @AliasFor("value")
    String[] basePackages() default {};
    ...
}隐性别名。以下代码说明,SpringBootApplication.default是 EnableAutoConfiguration.default的别名化,即引用的是它
public @interface SpringBootApplication {

    @AliasFor(annotation = EnableAutoConfiguration.class)
    Class<?>[] exclude() default {};
}
自定义属性别名
@Target(ElementType.TYPE)
@Retention(RetentionPolicy.RUNTIME)
@Documented
@ComponentScan
public @interface MyComponentScan {
    // scanBasePackages --> ComponentScan.basePackages --> ComponentScan.value
    @AliasFor(annotation = ComponentScan.class, attribute = "basePackages")
    String[] scanBasePackages() default {};
}
Spring注解属性覆盖(Attribute Overrides)
有两个注解A和B,其中A标注在B上,当A和B上都有value属性时,则B.value会覆盖A.value的值
@Target(ElementType.TYPE)
@Retention(RetentionPolicy.RUNTIME)
@Documented
@ComponentScan
public @interface MyComponentScan {
    // scanBasePackages --> ComponentScan.basePackages --> ComponentScan.value
    @AliasFor(annotation = ComponentScan.class, attribute = "basePackages")
    String[] scanBasePackages() default {"#"};
}

@MyComponentScan
@Target(ElementType.TYPE)
@Retention(RetentionPolicy.RUNTIME)
@Documented
public @interface MyComponentScan2 {
    @AliasFor(annotation = MyComponentScan.class)
    String[] scanBasePackages() default {};
}

//测试注解属性覆盖
@MyComponentScan2(scanBasePackages = {"top.sunyog.thinking.components"})
public class ComponentScanDemo {
    public static void main(String[] args) {
        MyComponentScan anno = AnnotatedElementUtils.findMergedAnnotation(ComponentScanDemo.class, MyComponentScan.class);
        //参数值可以传递
        System.out.println(Arrays.toString(anno.scanBasePackages()));
    }
}
Spring @Enable模块驱动
@Enable驱动模块是以 @Enable为前缀的注解驱动编程模型,所谓的“模块”是指具有相同领域的功能组件集合,组合所形成的一个独立的单元。如 WebMVC模块、AspectJ代理模块等。
举例说明:
@EnableWebMvc@EnableTransactionManagement@EnableCaching@EnableMBeanExport@EnableAsync
@Enable模块驱动通过导入注解@Import完成,具体实现可以通过以下三种方式:
- 基于Configuration Class
- 基于
ImportSelector接口实现 - 基于
ImportBeanDefinitionRegistrar接口实现
基于配置类实现代码如下:
//配置类
public class HelloWorldConfig {
    @Bean(name = "helloBean")
    public String getHelloWrold() {
        return "hello world";
    }
}

//自定义Enable*注解
@Target(ElementType.TYPE)
@Retention(RetentionPolicy.RUNTIME)
@Documented
@Import(HelloWorldConfig.class)
public @interface EnableHelloWorld {
}

//启动容器,获取Bean
@EnableHelloWorld
public class EnableModuleDemo {
    public static void main(String[] args) {
        AnnotationConfigApplicationContext context = new AnnotationConfigApplicationContext();
        context.register(EnableModuleDemo.class);

        context.refresh();

        String helloBean = context.getBean("helloBean", String.class);
        System.out.println(helloBean);

        context.close();
    }
}基于ImportSelector实现代码如下:
@Target(ElementType.TYPE)
@Retention(RetentionPolicy.RUNTIME)
@Documented
@Import(HelloImportSelector.class)
public @interface EnableHelloWorld {
}

public class HelloImportSelector implements ImportSelector {
    @Override
    public String[] selectImports(AnnotationMetadata importingClassMetadata) {
        return new String[]{"top.sunyog.thinking.annotation.enable.HelloWorldConfig"};
    }
}

//其他位置代码不变
基于 ImportBeanDefinitionRegistrar的实现方式如下:
@Target(ElementType.TYPE)
@Retention(RetentionPolicy.RUNTIME)
@Documented
@Import(HelloBeanDefinitionRegistrar.class)
public @interface EnableHelloWorld {
}

public class HelloBeanDefinitionRegistrar implements ImportBeanDefinitionRegistrar {
    @Override
    public void registerBeanDefinitions(AnnotationMetadata importingClassMetadata, BeanDefinitionRegistry registry, BeanNameGenerator importBeanNameGenerator) {
        ImportBeanDefinitionRegistrar.super.registerBeanDefinitions(importingClassMetadata, registry, importBeanNameGenerator);
        BeanDefinitionBuilder builder = BeanDefinitionBuilder.genericBeanDefinition(HelloWorldConfig.class);
        AbstractBeanDefinition beanDefinition = builder.getBeanDefinition();
        registry.registerBeanDefinition("importClassBean", beanDefinition);
    }
}

//其他位置代码不变
Spring条件注解
基于配置条件注解:@org.springframework.context.annotation.Profile,关联对象为:org.springframework.core.env.Environment 中的Profiles,从Spring4.0开始,@Proflie注解基于@Conditional实现
基于编程条件注解:@org.springframework.context.annotation.Conditional ,关联对象org.springframework.context.annotation.Condition为具体实现。
@Conditional的实现原理
- 上下文对象:
org.springframework.context.annotation.ConditionContext - 条件判断:
org.springframework.context.annotation.ConditionEvaluator#shouldSkip - 配置阶段:
org.springframework.context.annotation.ConfigurationCondition.ConfigurationPhase
判断入口:org.springframework.context.annotation.ConfigurationClassPostProcessor、org.springframework.context.annotation.ConfigurationClassParser#doProcessConfigurationClass
@Profile注解的使用效果如下:
public class SpringProfileDemo {
    public static void main(String[] args) {
        AnnotationConfigApplicationContext context = new AnnotationConfigApplicationContext();
        context.register(SpringProfileDemo.class);

        //设置默认 profiles
        ConfigurableEnvironment env = context.getEnvironment();
        env.setDefaultProfiles("odd");
        //添加活跃 profiles
        env.setActiveProfiles("even");

        context.refresh();

        Integer num = context.getBean("num", Integer.class);
        System.out.println(num);
        ////打印结果为:2
        context.close();
    }

    @Bean(name = "num")
    @Profile("odd")
    public Integer one() {
        return 1;
    }

    @Bean(name = "num")
    @Profile("even")
    public Integer two() {
        return 2;
    }
}@Conditional的用法如下:
public class SpringProfileDemo {

    //    @Profile("even")
    @Conditional(MyNumberProfileCondition.class)
    @Bean(name = "num")
    public Integer two() {
        return 2;
    }
}

public class MyNumberProfileCondition implements Condition {
    @Override
    public boolean matches(ConditionContext context, AnnotatedTypeMetadata metadata) {
        Environment env = context.getEnvironment();
        return env.acceptsProfiles("even");
    }
}
//其他不变
扩展资料
SpringBoot注解
| 注解 | 场景说明 | 起始版本 |
|---|---|---|
| @SpringBootConfiguration | SpringBoot配置类 | 1.4.0 |
| @SpringBootApplication | SpringBoot应用引导注解 | 1.2.0 |
| @EnableAutoConfiguration | SpringBoot激活自动配置 | 1.0.0 |
Spring Cloud注解
| 注解 | 此场景说明 | 起始版本 |
|---|---|---|
| @SpringCloudApplication | SpringCloud应用引导 | 1.0.0 |
| @EnableDiscoveryClient | 激活服务发现客户端 | 1.0.0 |
| @EnableCircuitBreaker | SpringBoot激活熔断注解 | 1.0.0 |
SpringEnvironment
- SpringEnvironment抽象
- Environment接口使用场景
- Environment占位符处理
- 条件配置 Spring Profile
- Spring4 重构的@Profile
- 依赖注入Environment
- 依赖查找Environment
- 依赖注入@Value
- Spring类型转换在Environment中的使用
- Spring类型转换在@Value中的使用
- Spring配置属性源 PropertySource
- Spring内置的配置属性源
- 基于注解扩展Spring配置属性源
- 基于API扩展Spring配置属性源
- 扩展资料--测试数据源
SpringEnvironment抽象
统一的Spring配置属性管理
Environment接口统一Spring配置属性的存储,包括占位符和类型转换,完整 的替换了PropertyPlaceholderconfigurer,而且支持丰富的配置属性源
条件化SpringBean装配管理
通过Profiles,条件话的配置SpringBean
Environment接口使用场景
- 属性占位符处理
- 转换Spring配置属性类型
- 存储Spring配置属性源(PropertySource)
- Profiles状态维护
Environment常用接口的继承关系为如下(常用方法已列出):
Environment占位符处理
Spring3.1前占位符处理:
- 组件:
org.springframework.beans.factory.config.PropertyPlaceholderConfigurer - 接口:
org.springframework.util.StringValueResolver
Spring3.1+占位符处理:
- 组件:
org.springframework.context.cupport.PropertySourcesPlaceholderConfigurer - 接口:
org.springframework.beans.config.EmbeddedValueResolver
PropertyPlaceholderConfigurerAPI的使用方法如下:
public class PropertyPlaceholderDemo {
    public static void main(String[] args) {
        ClassPathXmlApplicationContext context = new ClassPathXmlApplicationContext("META-INF/env-property-placeholder.xml");

        User bean = context.getBean("user", User.class);
        System.out.println(bean);

        context.close();
    }
}
xml配置文件内容为:
<?xml version="1.0" encoding="UTF-8"?>
<beans xmlns="http://www.springframework.org/schema/beans"
       xmlns:xsi="http://www.w3.org/2001/XMLSchema-instance"
       xsi:schemaLocation="http://www.springframework.org/schema/beans http://www.springframework.org/schema/beans/spring-beans.xsd">
    <bean class="org.springframework.beans.factory.config.PropertyPlaceholderConfigurer">
        <property name="fileEncoding" value="UTF-8"/>
        <property name="location" value="classpath:META-INF/env-user.properties"/>
    </bean>

    <bean id="user" class="top.sunyog.thinking.ioc.overview.domain.User">
        <property name="id" value="${user.uId}"/>
        <property name="name" value="${user.uName}"/>
    </bean>
</beans>
properties配置文件内容为:
user.uId=1009900
user.uName=测试用户名称
条件配置 Spring Profile
Spring3.1提供条件配置功能,通过 org.springframework.core.env.ConfigurableEnvironment API实现,具有如下方法:
- 修改:
setActiveProfile(), setActiveProflies(), setDefaultProfiles() - 获取:
getActiveProflies(), getDefaultProfiles() - 匹配:
acceptsProfiles(String), acceptsProfiles(Profiles)
注解:@org.springframework.context.annotation.Proflie
Spring4 重构的@Profile
通过org.springframework.context.annotation.Condition 接口实现类 org.springframework.context.annotation.ProfileCondition实现具体功能
依赖注入Environment
直接注入:
- 通过
EnvironmentAware接口回调 - 通过
@Autowired注入
间接注入:
ApplicationContextAware接口回调- 通过
@Autowired注入ApplicationContext
依赖查找Environment
直接查找(通过beanName):
org.springframework.context.ConfigurableApplicationContext#ENVIRONMENT_BEAN_NAME
间接查找:
org.springframework.context.ConfigurableApplicationContext#getEnvironment
依赖注入@Value
通过 org.springframework.beans.factory.annotation.AutowiredAnnotationBeanPostProcessor,部分源码如下:
public AutowiredAnnotationBeanPostProcessor(){
        this.autowiredAnnotationTypes.add(Autowired.class);
        this.autowiredAnnotationTypes.add(Value.class);
        try{
        this.autowiredAnnotationTypes.add((Class<?extends Annotation>)
        ClassUtils.forName("javax.inject.Inject",AutowiredAnnotationBeanPostProcessor.class.getClassLoader()));
        logger.trace("JSR-330 'javax.inject.Inject' annotation found and supported for autowiring");
        }
        catch(ClassNotFoundException ex){
        // JSR-330 API not available - simply skip.
        }
        }
获取Value的过程中涉及到以下几个类:
org.springframework.beans.factory.support.DefaultListableBeanFactory#doResolveDependencyorg.springframework.beans.factory.annotation.QualifierAnnotationAutowireCandidateResolver#findValueorg.springframework.context.annotation.ContextAnnotationAutowireCandidateResolver
Spring类型转换在Environment中的使用
底层实现通过:
org.springframework.core.env.PropertySourcesPropertyResolver#converrtValueIfNecessary(Object,Class)org.springframework.core.convert.ConversionService接口,默认实现类org.springframework.coree.convert.support.DefaultConversionServcie
Spring类型转换在@Value中的使用
@Value底层实现:
org.springframework.beans.factory.annotation.AutowireAnnotationBeanPostProcessor
org.springframework.beans.factory.support.DefaultListableBeanFactory#doResolveDependency
@Value类型转换底层实现:
- 接口:
org.springframework.beans.TypeConverter
默认实现:org.springframework.beans.TypeConverterDelegate,java.beans.PropetyEditor,org.springframework.core.convert.ConversionService
Spring配置属性源 PropertySource
API:
- 单配置属性源:
org.springframework.core.env.PropertySource - 多配置属性源:
org.springframework.core.env.PropertySources
注解:
- 单配置属性注解:
@org.springframework.context.annotation.PropertySource - 多配置属性注解:
@org.springframework.context.annotation.PropertySources
关联:
- 存储对象:
org.springframework.core.env.MutablePropertySources - 关联方法:
org.springframework.core.env.ConfigurableEnvironment#getPropertySources
Spring内置的配置属性源
| PropertySource类型 | 说明 |
|---|---|
| org.springframework.core.env.CommandLinePropertySource | 命令行配置属性源 |
| org.springframework.jndi.JndiPropertySource | JNDI配置属性源 |
| org.springframework.core.env.PropertiesPropertySource | properties配置属性源 |
| org.springframework.web.context.support.ServletConfigPropertySource | servlet配置属性源 |
| org.springframework.web.context.support.ServletContextPropertySource | ServletContext配置属性源 |
| org.springframework.core.env.SystemEnvironmentPropertySource | 环境变量配置属性源 |
| …… |
基于注解扩展Spring配置属性源
@PropertySource实现原理如下:
入口:
org.springframework.context.annotation.ConfigurationClassParser#doProcessConfigurationClassorg.springframework.context.annotation.ConfigurationClassParser#processPropertySource
4.3新增语义:
- 配置属性字符编码:encoding
org.springframework.core.io.support.PropertySourceFactory
适配对象:org.springframework.core.env.CompositePropertySource
基于API扩展Spring配置属性源
- 应用上下文启动前装配
PropertySource - 应用上下文启动后装配
PropertySource
public class PropertySourceDemo {
    @Value("${user.name}")
    private String userName;

    /**
     * property sources有多个user.name配置,分别是:
     * 1. systemProperties
     * 2. systemEnvironment
     * 3. pre-map-source
     * 4. suf-map-source
     *
     * @param args
     * @author Myste
     * @since 2023/7/6 16:53
     */
    public static void main(String[] args) {
        AnnotationConfigApplicationContext context = new AnnotationConfigApplicationContext();
        context.register(PropertySourceDemo.class);

        //启动之前调整environment中的property source
        ConfigurableEnvironment env = context.getEnvironment();
        MutablePropertySources propertySources = env.getPropertySources();
        //插入property source
        Map<String, Object> map = new HashMap<>();
        map.put("user.name", "mapName");
//        propertySources.addLast(new MapPropertySource("pre-map-source", map));//修改失败
        propertySources.addFirst(new MapPropertySource("pre-map-source", map));//修改成功

        context.refresh();
        PropertySourceDemo demo = context.getBean(PropertySourceDemo.class);
        System.out.println(demo.userName);

        //启动之后
        context.getEnvironment().getPropertySources().addFirst(new MapPropertySource("suf-map-source", map));
        map.put("user.name", "lastName");
        System.out.println(demo.userName);//能新增成功,但属性不会刷新

        propertySources.forEach(o -> System.out.println(o.getName()));

        context.close();
    }
}
扩展资料--测试数据源
Spring测试条件下提供了 @TestPropertySource注解,这个注解具有最高的优先级,使用方法如下:
@RunWith(SpringRunner.class)
@ContextConfiguration(classes = TestPropertySourceDemo.class)
@TestPropertySource(properties = "user.name=abc", locations = "classpath:/META-INF/user.yaml")
public class TestPropertySourceDemo {
    @Value("${user.name}")
    private String userName;
    @Autowired
    private ConfigurableEnvironment env;

    @Test
    public void testUserName() {
        boolean flag = userName.equals("abc");
        System.out.println(flag);

        for (PropertySource<?> propertySource : env.getPropertySources()) {
            System.out.println("property source name = " + propertySource.getName());
        }
    }
}
打印内容如下:
true
property source name = Inlined Test Properties
property source name = class path resource [META-INF/user.yaml]
property source name = systemProperties
property source name = systemEnvironment
Spring应用上下文
- Spring应用上下文启动准备阶段
- BeanFactory创建阶段
- BeanFactory准备阶段
- BeanFactory后置处理阶段
- BeanFactory注册BeanPostProcessor阶段
- 初始化内置Bean:MessageSource
- 初始化内置Bean:Spring事件广播器
- Spring应用上下文刷新阶段
- Spring事件监听器注册阶段
- BeanFactory初始化完成阶段
- Spring应用上下文刷新完成阶段
- Spring应用上下文启动阶段
- Spring应用上下文停止阶段
- Spring应用上下文关闭阶段
Spring应用上下文启动准备阶段
AbstractApplicationContext#prepareRefresh()方法
- 启动时间 - startupDate
- 状态标识 - closed(false)、active(true)
- 初始化 PropertySource - initPropertySources()
- 检验Environment中必须的属性
- 初始化时间监听器集合
- 初始化早期Spring事件集合
部分源码如下:
protected void prepareRefresh(){
        //startup
        this.startupDate=System.currentTimeMillis();
        //closed
        this.closed.set(false);
        //active
        this.active.set(true);
        //日志
        ...
        //初始化Environment相关的PropertySource
        initPropertySources();

        // 校验必要的属性
        // see ConfigurablePropertyResolver#setRequiredProperties
        getEnvironment().validateRequiredProperties();

        //初始化事件监听
        if(this.earlyApplicationListeners==null){
        this.earlyApplicationListeners=new LinkedHashSet<>(this.applicationListeners);
        }
        else{
        // Reset local application listeners to pre-refresh state.
        this.applicationListeners.clear();
        this.applicationListeners.addAll(this.earlyApplicationListeners);
        }

        //初始化早期事件
        this.earlyApplicationEvents=new LinkedHashSet<>();
        }
BeanFactory创建阶段
AbstractApplicationContext#obtainFreshBeanFactory方法,步骤为:
- 刷新Spring应用上下文层 BeanFactory - refreshBeanFactory()
- 如果已存在BeanFactory,将其销毁或关闭
- 创建BeanFactory - createBeanFactory()
- 设置BeanFactory id
- 设置是否允许BeanDefinition重复定义 - customizeBeanFactory(beanFactory)
- 设置是否允许循环依赖 - customizeBeanFactory(beanFactory)
- 加载 BeanDefinition - loadBeanDefinitions(beanFactory)
- 关联新建的BeanFactory到Spring应用上下文
- 返回Spring应用上下文底层 BeanFactory - getBeanFactory()
BeanFactory准备阶段
AbstractApplicationContext#prepareBeanFactory方法,步骤如下:
- 关联ClassLoader
- 设置Bean表达式解析器
- 添加PropertyEditorRegistrar实现 - ResourceEditorRegistrar
- 添加上下文Aware回调接口的BeanPostProcessor - ApplicationContextAwareProcessor
- 忽略上下文Aware回调接口作为依赖注入接口(因为Aware接口关注的是它的回调方法,而不是这个接口本身)
- 注册ResolvableDependency对象 - BeanFactory、ResourceLoader、ApplicationEventPublisher以及ApplicationContext(按类型注册)
- 注册ApplicationListenerDetector对象(ApplicationListenerDetector将单例的ApplicationListener注册到容器上下文)
- 注册LoadTimeWeaverAwareProcessor对象(SpringAOP相关)
- 注册单例对象 - Environment、JavaSystemProperties、OS环境变量
BeanFactory后置处理阶段
AbstractApplicationContext#postProcessBeanFactory方法由子类覆盖
AbstractApplicationContext#invokeBeanFactoryPostProcessors方法:
调用BeanFactoryPostProcessor或BeanDefinitionRegistry后置处理方法,主要在 PostProcessorRegistrationDelegate#invokeBeanFactoryPostProcessors 方法中进行
- 注册LoadTimeWeaverAwareProcessor对象
BeanFactory注册BeanPostProcessor阶段
AbstractApplicationContext#registerBeanPostProcessors 方法通过代理API实现,代理API为 PostProcessorRegistrationDelegate#registerBeanPostProcessors 具体步骤:
- 注册 PriorityOrdered类型的 BeanPostProcessor Beans
- 注册Ordered类型的BeanPostProcessor Beans
- 注册普通的(没有以上两个排序的)BeanPostProcessor Beans
- 注册MergedBeanDefinitionPostProcessor Beans
- 注册ApplicationListenerDetector对象
注意:PriorityOrdered的优先级比Ordered高
初始化内置Bean:MessageSource
AbstractApplicationContext#initMessageSource
默认创建 DelegatingMessageSource类型的MessageSource
SpringBoot中创建 ResourceBundleMessageSource类型的MessageSource,源码见 MessageSourceAutoConfiguration#messageSource 类中
初始化内置Bean:Spring事件广播器
AbstractApplicationContext#initApplicationEventMulticaster
Spring应用上下文刷新阶段
AbstractApplicationContext#onRefresh没有默认实现,常见的子类覆盖方法包括:
org.springframework.web.context.support.AbstractRefreshableWebApplicationContextorg.springframework.web.context.support.GenericWebApplicationContextorg.springframework.boot.web.reactive.context.ReactiveWebServerApplicationContextorg.springframework.boot.web.servlet.context.ServletWebServerApplicationContextorg.springframework.web.context.support.StaticWebApplicationContext
非Web场景下onRefresh方法基本没用,Web场景下onRefresh方法一般都与主题样式相关
Spring事件监听器注册阶段
AbstractApplicationContext#registerListeners方法:
- 添加当前应用上下文所关联的ApplicationListener集合
- 添加BeanFactory注册的ApplicationListener Beans
- 广播早期Spring事件
BeanFactory初始化完成阶段
AbstractApplicationContext#finishBeanFactoryInitialization:
- BeanFactory关联ConversionService Bean
- 添加StringValueResolver对象
- 依赖查找LoadTimeWeaverAware Bean
- BeanFActory临时 ClassLoader置为null
- BeanFactory冻结配置
- BeanFactory初始化非延迟单例Bean
Spring应用上下文刷新完成阶段
AbstractApplicationContext#finishRefresh
- 清除ResourseLoader 缓存 - clearResourceCaches() (since 5.0)
- 初始化Lifecycle Processor对象 - initLifecycleProcessor()
- 调用LifecycleProcessor#onRefresh()方法
- 发布Spring应用上下文已刷新事件
- 向MBeanServer 托管Live Beans
向MBeanServer托管Lives Beans示例:
/**
 * live beans 示例
 * spring bean 桥接到 JMX中的myBeanServer中
 * @see org.springframework.context.support.LiveBeansView registerApplicationContext方法
 * @see org.springframework.context.support.AbstractApplicationContext finishRefresh方法
 * @author Myste
 * @since 2023/7/7 9:20
 */
public class LiveBeansDemo {
    public static void main(String[] args) throws IOException {
        //添加live beans view 的 object name domain
        System.setProperty(LiveBeansView.MBEAN_DOMAIN_PROPERTY_NAME, "top.sunyog");
        AnnotationConfigApplicationContext context = new AnnotationConfigApplicationContext();
        context.register(LiveBeansDemo.class);

        context.refresh();

        System.out.println("按任意键继续");
        System.in.read();

        context.close();
    }
}
Spring应用上下文启动阶段
AbstractApplicationContext#start
- 启动LifecycleProcessor
- 依赖查着LifecycleBeans
- 启动LifeCycleBeans
- 发布Spring应用上下文事件
Spring应用上下文停止阶段
AbstractApplicationContext#stop
- 停止LifecycleProcessor
- 依赖查着LifecycleBeans
- 停止LifeCycleBeans
- 发布Spring应用上下文事件
Lifecycle接口的使用方法如下:
public class MyLifeCycle implements Lifecycle {
    private boolean running;

    @Override
    public void start() {
        this.running = true;
        this.printMsg();
    }

    private void printMsg() {
        System.out.printf("MyLifeCycle运行状态 running is %b \n", running);
    }

    @Override
    public void stop() {
        this.running = false;
        this.printMsg();
    }

    @Override
    public boolean isRunning() {
        return running;
    }
}

//main方法
public class LifecycleContextDemo {
    public static void main(String[] args) {
        GenericApplicationContext context = new GenericApplicationContext();
        BeanDefinitionBuilder builder = BeanDefinitionBuilder.genericBeanDefinition(MyLifeCycle.class);
        context.registerBeanDefinition("myLifecycle", builder.getBeanDefinition());

        context.refresh();

        context.start();
        context.stop();
        context.close();
    }
}
Spring应用上下文关闭阶段
AbstractApplicationContext#close方法步骤:
- 状态标识:active(false)、closed(true)
- Lives Beans JMX撤销托管:
LiveBeansView#unregisterApplicationContext - 发布Spring应用上下文已关闭事件
- 关闭LifecycleProcessor
- 依赖查找Lifecycle Beans
- 停止Lifecycle Beans
- 销毁SpringBeans
- 关闭BeanFactory
- 回调onClose(),没有模式实现,子类容器也没有实现
- 注册Shutdown Hook线程(如果已注册),ShutdownHook通过
AbstractApplicationContext#registerShutdownHook方法注册
扩展
JNDI和服务定位模式
JNDI全称 Java Naming and Directory Interface(Java命名和目录接口),其定义了一系列接口**,可以使用命名约定,**如:java: com/env/jdbc,向服务器获取相关的资源,具体的实现需要各系统自行完成,如JDBC的实现、域名解析、LDAP等。JNDI所包含的基本接口在
javax.naming.*包中可以查到
服务定位模式考虑到使用JNDI定位服务的代价很高,引入了缓存。当在JNDI中查找到对应的服务之后,会将该服务保存到缓存中,下次再使用相同的服务时直接在缓存中获取。具体实现方式如图:
第一次查询服务A
客户端向ServiceLoader获取服务A,发现缓存中不存在此服务,通过JNDI获取服务,并将此服务放到缓存中
第二次查询服务A
客户端向ServiceLoader获取服务A,发现缓存中存在此服务,直接返回服务A
参考资料
《spring in action》
《spring boot in action》
《spring boot编程思想(核心篇)》
《spring boot编程思想(运维篇)》
《Effective Java》