SpringCloudAlibaba微服务框架入门
Nacos服务注册中心和配置中心
Nacos (NamingConfigurationService缩写),一个更易于构建云原生应用的动态服务发现、配置管理和服务管理平台。(相当于eureka+config+bus)
Nacos服务器源码打包,部署
- git下载nacos源码
git clone https://github.com/alibaba/nacos.git- 修改nacos配置文件,添加数据库配置
   #*************** Config Module Related Configurations ***************#
   ### If use MySQL as datasource:
   spring.datasource.platform=mysql

   ### Count of DB:
   db.num=1

   ### Connect URL of DB:
   db.url.0=jdbc:mysql://172.16.211.101:3306/nacos_config?characterEncoding=utf8&connectTimeout=1000&socketTimeout=3000&autoReconnect=true&useUnicode=true&useSSL=false&serverTimezone=UTC
   db.user.0=root
db.password.0=Leej090710.- mysql数据库中创建nacos_config数据库,并导入数据库数据
   create databases nacos_config;
   use nacos_config;
   source /app/nacos/conf/nacos-config.sql;
启动nacos代码,启动类在console模块中
浏览器访问
localhost:8848/nacos进入后台管理界面
Nacos服务注册中心配置
生产者微服务
- 创建项目,添加依赖
   <dependencies>
       <dependency>
           <groupId>com.alibaba.cloud</groupId>
           <artifactId>spring-cloud-starter-alibaba-nacos-discovery</artifactId>
       </dependency>
       <dependency>
           <groupId>org.springframework.boot</groupId>
           <artifactId>spring-boot-starter-web</artifactId>
       </dependency>
       <dependency>
           <groupId>org.springframework.boot</groupId>
           <artifactId>spring-boot-starter-actuator</artifactId>
       </dependency>
       <dependency>
           <groupId>org.springframework.boot</groupId>
           <artifactId>spring-boot-starter-test</artifactId>
       </dependency>
       <dependency>
           <groupId>org.springframework.boot</groupId>
           <artifactId>spring-boot-devtools</artifactId>
           <scope>runtime</scope>
           <optional>true</optional>
       </dependency>
       <dependency>
           <groupId>org.projectlombok</groupId>
           <artifactId>lombok</artifactId>
           <optional>true</optional>
       </dependency>
</dependencies>- 启动类
   //Nacos支持服务发现注解
   @EnableDiscoveryClient
   @SpringBootApplication
   public class NacosProvicer9001Application {
       public static void main(String[] args) {
           SpringApplication.run(NacosProvicer9001Application.class);
       }
}- 配置文件
   server.port=9001
   spring.application.name=cloud-nacos-provider
   # 配置nacos服务地址
   spring.cloud.nacos.discovery.server-addr=127.0.0.1:8848
management.endpoints.web.exposure.include=*- 创建测试controller
   @RequestMapping("/nacos/payment")
   @RestController
   public class NacosPaymentController {
       @Value("${server.port}")
       private String currPort;

       @GetMapping("/test")
       public String getTest(){
           return "Nacos 服务生产者已启动,端口号:"+currPort+"\t==========>"+System.currentTimeMillis();
       }
   }
启动服务,浏览器访问:
localhost:9001/nacos/payment/test,测试服务部署是否成功IDEA中通过run configuration界面复制9001服务启动器,添加VM options参数,创建和9001同样的微服务
-DServer.port=9003消费者微服务
pom文件、启动类、配置文件和生产者相同
添加
RestTemplate配置类
   @Configuration
   public class AppRestTemplateConfig {
     	//nacos继承了ribbon,原生支持负载均衡
       @LoadBalanced
       @Bean
       public RestTemplate getRestTemplate(){
           return new RestTemplate();
       }
}- 创建controller类调用生产者服务
   @RestController
   @RequestMapping("/nacos/order")
   @Slf4j
   public class NacosOrderController {
       @Autowired
       private RestTemplate restTemplate;

       private String PROVIDER_URL="http://cloud-nacos-provider";


       @GetMapping("/test")
       public String testPayment(){
           return restTemplate.getForObject(PROVIDER_URL+"/nacos/payment/test",String.class);
       }
}- 启动服务,浏览器访问
http://localhost:83/nacos/order/test,并多次调用,查看是否实现负载均衡
服务注册中心对比
| Nacos | Eureka | Consul | CoreDNS | Zookeeper | |
|---|---|---|---|---|---|
| 一致性协议 | cp+ap | ap | cp | / | cp |
| 健康检查 | TCP/HTTP/MySQL/ClientBeat | ClientBeat | TCP/HTTP/gRPC/Cmd | / | ClientBeat |
| 负载均衡 | 权重/DSL/metadata/CMDB | Ribbon | Fabio | RR | / |
| 雪崩保护 | 支持 | 支持 | 不支持 | 不支持 | 不支持 |
| 自动注销实例 | 支持 | 支持 | 不支持 | 不支持 | 支持 |
| 访问协议 | HTTP/DNS/UDP | HTTP | HTTP/DNS | DNS | TCP |
| 监听支持 | 支持 | 支持 | 支持 | 不支持 | 支持 |
| 多数据中心 | 支持 | 支持 | 支持 | 不支持 | 不支持 |
| 跨注册中心 | 支持 | 不支持 | 支持 | 不支持 | 不支持 |
| SpringCloud集成 | 支持 | 支持 | 支持 | 不支持 | 不支持 |
| Dubbo集成 | 支持 | 不支持 | 不支持 | 不支持 | 支持 |
| K8s集成 | 支持 | 不支持 | 支持 | 支持 | 不支持 |
Nacos支持CP和AP一致性协议切换。(其中,C指数据一致性,即所有节点在同一时间看到的数据都是一致的;A指高可用性,即对所有节点的请求都会得到响应;)。
如果不需要存储服务级别的信息切服务实例通过nacos-client注册,并能够保持心跳上报,就可以选择AP模式,当前主流服务,如SpringCloud和Dubbo都适用于AP模式,AP模式为了服务的可用性牺牲了一致性,因此,AP模式下只支持注册临时实例。
如果需要在服务级别编辑或存储配置信息,那么CP是必须的,K8S和DNS服务则适用于CP模式。CP模式下支持注册持久化实例,此时则是以Raft协议为集群运行模式,该模式下注册实例之前必须先注册服务,若服务不存在,则会返回错误。使用如下命令开启CP模式
curl -X PUT "$NACOS_SERVER:8848/nacos/v1/ns/operator/switches?entry=serverMode&value=CP"Nacos做服务配置中心
基本配置
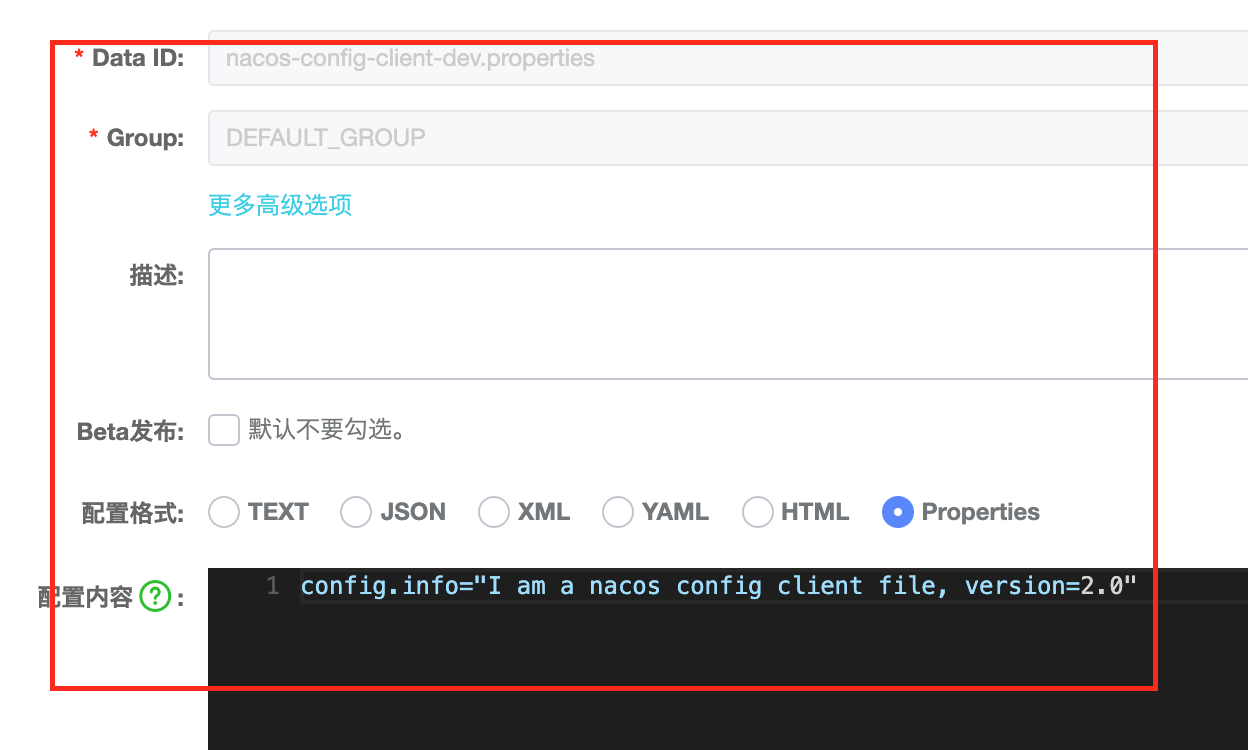
Nacos管理页面,配置管理 > 配置列表 > +进入新增配置文件界面
创建项目,添加nacos配置客户端依赖、服务发现依赖
   <dependencies>
       <!--nacos 配置中心-->
       <dependency>
           <groupId>com.alibaba.cloud</groupId>
           <artifactId>spring-cloud-starter-alibaba-nacos-config</artifactId>
       </dependency>
       <!--nacos 注册中心-->
       <dependency>
           <groupId>com.alibaba.cloud</groupId>
           <artifactId>spring-cloud-starter-alibaba-nacos-discovery</artifactId>
       </dependency>
       <dependency>
           <groupId>org.springframework.boot</groupId>
           <artifactId>spring-boot-starter-web</artifactId>
       </dependency>
       <dependency>
           <groupId>org.springframework.boot</groupId>
           <artifactId>spring-boot-starter-actuator</artifactId>
       </dependency>
       <dependency>
           <groupId>org.springframework.boot</groupId>
           <artifactId>spring-boot-devtools</artifactId>
           <scope>runtime</scope>
           <optional>true</optional>
       </dependency>
       <dependency>
           <groupId>org.springframework.boot</groupId>
           <artifactId>spring-boot-starter-test</artifactId>
       </dependency>
       <dependency>
           <groupId>org.projectlombok</groupId>
           <artifactId>lombok</artifactId>
           <optional>true</optional>
       </dependency>
</dependencies>- 编辑bootstrap.properties配置文件
   server.port=3377
   spring.application.name=nacos-config-client
   spring.cloud.nacos.discovery.server-addr=localhost:8848
   spring.cloud.nacos.config.server-addr=localhost:8848
   # 指定配置文件格式为properties文件
   spring.cloud.nacos.config.file-extension=properties
   spring.profiles.active=dev
   # 配置文件匹配格式如下,即nacos-config-client-dev.properties
# ${spring.application.name}-${spring.profile.active}.${spring.cloud.nacos.config.file-extension}- 创建启动类
   @SpringBootApplication
   @EnableDiscoveryClient
   public class NacosConfigClientApp {
       public static void main(String[] args) {
           SpringApplication.run(NacosConfigClientApp.class);
       }
}- 创建controller类
   @RestController
   @RequestMapping("/nacos/config")
   @RefreshScope
   @Slf4j
   public class NacosConfigController {
       @Value("${server.port}")
       private String currPort;
       @Value("${config.info}")
       private String configInfo;

       @GetMapping("/info")
       public String getConfigInfo(){
           String res="Nacos Config Client: "+currPort+"\tMy Config Info = "+configInfo;
           log.info(res);
           return res;
       }
   }
启动服务,获取配置信息
Nacos管理页面修改配置文件,重新获取配置信息,可见配置信息已经同步变化
分类配置
命名空间 > 分组 > 服务(namespace > group > service),默认情况下namespace=public,group=DEFAULT_GROUP,Cluster=default。
namespace主要用来实现隔离,如存在开发、生产、测试三个环境,可以创建三个namespace,不同namespace之间相互隔离。
group可以吧不同的微服务划分到不同的分组里,不同的分组使用不同的配置信息。
service表示服务,一个service可以包含多个cluster(集群),Cluster是对微服务的虚拟划分,如:杭州机房的微服务集群名称为HZ,广州机房的微服务集群名称为GZ,可以让同一个机房中的微服务互相调用,提升性能。
instance表示微服务实例。
分组配置:
在nacos管理页面创建配置文件时,修改GROUP名称,如:DEV_GROUP
在微服务端增加GROUP的配置
spring.cloud.nacos.config.group=DEV_GROUP- 浏览器访问获取最新配置信息
命名空间配置
在nacos管理页面 > 命名空间中新增命名空间,如:sahnghai
在配置管理页面可以看到多了shanghai选项,在此页中新增配置文件
微服务端增加namespace的配置
   # 此处应该是namespace id,不是namespace名称
spring.cloud.nacos.config.namespace=b433593d-0064-47a4-82b7-348ca60a7098- 浏览器访问获取最新配置
Nacos集群和持久化配置
Nacos默认自带嵌入式数据库derby。 0.7 版本之后,开始支持MySQL作为一致性存储。配置集群时,需要切换到Mysql数据库作为默认存储。Nacos解压后,在conf文件中有一个nacos-config.sql文件,为mysql数据库初始化文件,需要提前将数据库信息初始化到MySQL中。
持久化配置
实现持久化配置需要在conf文件下的application.properties文件中新增以下配置,重启后即可实现持久化配置
#*************** Config Module Related Configurations ***************#
### If use MySQL as datasource:
spring.datasource.platform=mysql

### Count of DB:
db.num=1

### Connect URL of DB:
db.url.0=jdbc:mysql://172.16.211.101:3306/nacos_config?characterEncoding=utf8&connectTimeout=1000&socketTimeout=3000&autoReconnect=true&useUnicode=true&useSSL=false&serverTimezone=UTC
db.user.0=root
db.password.0=Leej090710.
集群配置
下载Nacos包,并解压文件
修改application.properties配置文件,实现持久化
修改conf/cluster.conf配置文件
   172.16.211.101:8846
   172.16.211.101:8847
172.16.211.101:8848- 修改bin/startup.sh文件,实现按不同端口号启动
   # 增加参数a
   while getopts ":m:f:s:c:p:a:" opt
   do
       case $opt in
           a)
               PORT=$OPTARG;;
           m)
               MODE=$OPTARG;;
           f)
               FUNCTION_MODE=$OPTARG;;
           s)
               SERVER=$OPTARG;;
           c)
               MEMBER_LIST=$OPTARG;;
           p)
               EMBEDDED_STORAGE=$OPTARG;;
           ?)
           echo "Unknown parameter"
           exit 1;;
       esac
   done

   # 143行
nohup $JAVA -Dserver.port=${PORT} ${JAVA_OPT} nacos.nacos >> ${BASE_DIR}/logs/start.out 2>&1 &- 配置nginx,作为nacos集群vip,配置文件为
/usr/local/nginx/conf/nginx.conf,nginx安装
   #修改代理
   upstream cluster{
       server 127.0.0.1:8846;
       server 127.0.0.1:8847;
       server 127.0.0.1:8848;
   }
   #修改监听
   server {
       listen       1111;
       server_name  localhost;

       #修改代理
       location / {
           proxy_pass http://cluster;
       }

       error_page   500 502 503 504  /50x.html;
       location = /50x.html {
           root   html;
       }
}- 启动nacos集群
   sh ./bin/startup.sh -a 8846
   sh ./bin/startup.sh -a 8847
   sh ./bin/startup.sh -a 8848
   # 查看集群启动情况
   ps -ef|grep nacos|grep -v grep|wc -l
注意Nacos服务占用内存较大,单台Nacos服务需要虚拟机配置内存超过2G
- 启动nginx
   # 启动nginx
   ./naginx
   # 刷新配置文件
   ./nginx -s reload
   # 关闭nginx
   ./nginx -s stop
浏览器访问http://172.16.211.101:1111/nacos进入nacos管理界面
nacos客户端配置文件nacos地址需要修改为nginx的访问路径,实现服务注册
Sentinel服务熔断和限流
Sentinel,面向云原生微服务的流量监控、熔断降级组件。Sentinel中文介绍,Sentinel官网
| Hystrix | Sentinel |
|---|---|
| 需要自己手动搭建监控平台 | 单独一个组件,可以独立出来 |
| 没有web界面进行细粒度化的配置流量、速率监控,服务熔断、降级 | 直接界面化的细粒度统一配置 |
Sentinel分为两部分,核心库和控制台。核心库(Java客户端)不依赖于任何框架库,能够运行于所有java运行时环境,同时对Dubbo/SpringCloud等框架有较好的支持;控制台(Dashboard)基于Springboot开发,打包后可以直接运行,不需要额外的tomcat应用器。
Sentinel控制台安装
- 下载Sentinel控制台jar包
- 执行
java -jar命令,启动SentinelDashboard服务 - 浏览器访问
localhost:8080进入管理界面,用户名、密码为sentinel
Sentinel客户端基本配置
- 创建项目,添加pom依赖
   <dependencies>
       <!--centinel依赖包-->
       <dependency>
           <groupId>com.alibaba.cloud</groupId>
           <artifactId>spring-cloud-starter-alibaba-sentinel</artifactId>
       </dependency>
       <!--持久化需要用到-->
       <dependency>
           <groupId>com.alibaba.csp</groupId>
           <artifactId>sentinel-datasource-nacos</artifactId>
       </dependency>
       <dependency>
           <groupId>org.springframework.cloud</groupId>
           <artifactId>spring-cloud-starter-openfeign</artifactId>
       </dependency>
       <dependency>
           <groupId>com.alibaba.cloud</groupId>
           <artifactId>spring-cloud-starter-alibaba-nacos-discovery</artifactId>
       </dependency>
       <dependency>
           <groupId>org.springframework.boot</groupId>
           <artifactId>spring-boot-starter-web</artifactId>
       </dependency>
       <dependency>
           <groupId>org.springframework.boot</groupId>
           <artifactId>spring-boot-starter-actuator</artifactId>
       </dependency>
       <dependency>
           <groupId>org.springframework.boot</groupId>
           <artifactId>spring-boot-starter-test</artifactId>
       </dependency>
       <dependency>
           <groupId>org.springframework.boot</groupId>
           <artifactId>spring-boot-devtools</artifactId>
           <scope>runtime</scope>
           <optional>true</optional>
       </dependency>
       <dependency>
           <groupId>org.projectlombok</groupId>
           <artifactId>lombok</artifactId>
           <optional>true</optional>
       </dependency>
</dependencies>- 配置文件增加sentinel配置
   server.port=8401
   spring.application.name=cloud-sentinel-service
   spring.cloud.nacos.discovery.server-addr=172.16.211.101:1111
   # sentinel控制台位置
   spring.cloud.sentinel.transport.dashboard=localhost:8080
   # 默认为8719端口,被占用后会自动从8719 +1依次扫描,直到找到未被占用的端口
   spring.cloud.sentinel.transport.port=8719
management.endpoints.web.exposure.include=*- 创建服务监控测试controller
   @RestController
   @RequestMapping("/sentinel")
   public class FlowLimitController {

       @GetMapping("/test")
       public String test(){
           return "==========Test A===========";
       }

       @GetMapping("/test2")
       public String test2(){
           return "==========Test B===========";
       }
   }
访问监控测试,访问路径
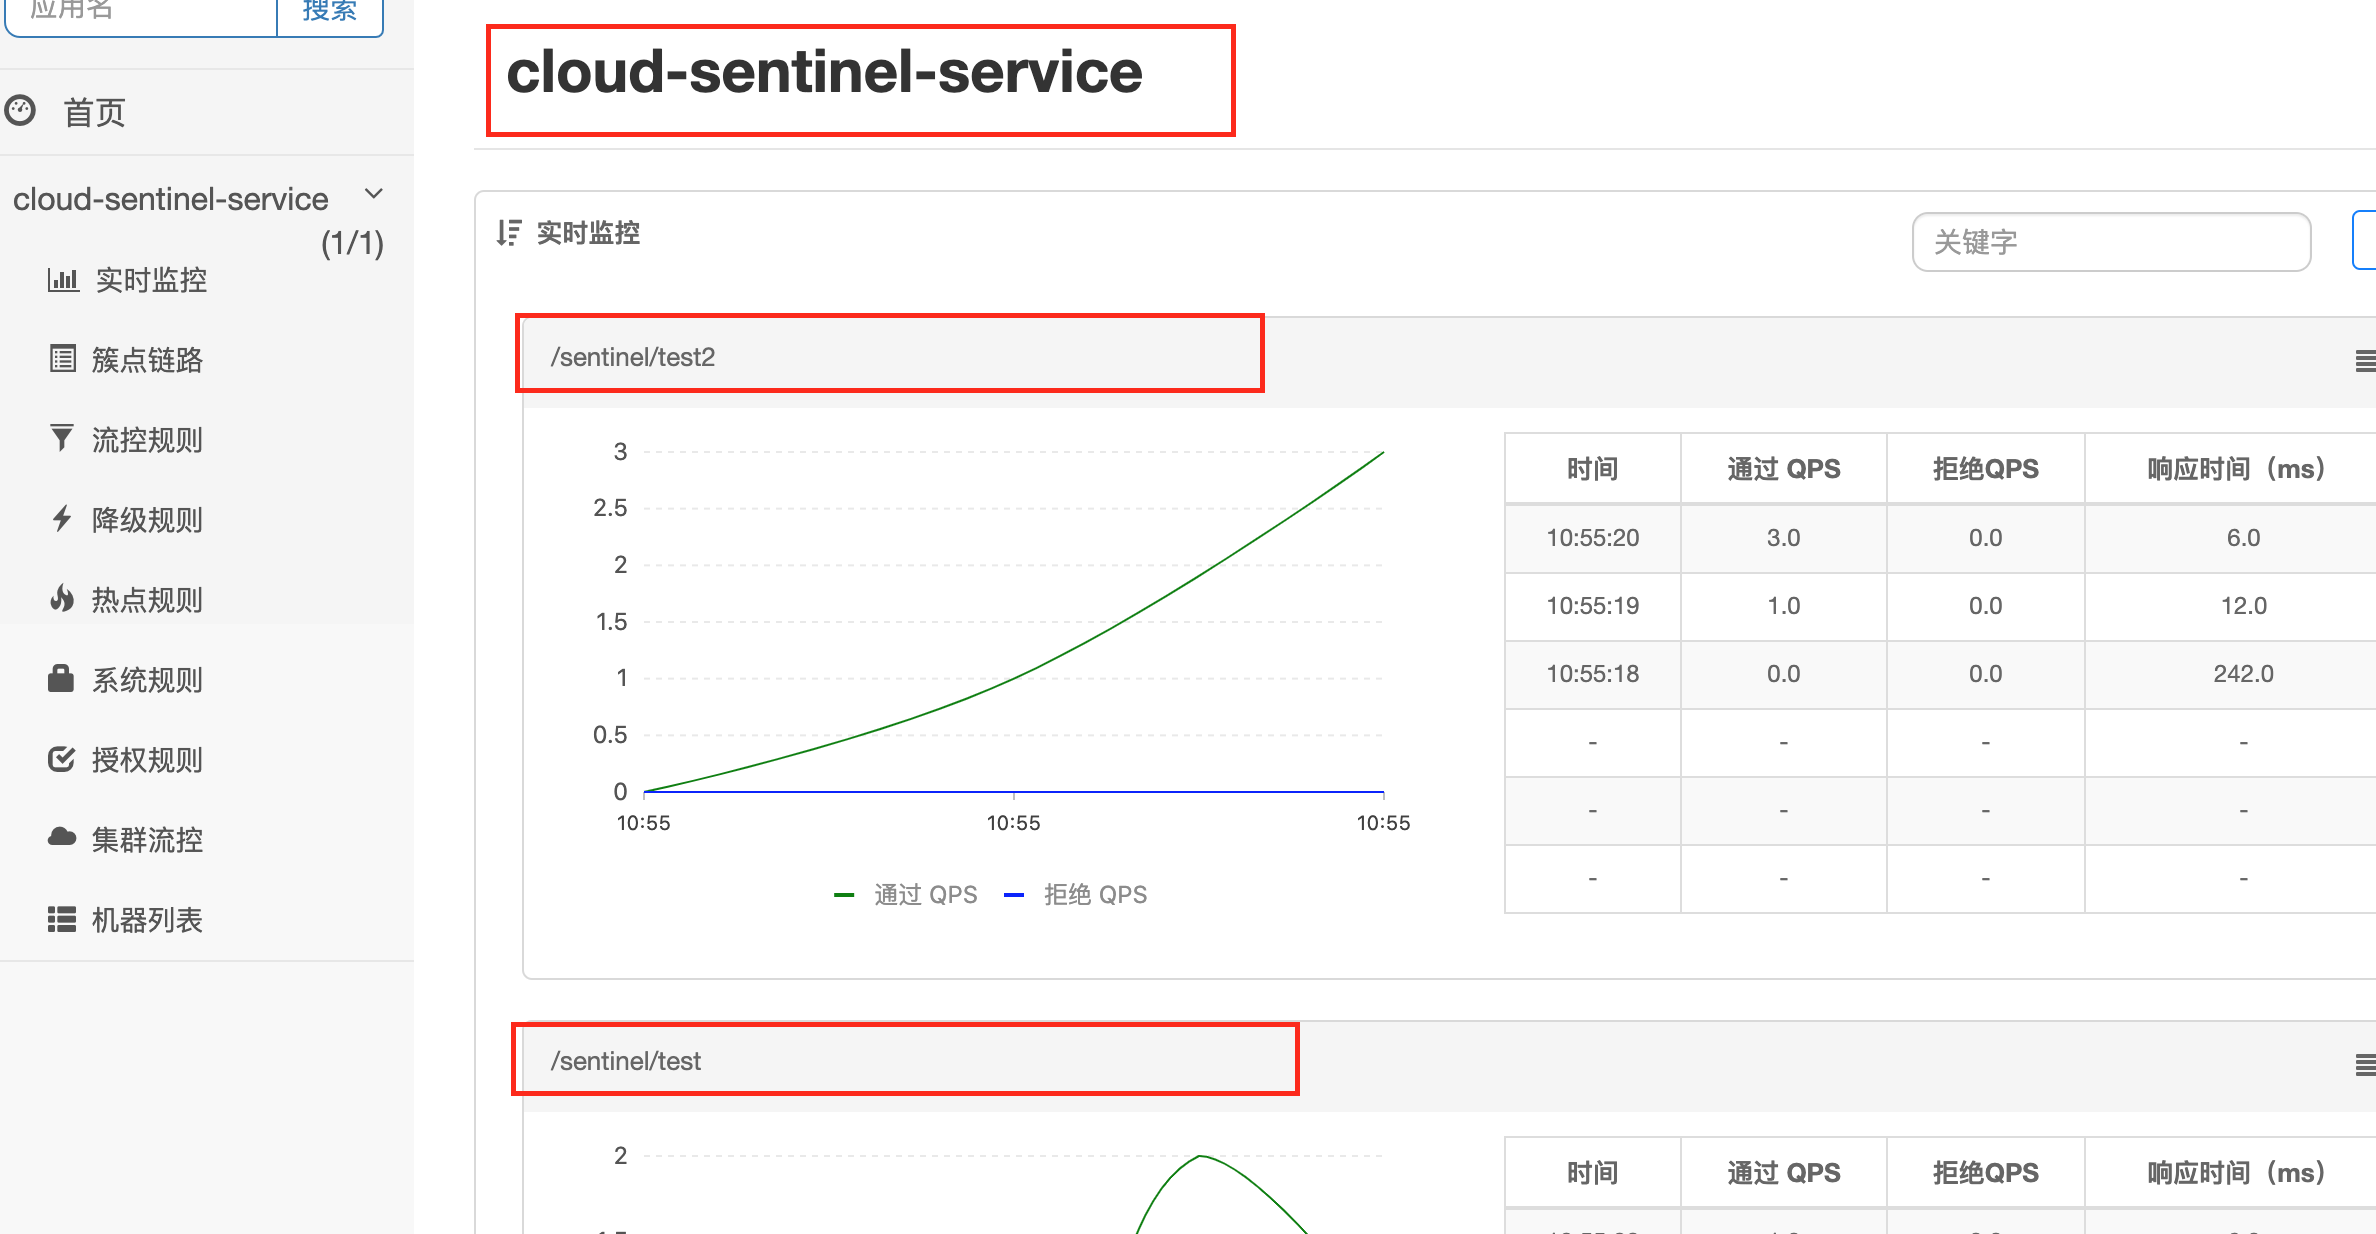
localhost:8401/sentinel/testSentinel控制台查看微服务实时监控
SentinelDashboard配置流控规则
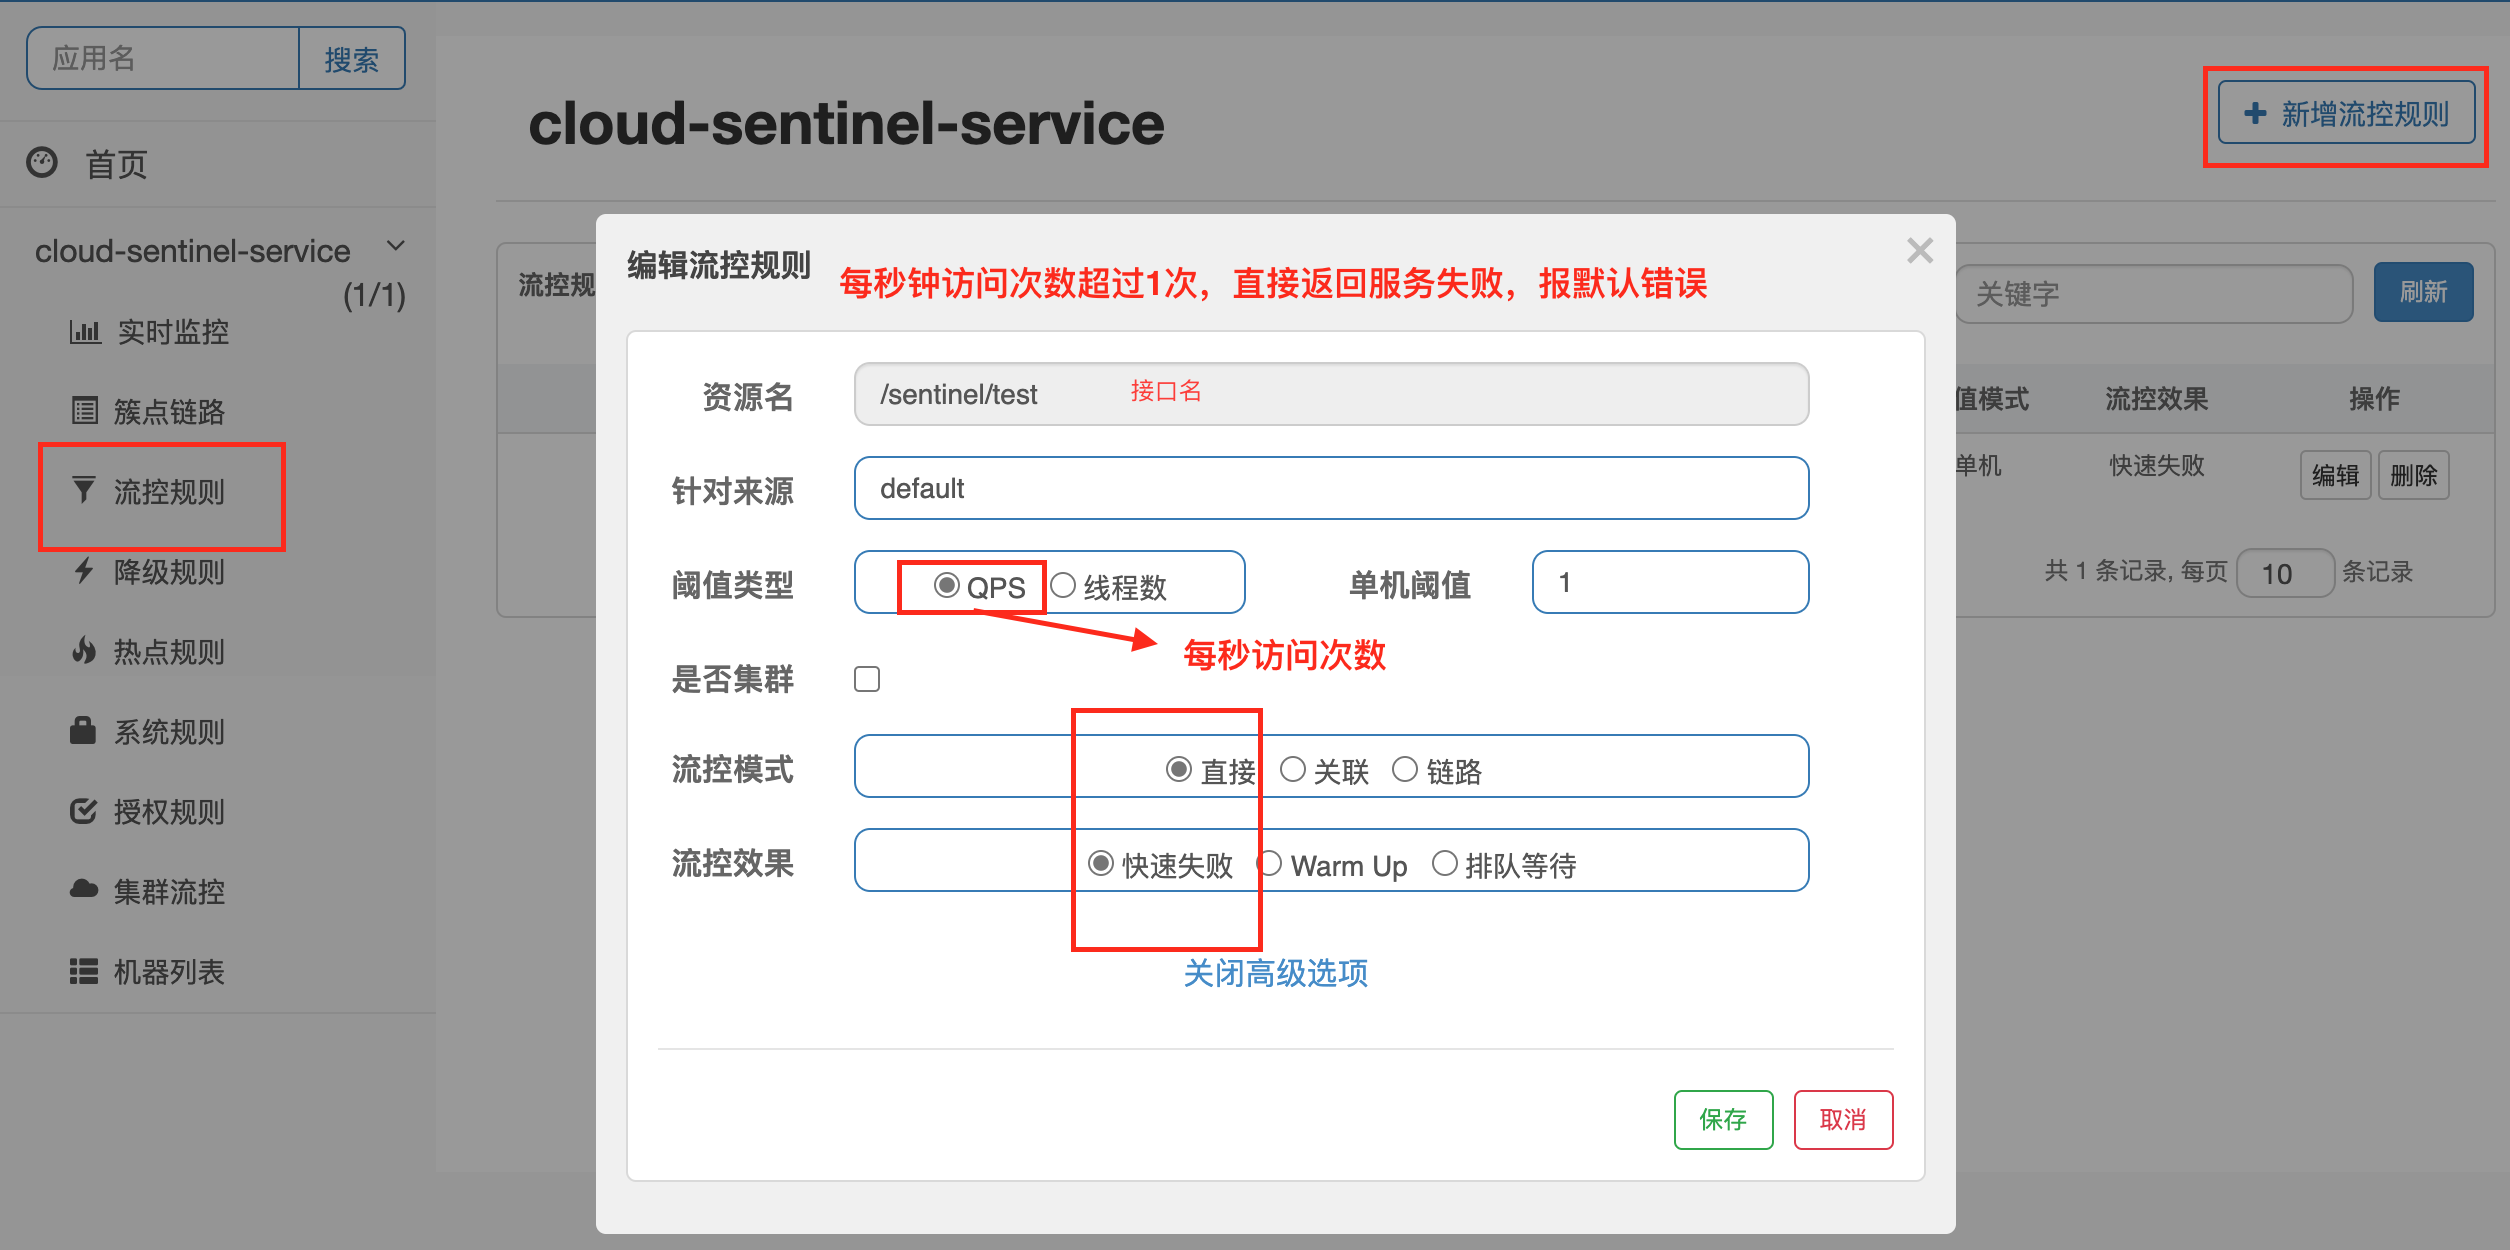
阈值类型
- QPS,表示每秒访问次数
- 单机阈值,表示每秒钟访问次数超过1次,则进入流量监控管理
- 线程数,表示处理请求时,如果线程数超过阈值,则进入流量监控管理
流控模式
直接,QPS超过1后,直接采取操作(失败、警告、等待)
关联,当关联的资源B达到阈值后(即B的QPS超过1),就限流自己。常用于支付接口达到阈值,限流订单接口
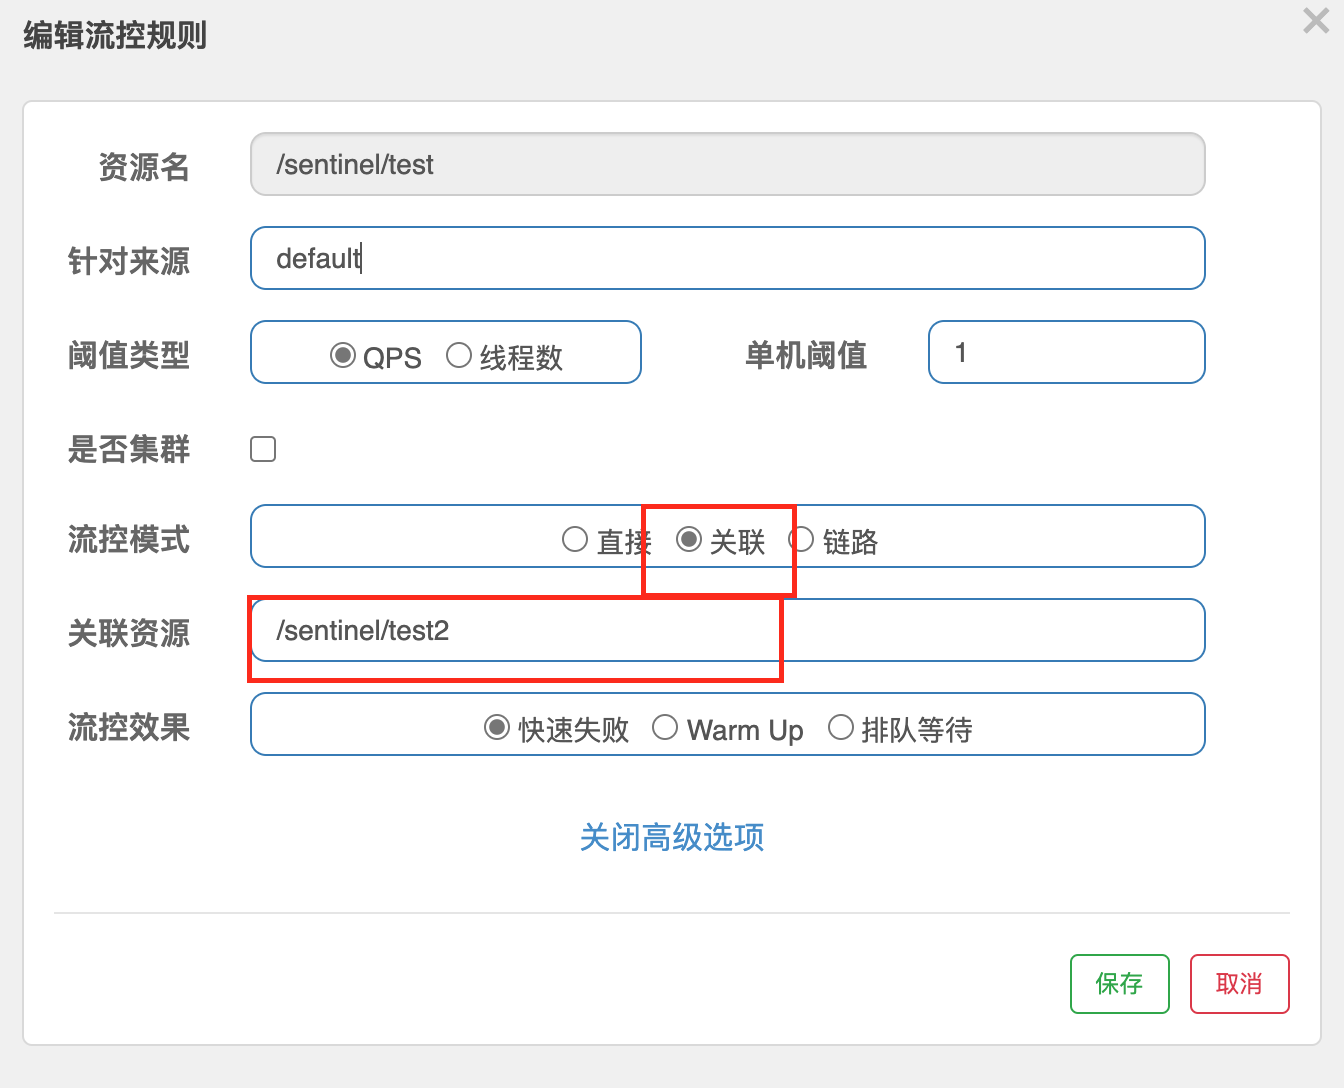
以上配置保存后,通过postman集合访问/sentinel/text2接口,循环20次,每300毫秒访问一次。循环开始后浏览器访问/sentinel/test接口,可以看出,test接口返回
Blocked by Sentinel (flow limiting)链路
流控效果
快速失败,直接失败,返回默认失败结果,源码来自
com.alibaba.csp.sentinel.slots.block.flow.controller.DefaultControllerWarm Up(预热),阈值 / coldFactor=初始单机阈值,最开始阈值为初始单机阈值,经过预热时长后才会达到阈值。coldFactor(冷加载因子)默认为3,源码来自
com.alibaba.csp.sentinel.slots.block.flow.controller.WarmUpController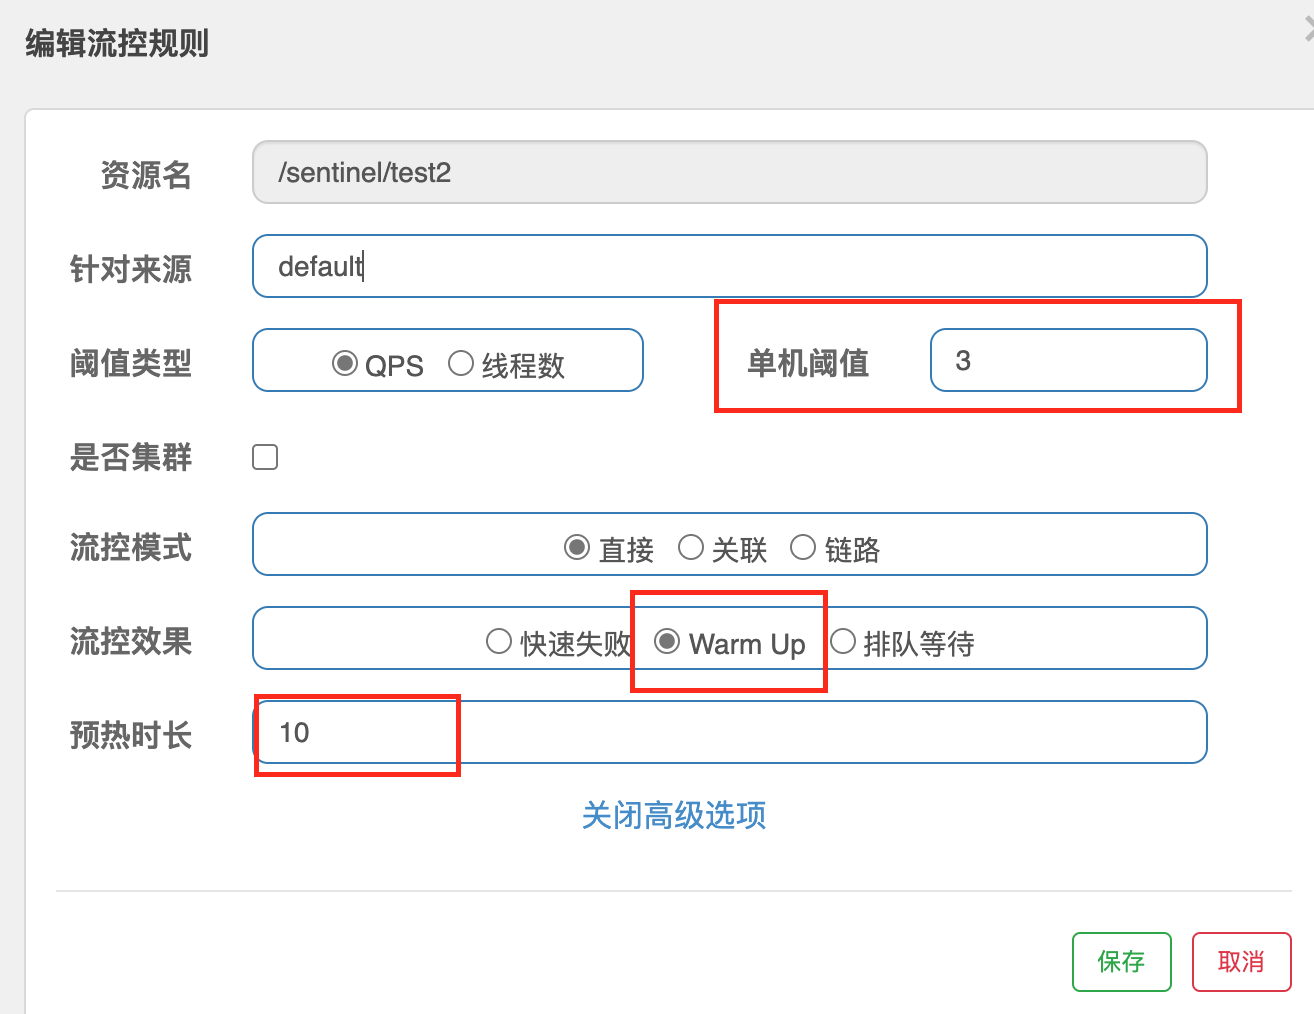
以上配置表示:QPS激增后,前10秒为预热时间,此时单机阈值为3 / 3 = 1,当QPS超过1则直接限流,10秒之后,单机阈值改为3,即当QPS超过3后限流。通常用于,秒杀系统在开启的瞬间会有很大访问量上来,预热是为了保护系统,慢慢的把流量放进来。
排队等待,所有请求进入系统后以均匀的速度通过,这种效果下,阈值类型必须是QPS,否则无效。
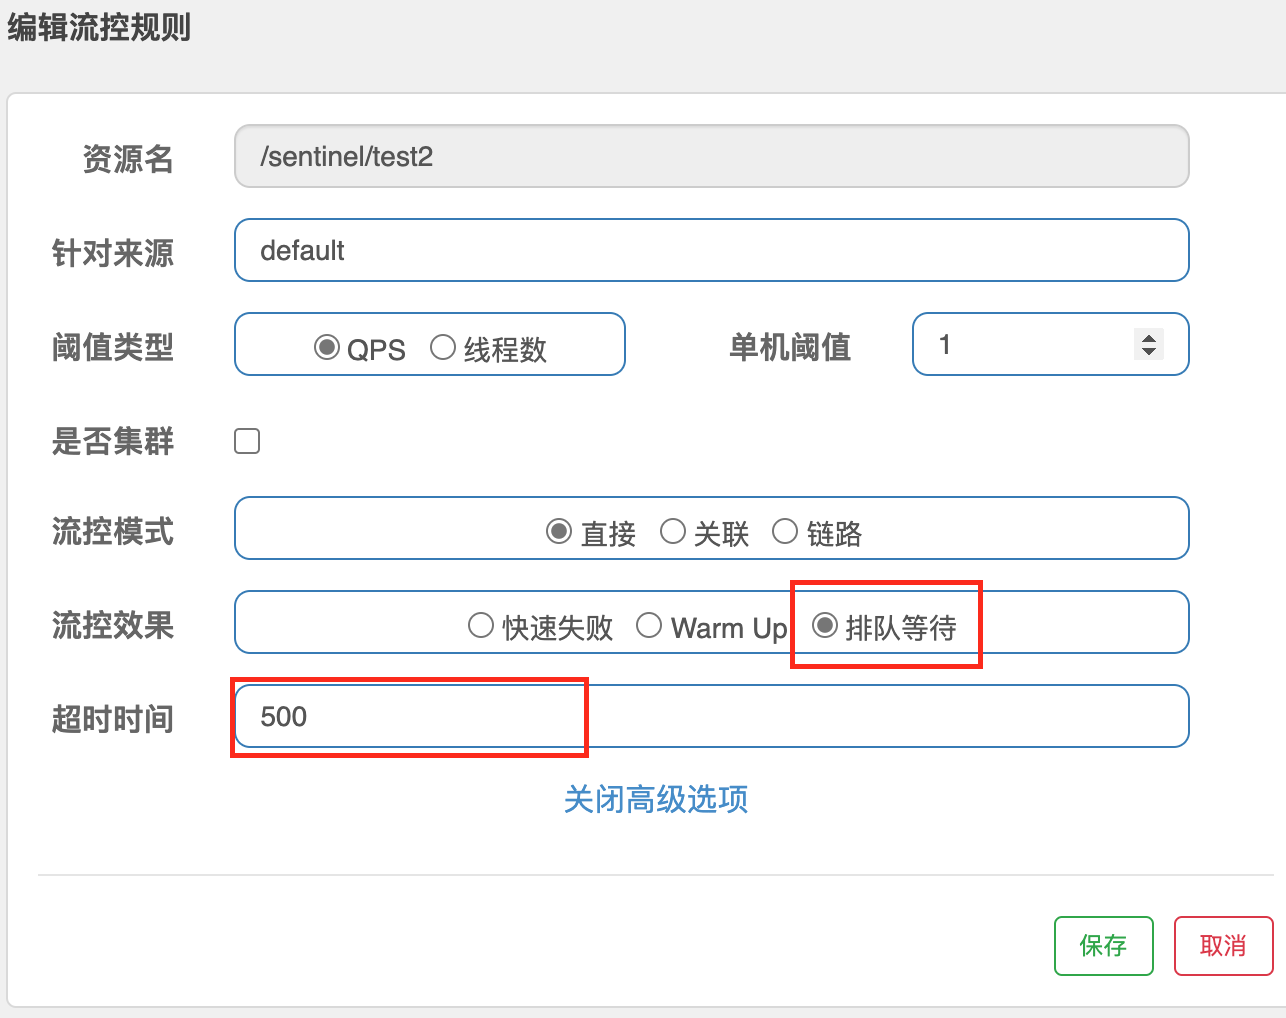
以上配置表示,每秒处理1个请求,超过1个请求则排队等待(匀速排队),等待超时时间时间500毫秒。匀速排队方式会严格控制请求通过的时间,对应的是漏桶算法。
这种方式主要用于处理间隔性突发的流量。如,消息队列,在某一秒有大量的消息到来,而接下来的几秒处于空现状他,我们希望系统能够在接下来的空闲时间逐渐处理这些请求,而不是在第一秒直接拒绝多余的请求。
SentinelDashboard配置降级规则
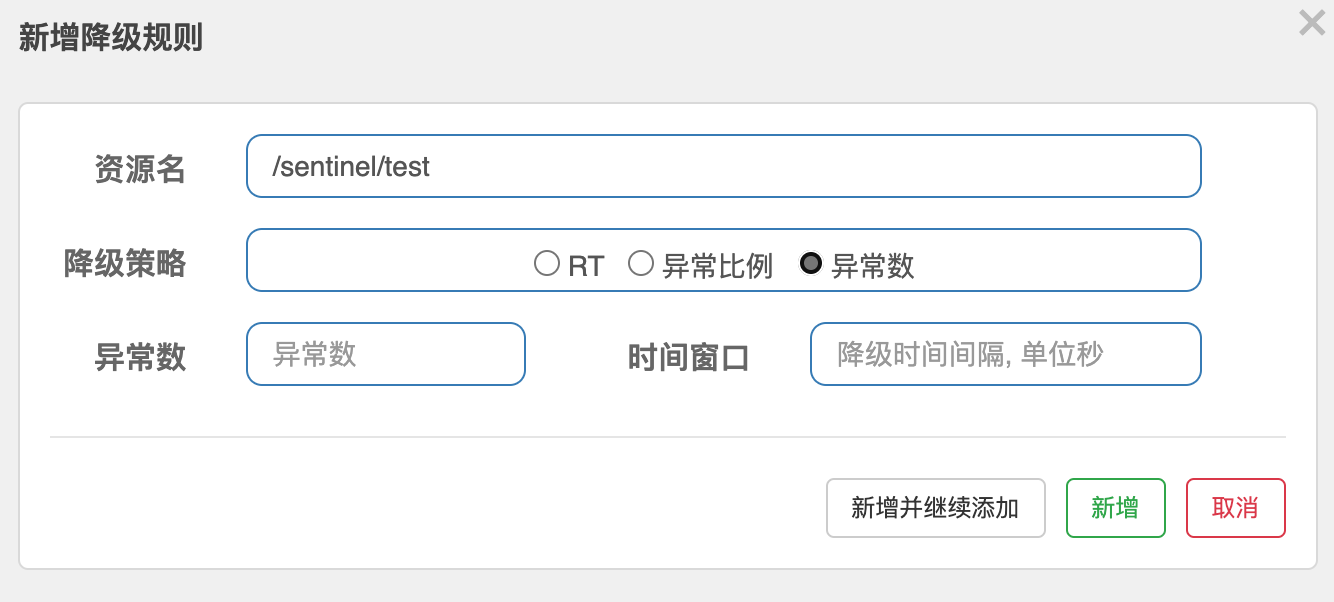
Sentinel熔断降级会在调用链路中某一个资源出现不稳定状态(如调用超时或异常比例升高)时,对这个资源的调用进行限制,让请求快速失败,避免影响到其他资源而导致级联错误,当资源被降级后,在接下来的时间窗口之内,对该资源的调用都自动熔断(默认时抛出DegradeException异常),和Hystrix不同的是Sentinel的熔断没有半开状态。
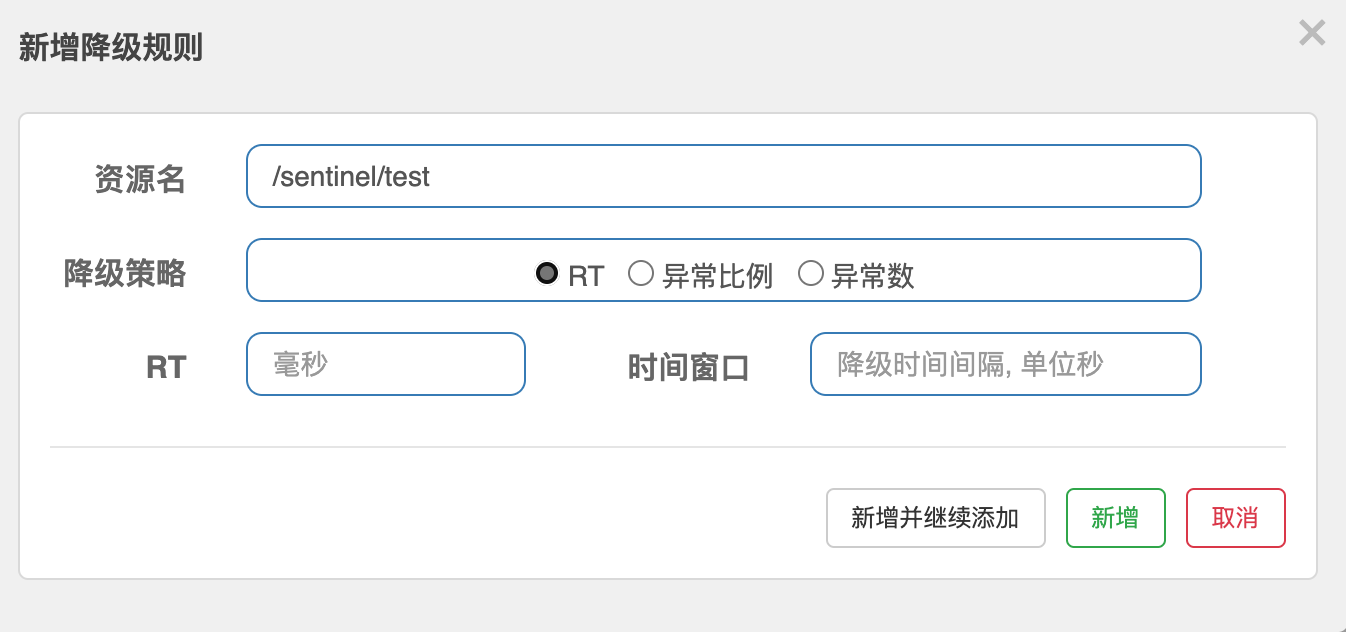
降级策略包括:RT(平均响应时间)、异常比例、异常数三种
RT,平均响应时间超出阈值 且 在时间窗口内通过的请求数 >= 5,两个条件同时满足后触发降级。窗口期过后关闭断路器。其中RT最大值为 4900 (更大值需要通过-Dcsp.sentinel.statistic.max.rt=XXX参数才能生效);
异常比例,QPS >= 5且异常比例(每秒异常总数占通过量的比值)值超过阈值时,触发降级,时间窗口期结束后,关闭降级;
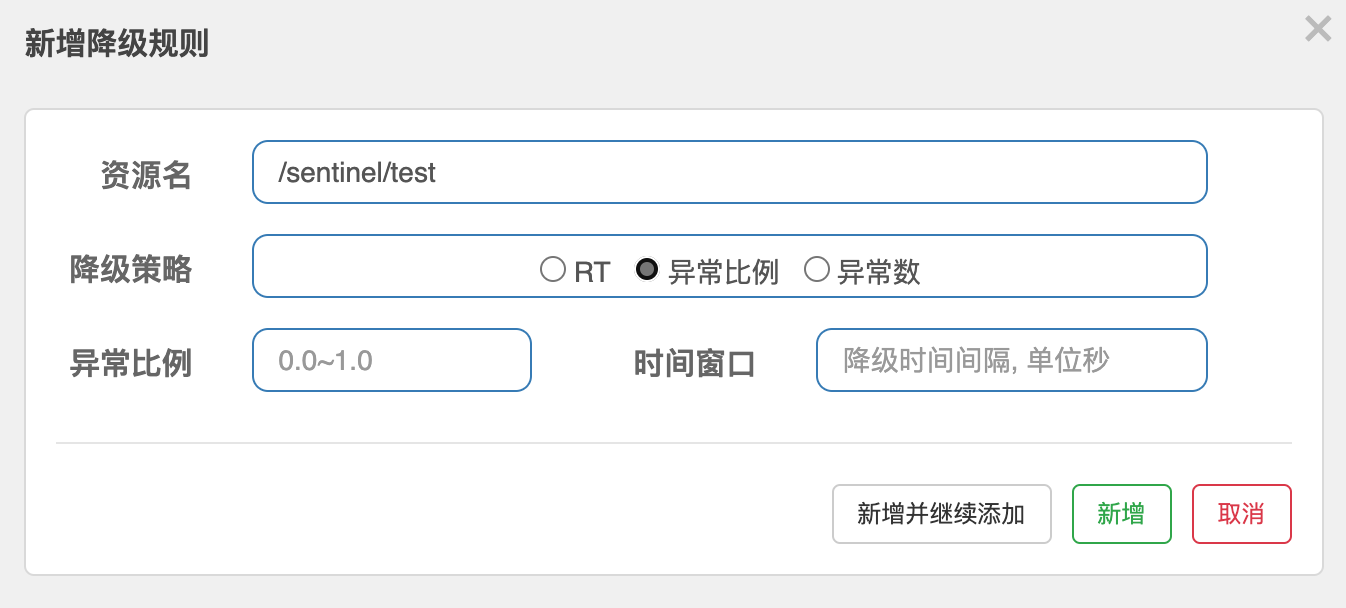
异常数,异常数(分钟统计)超过阈值时,触发降级,时间窗口结束后,关闭降级。若窗口时间小于60s,则结束熔断状态后仍可能再进入熔断;
SentinelDashboard配置热点规则
REST请求http://localhost:8080/payment?param1=1¶m2=2中,对带参数param1的请求限流,对其他不带参数param1的请求不限流。这种限流规则需要使用热点限流规则配置实现。
热点限流规则配置
- 创建需要热点限流的方法(此方法需要带参数)并注解标明限流后的降级方法
   /**
    * @Desc: @SentinelResource注解表示Sentinel降级配置
    *          value属性:标识符
    *					如果不配置value属性,则资源名为rest地址,可在簇点链路中添加热点规则
    *          blockHandler属性:降级方法名,不注明此属性会直接返回500
    * @Author: MysteriousGT
    * @Date: 2021/3/9
    * @Param: [p1, p2]
    * @Return: java.lang.String
    */
   @GetMapping("/hot/key")
   @SentinelResource(value = "testHotKey",blockHandler = "dealTestHotKey")
   public String testHotKey(@RequestParam(required = false) String p1,@RequestParam(required = false)String p2){
       return "========Test Hot Key==========>\tp1="+p1+"\t,p2="+p2;
   }

   public String dealTestHotKey(String p1, String p2, BlockException be){
       return "。==进入热点key降级handler方法==。";
   }
启动服务,在SentinelDashboard管理界面新增热点规则
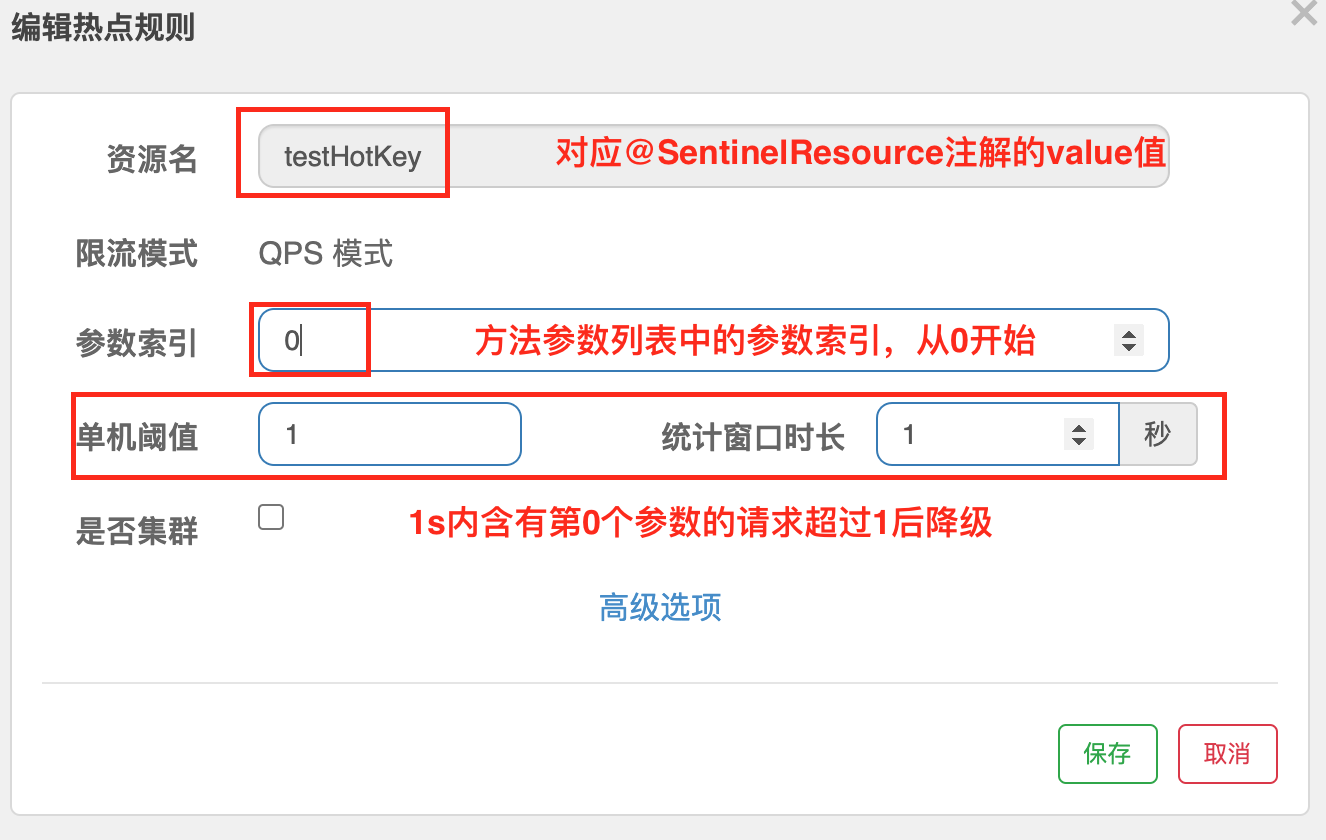
浏览器访问对应的url,1秒内只包含第一个参数的访问,超过两次的会降级
   # 下列请求会降级
   http://localhost:8401/sentinel/hot/key?p1=abc
   http://localhost:8401/sentinel/hot/key?p1=abc&p2=add
   # 不会降级
   http://localhost:8401/sentinel/hot/key?p2=add
http://localhost:8401/sentinel/hot/key参数例外项:配置当参数p1的值为某一固定值时,他的QPS值可以单独设定。
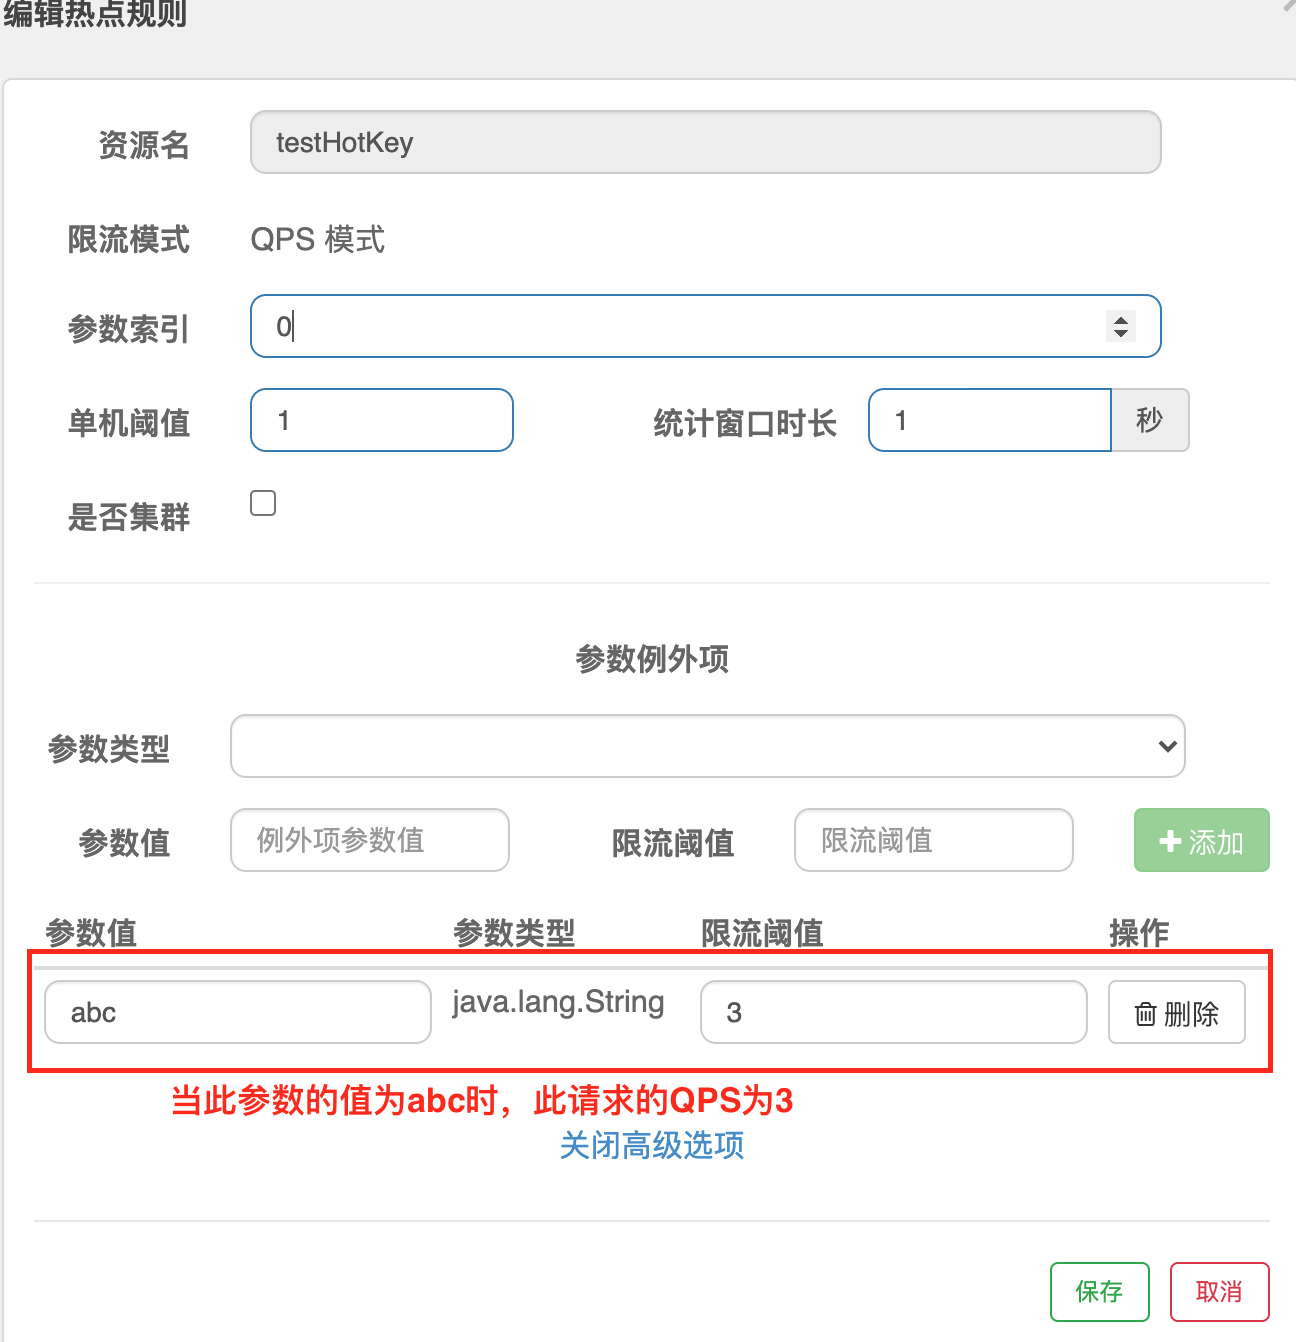
当此接口存在运行时异常时会直接报错,不会进入限流blockHandler方法。
SentinelDashboard系统自适应限流
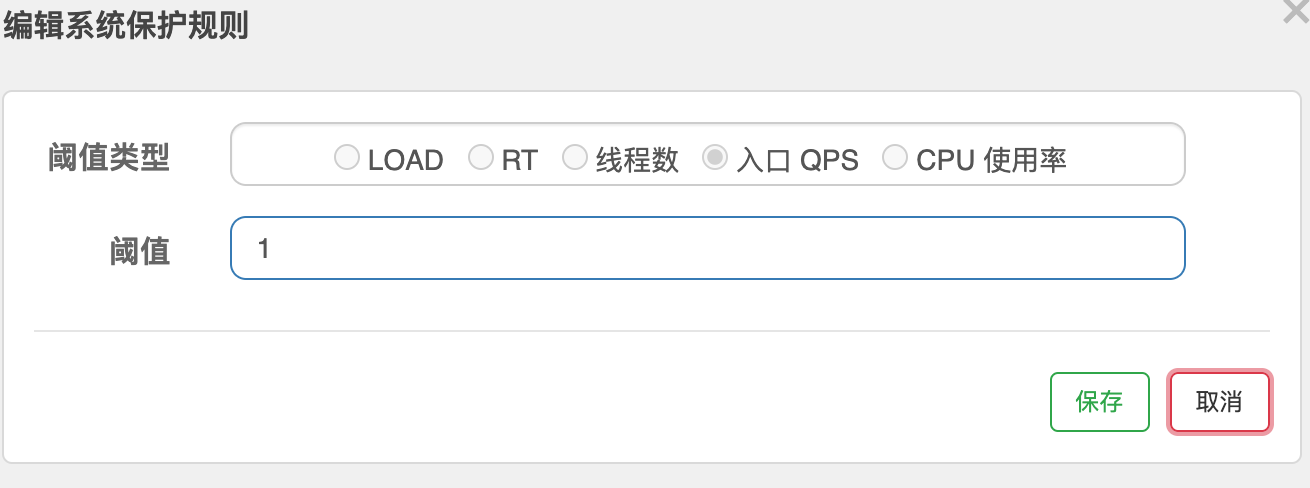
系统自适应限流从整体维度对应用入口流量进行控制,结合应用的 Load、CPU 使用率、总体平均 RT、入口 QPS 和并发线程数等几个维度的监控指标,通过自适应的流控策略,让系统的入口流量和系统的负载达到一个平衡,让系统尽可能跑在最大吞吐量的同时保证系统整体的稳定性。
系统规则支持以下的模式:
- Load 自适应(仅对 Linux/Unix-like 机器生效):系统的 load1 作为启发指标,进行自适应系统保护。当系统 load1 超过设定的启发值,且系统当前的并发线程数超过估算的系统容量时才会触发系统保护(BBR 阶段)。系统容量由系统的
maxQps * minRt估算得出。设定参考值一般是CPU cores * 2.5。- CPU usage(1.5.0+ 版本):当系统 CPU 使用率超过阈值即触发系统保护(取值范围 0.0-1.0),比较灵敏。
- 平均 RT:当单台机器上所有入口流量的平均 RT 达到阈值即触发系统保护,单位是毫秒。
- 并发线程数:当单台机器上所有入口流量的并发线程数达到阈值即触发系统保护。
- 入口 QPS:当单台机器上所有入口流量的 QPS 达到阈值即触发系统保护。
自定义服务降级(@SentinelResource)
自定义降级兜底方法,类似Hystrix,某个方法出现问题,直接执行对应的降级方法,在Hystrix中使用注解@HystrixCommand实现,在Sentinel中则使用@SentinelResource注解
自定义限流降级处理逻辑
- 创建限流降级处理类,类中创建两个方法
   /**
    * @Author: MysteriousGT
    * @Date: 2021/3/9 1:41 下午
    * @Desc: 自定义block handler类
    */
   public class CustomerBlockHandler {
       public static CommonResult handlerException(BlockException e) {
           return new CommonResult(444, "客户自定义全局block处理方法====>\t方法 1");
       }

       public static CommonResult handlerException2(BlockException e) {
           return new CommonResult(444, "客户自定义全局block处理方法===>\t方法 2");
       }
}- 在controller类的接口中使用
@SentinelResource注解标明降级处理方法
   /**
    * @Desc: 使用自定义的Block异常处理类中的方法处理降级
    *          如果不使用blockHandlerClass属性,则使用此类中的方法处理阿尼龟
    * @Author: MysteriousGT
    * @Date: 2021/3/9
    * @Param: []
    * @Return: com.sunyog.springcloud.entities.CommonResult
    */
   @GetMapping("/customer/block/handler")
   @SentinelResource(value = "customerBlockHandler", blockHandlerClass = CustomerBlockHandler.class,
       blockHandler = "handlerException2")
   public CommonResult customerBlockHandler() {
       return new CommonResult(200, "客户自定义block处理方法", new Payment(2020L, "serial00000"));
   }
重启服务后,在sentinelDashboard页面新增限流规则
访问对应的接口,查看限流降级是否实现
自定义异常fallback
fallback也是@sentinelResource注解的一个属性,使用方法和blockHandler属性一样。fallback属性所指向的方法表示当发生异常或错误时,走fallback方法。
如果即配置了fallback,也配置了blockhandler,当即发生了异常,又发生了限流,则走blockHandler方法
Sentinel使用代码方式自定义限流的三个核心API
- SphU 用于定义规则
- Tracer 用于定义统计,如线程、QPS等
- ContextUtil 用于定义上下文
Sentinel对openFeign的支持
sentinel支持对openFeign形式的微服务调用的服务降级、熔断处理,实现步骤如下:
- 服务消费者添加openFeign依赖
   <dependency>
       <groupId>org.springframework.cloud</groupId>
       <artifactId>spring-cloud-starter-openfeign</artifactId>
</dependency>- 配置文件添加feign对sentinel的支持
   # 激活feign对sentinel的支持
   feign.sentinel.enabled=true
启动类通过注解启动feign支持,使用
@EnableFeignClients注解定义openFeign微服务调用接口
   @FeignClient(value = "cloud-nacos-provider",fallback = PaymentFallbackService.class)
   public interface FeignPaymentService {
       @GetMapping("/nacos/payment/{id}")
       public CommonResult<Payment> getById(@PathVariable("id")Long id);
}- 实现openFeign微服务调用接口,用作fallback处理类
   @Component
   public class PaymentFallbackService implements FeignPaymentService{
       @Override
       public CommonResult<Payment> getById(Long id) {
           return new CommonResult<>(444,"feign sentinel服务降级返回");
       }
}- controller层调用openFeign微服务调用接口
   @Resource
   private FeignPaymentService feignPaymentService;

   @GetMapping("/feign/get/{id}")
   public CommonResult feignGetById(@PathVariable("id")Long id){
       return feignPaymentService.getById(id);
   }
启动微服务生产者、消费者,测试接口正常
当微服务生产者发生异常或所有微服务生产者都宕机,会启动服务熔断措施
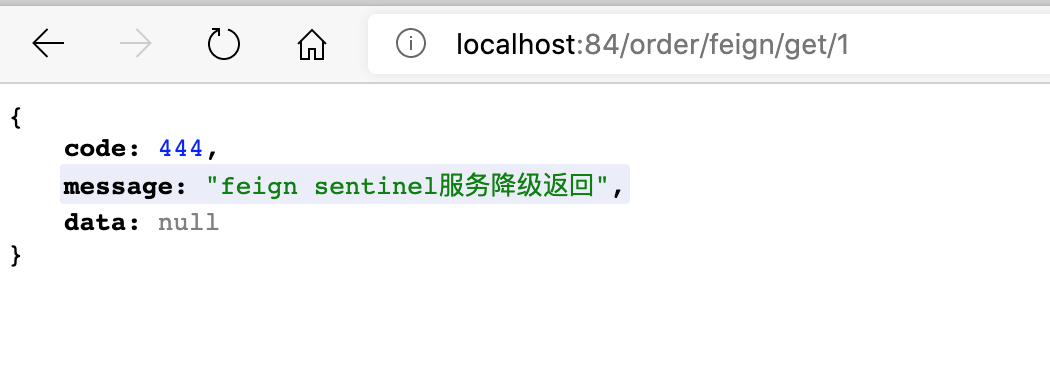
注意:此时所有微服务生产者全部宕机
Sentinel规则持久化
在不进行任何配置的情况下,Sentinel的限流规则时临时的。如果微服务重启,则直前配置的所有相关限流规则都消失。
实现Sentinel规则持久化需要将所有配置规则持久化进Nacos保存,只要Nacos里的配置不删除,针对配置过的流控规则就持续有效。
配置步骤为:
- sentinel客户端添加sentinel在nacos上持久化依赖
   <!--sentinel配置持久化需要用到-->
   <dependency>
       <groupId>com.alibaba.csp</groupId>
       <artifactId>sentinel-datasource-nacos</artifactId>
</dependency>- sentinel客户端配置文件中添加sentinel持久化数据源
   # sentinel持久化配置,nacos数据源
   spring.cloud.sentinel.datasource.ds1.nacos.server-addr=172.16.211.101:1111
   spring.cloud.sentinel.datasource.ds1.nacos.data-id=cloud-sentinel-service
   spring.cloud.sentinel.datasource.ds1.nacos.group-id=DEFAULT_GROUP
   spring.cloud.sentinel.datasource.ds1.nacos.data-type=json
spring.cloud.sentinel.datasource.ds1.nacos.rule-type=flow- nacos配置列表中添加配置,DataId为第 2 部配置文件中标注的DataId
   [{
       "resource":"/sentinel/rate/byUrl",
       "limitApp":"default",
       "grade":1,
       "count":1,
       "strategy":0,
       "controlBehavior":0,
       "clusterMode":false
   }]
配置注释
   [{
       "resource":"/sentinel/rate/byUrl",//资源名称
       "limitApp":"default",//来源应用
       "grade":1,//阈值类型,0-线程数,1-QPS
       "count":1,//单机阈值
       "strategy":0,//流控模式,0-直接,1-关联,2-链路
       "controlBehavior":0,//流控效果,0-快速失效,1-warmUp,2-排队等待
       "clusterMode":false//是否集群
   }]
重启sentinel客户端服务,发送请求一次,可以在sentinel dashboard管理页面中看到配置的流控规则
流控规则配置只能在nacos页面修改,在sentinel dashboard上修改的配置不会被保存,服务重启后会还原
Seata处理分布式事务
分布式事务简介
分布式事务典型应用场景:
用户购买商品的业务逻辑需要由 3 个微服务提供支持,包括:
- 仓储服务:对给定的商品扣除仓储数量
- 订单服务:根据采购需求创建订单
- 支付服务:从用户账户中扣除余额
此时每个服务内部的数据一致性都能由本地的事物来保证,但是全局的数据一致性问题没有保证。
即:一次业务操作需要跨多个数据源活需要跨多个系统进行远程调用,就会产生分布式事务问题。
Seata简介
Seate(Simple Extensible Autonomour Transaction Architecture简单可扩展的自治事务框架)是一个分布式事务解决方案,致力于在微服务架构下提供高性能和简单易用的分布式事务服务。
Seate下载地址,建议下载1.0.0GA版
Seata分布式事务处理过程中的一个ID和三个组件模型
- Transaction ID 全局唯一事务ID(XID)
- Transaction Coordinator(TC)事务协调器,维护全局和分支事务的状态,驱动全局事务提交或回滚。
- Transaction Manager(TM)事务管理器,定义全局事务的范围,开始全局事务、提交或回滚全局事务。
- Resource Manager(RM)资源管理器,管理分支事务处理的资源,与TC交谈以注册分支事务和报告分支事务的状态,并驱动分支事务提交或回滚。
Seata分布式事务的处理过程(默认AT模式)
- TM开启一个全局事务。TM向TC注册全局事务记录,全局事务创建成功并生成一个全局唯一的XID;
- XID在微服务调用链路中传播。按业务场景编排数据库、服务等资源;
- 在业务调用过程中,RM向TC注册分支事务,将其纳入到XID对全局事务的管辖;
- TM向TC发起针对XID的全局提交或回滚决议;
- TC调度XID下管辖的全部分支事务,汇总事务信息,决定分布式事务是提交还是回滚;
- TC通知所有RM,提交或回滚资源,整个分布式事务结束。
具体流程图如下:
其中,TC为Seata服务器,TM为事务发起方,即@GlobalTransaction注解标注的位置,RM为事务的数据参与方,可以理解为一个数据库即为一个RM
Seata服务端安装配置
下载Seata服务端程序;
修改registry配置文件,使用nacos作为服务注册中心,registry文件位置:
seata/conf/registry.conf
   registry {
     # file 、nacos 、eureka、redis、zk、consul、etcd3、sofa
     # 修改位置1,配置nacos注册中心
     type = "nacos"
     loadBalance = "RandomLoadBalance"
     loadBalanceVirtualNodes = 10
   	# 修改2,nacos注册中心位置
     nacos {
       application = "seata-server"
       serverAddr = "172.16.211.101:1111"
       group = "SEATA_GROUP"
       namespace = ""
       cluster = "default"
       username = ""
       password = ""
     }
     eureka {
       serviceUrl = "http://localhost:8761/eureka"
       application = "default"
       weight = "1"
     }
     redis {
       serverAddr = "localhost:6379"
       db = 0
       password = ""
       cluster = "default"
       timeout = 0
     }
     zk {
       cluster = "default"
       serverAddr = "127.0.0.1:2181"
       sessionTimeout = 6000
       connectTimeout = 2000
       username = ""
       password = ""
     }
     consul {
       cluster = "default"
       serverAddr = "127.0.0.1:8500"
     }
     etcd3 {
       cluster = "default"
       serverAddr = "http://localhost:2379"
     }
     sofa {
       serverAddr = "127.0.0.1:9603"
       application = "default"
       region = "DEFAULT_ZONE"
       datacenter = "DefaultDataCenter"
       cluster = "default"
       group = "SEATA_GROUP"
       addressWaitTime = "3000"
     }
     file {
       name = "file.conf"
     }
   }

   config {
     # file、nacos 、apollo、zk、consul、etcd3
     type = "file"

     nacos {
       serverAddr = "127.0.0.1:8848"
       namespace = ""
       group = "SEATA_GROUP"
       username = ""
       password = ""
     }
     consul {
       serverAddr = "127.0.0.1:8500"
     }
     apollo {
       appId = "seata-server"
       apolloMeta = "http://192.168.1.204:8801"
       namespace = "application"
       apolloAccesskeySecret = ""
     }
     zk {
       serverAddr = "127.0.0.1:2181"
       sessionTimeout = 6000
       connectTimeout = 2000
       username = ""
       password = ""
     }
     etcd3 {
       serverAddr = "http://localhost:2379"
     }
     file {
       name = "file.conf"
     }
}- 修改file配置文件,位置
seata/conf/file.conf
   ## transaction log store, only used in seata-server
   store {
     ## store mode: file、db、redis
     # 修改1,使用数据库存储
     mode = "db"

     ## file store property
     file {
       ## store location dir
       dir = "sessionStore"
       # branch session size , if exceeded first try compress lockkey, still exceeded throws exceptions
       maxBranchSessionSize = 16384
       # globe session size , if exceeded throws exceptions
       maxGlobalSessionSize = 512
       # file buffer size , if exceeded allocate new buffer
       fileWriteBufferCacheSize = 16384
       # when recover batch read size
       sessionReloadReadSize = 100
       # async, sync
       flushDiskMode = async
     }

     ## database store property
     #修改2,配置数据库信息
     db {
       ## the implement of javax.sql.DataSource, such as DruidDataSource(druid)/BasicDataSource(dbcp)/HikariDataSource(hikari) etc.
       datasource = "druid"
       ## mysql/oracle/postgresql/h2/oceanbase etc.
       dbType = "mysql"
       driverClassName = "com.mysql.jdbc.Driver"
       url = "jdbc:mysql://172.16.211.101:3306/seata"
       user = "root"
       password = "Leej090710."
       minConn = 5
       maxConn = 100
       globalTable = "global_table"
       branchTable = "branch_table"
       lockTable = "lock_table"
       queryLimit = 100
       maxWait = 5000
     }

     ## redis store property
     redis {
       host = "127.0.0.1"
       port = "6379"
       password = ""
       database = "0"
       minConn = 1
       maxConn = 10
       maxTotal = 100
       queryLimit = 100
     }
}- 在配置的数据库中创建响应数据表,
global_table;branch_table;lock_table
   -- -------------------------------- The script used when storeMode is 'db' --------------------------------
   -- the table to store GlobalSession data
   CREATE TABLE IF NOT EXISTS `global_table`
   (
       `xid`                       VARCHAR(128) NOT NULL,
       `transaction_id`            BIGINT,
       `status`                    TINYINT      NOT NULL,
       `application_id`            VARCHAR(32),
       `transaction_service_group` VARCHAR(32),
       `transaction_name`          VARCHAR(128),
       `timeout`                   INT,
       `begin_time`                BIGINT,
       `application_data`          VARCHAR(2000),
       `gmt_create`                DATETIME,
       `gmt_modified`              DATETIME,
       PRIMARY KEY (`xid`),
       KEY `idx_gmt_modified_status` (`gmt_modified`, `status`),
       KEY `idx_transaction_id` (`transaction_id`)
   ) ENGINE = InnoDB
     DEFAULT CHARSET = utf8;

   -- the table to store BranchSession data
   CREATE TABLE IF NOT EXISTS `branch_table`
   (
       `branch_id`         BIGINT       NOT NULL,
       `xid`               VARCHAR(128) NOT NULL,
       `transaction_id`    BIGINT,
       `resource_group_id` VARCHAR(32),
       `resource_id`       VARCHAR(256),
       `branch_type`       VARCHAR(8),
       `status`            TINYINT,
       `client_id`         VARCHAR(64),
       `application_data`  VARCHAR(2000),
       `gmt_create`        DATETIME(6),
       `gmt_modified`      DATETIME(6),
       PRIMARY KEY (`branch_id`),
       KEY `idx_xid` (`xid`)
   ) ENGINE = InnoDB
     DEFAULT CHARSET = utf8;

   -- the table to store lock data
   CREATE TABLE IF NOT EXISTS `lock_table`
   (
       `row_key`        VARCHAR(128) NOT NULL,
       `xid`            VARCHAR(128),
       `transaction_id` BIGINT,
       `branch_id`      BIGINT       NOT NULL,
       `resource_id`    VARCHAR(256),
       `table_name`     VARCHAR(32),
       `pk`             VARCHAR(36),
       `gmt_create`     DATETIME,
       `gmt_modified`   DATETIME,
       PRIMARY KEY (`row_key`),
       KEY `idx_branch_id` (`branch_id`)
   ) ENGINE = InnoDB
DEFAULT CHARSET = utf8;- 启动Seata服务端程序
sh seata-server.sh- 注意:registry.conf和file.conf两个配置文件模版位置:https://github.com/seata/seata/tree/develop/script
微服务中使用Seata解决分布式事务问题
- 创建
seata-order-service2001,seata-storage-service2002,seata-account-service2003三个微服务项目分别对应订单服务、库存服务、账户服务调用顺序为:
在三个微服务项目的resource目录下创建
registry.conf,file.conf两个配置文件,配置信息如下:- file.conf
   transport {
     # tcp, unix-domain-socket
     type = "TCP"
     #NIO, NATIVE
     server = "NIO"
     #enable heartbeat
     heartbeat = true
     # the client batch send request enable
     enableClientBatchSendRequest = true
     #thread factory for netty
     threadFactory {
       bossThreadPrefix = "NettyBoss"
       workerThreadPrefix = "NettyServerNIOWorker"
       serverExecutorThread-prefix = "NettyServerBizHandler"
       shareBossWorker = false
       clientSelectorThreadPrefix = "NettyClientSelector"
       clientSelectorThreadSize = 1
       clientWorkerThreadPrefix = "NettyClientWorkerThread"
       # netty boss thread size
       bossThreadSize = 1
       #auto default pin or 8
       workerThreadSize = "default"
     }
     shutdown {
       # when destroy server, wait seconds
       wait = 3
     }
     serialization = "seata"
     compressor = "none"
   }
   service {
     #transaction service group mapping
     # my_test_tx_group为配置的分组信息
     vgroup_mapping.my_test_tx_group = "default"
     #only support when registry.type=file, please don't set multiple addresses
     default.grouplist = "127.0.0.1:8091"
     #degrade, current not support
     enableDegrade = false
     #disable seata
     disableGlobalTransaction = false
   }

   client {
     rm {
       asyncCommitBufferLimit = 10000
       lock {
         retryInterval = 10
         retryTimes = 30
         retryPolicyBranchRollbackOnConflict = true
       }
       reportRetryCount = 5
       tableMetaCheckEnable = false
       tableMetaCheckerInterval = 60000
       reportSuccessEnable = false
       sagaBranchRegisterEnable = false
       sagaJsonParser = jackson
       sagaRetryPersistModeUpdate = false
       sagaCompensatePersistModeUpdate = false
     }
     tm {
       commitRetryCount = 5
       rollbackRetryCount = 5
       defaultGlobalTransactionTimeout = 60000
       degradeCheck = false
       degradeCheckPeriod = 2000
       degradeCheckAllowTimes = 10
     }
     undo {
       dataValidation = true
       onlyCareUpdateColumns = true
       logSerialization = "jackson"
       logTable = "undo_log"
       compress {
         enable = true
         # allow zip, gzip, deflater, 7z, lz4, bzip2, default is zip
         type = zip
         # if rollback info size > threshold, then will be compress
         # allow k m g t
         threshold = 64k
       }
     }
   }
   log {
     exceptionRate = 100
}- registry.conf
   registry {
       # file 、nacos 、eureka、redis、zk、consul、etcd3、sofa、custom
    type = "file"
    loadBalance = "RandomLoadBalance"
    loadBalanceVirtualNodes = 10

    nacos {
      application = "seata-server"
      serverAddr = "172.16.211.101:1111"
      group = "SEATA_GROUP"
      namespace = ""
      username = ""
      password = ""
    }
    eureka {
      serviceUrl = "http://localhost:8761/eureka"
      weight = "1"
    }
    redis {
      serverAddr = "localhost:6379"
      db = "0"
      password = ""
      timeout = "0"
    }
    zk {
      serverAddr = "127.0.0.1:2181"
      sessionTimeout = 6000
      connectTimeout = 2000
      username = ""
      password = ""
    }
    consul {
      serverAddr = "127.0.0.1:8500"
      aclToken = ""
    }
    etcd3 {
      serverAddr = "http://localhost:2379"
    }
    sofa {
      serverAddr = "127.0.0.1:9603"
      region = "DEFAULT_ZONE"
      datacenter = "DefaultDataCenter"
      group = "SEATA_GROUP"
      addressWaitTime = "3000"
    }
    file {
      name = "file.conf"
    }
    custom {
      name = ""
    }
   }

   config {
    # file、nacos 、apollo、zk、consul、etcd3、springCloudConfig、custom
    type = "file"

    nacos {
      serverAddr = "127.0.0.1:8848"
      namespace = ""
      group = "SEATA_GROUP"
      username = ""
      password = ""
      dataId = "seata.properties"
    }
    consul {
      serverAddr = "127.0.0.1:8500"
      aclToken = ""
    }
    apollo {
      appId = "seata-server"
      apolloMeta = "http://192.168.1.204:8801"
      namespace = "application"
      apolloAccesskeySecret = ""
    }
    zk {
      serverAddr = "127.0.0.1:2181"
      sessionTimeout = 6000
      connectTimeout = 2000
      username = ""
      password = ""
    }
    etcd3 {
      serverAddr = "http://localhost:2379"
    }
    file {
      name = "file.conf"
    }
    custom {
      name = ""
    }
}- 创建各自的配置文件,添加相应的配置信息
   # 不同微服务配置各自的端口号
   server.port=2001
   # 不同微服务配置各自的服务名称
   spring.application.name=seata-order-service
   # nacos服务注册中心地址
   spring.cloud.nacos.discovery.server-addr=172.16.211.101:1111
   # 不同微服务配置各自的数据库信息
   spring.datasource.driver-class-name=com.mysql.jdbc.Driver
   spring.datasource.url=jdbc:mysql://172.16.211.101:3306/seata_order
   spring.datasource.username=root
   spring.datasource.password=Leej090710.
   # mybatis配置
   mybatis.mapper-locations=classpath*:/mapper/*.xml
   mybatis.configuration.map-underscore-to-camel-case=true
   # feign关闭hystrix
   feign.hystrix.enabled=false
   # 设定日志级别
   logging.level.root=info

   # seata配置
   spring.cloud.alibaba.seata.enabled=true
   # 此处配置自定义的seata事务分组名称
spring.cloud.alibaba.seata.tx-service-group=my_test_tx_group- 微服务中添加配置类,配置使用seata代理mybatis数据源
   package com.sunyog.cloudalibaba.config;

   import javax.sql.DataSource;

   import org.apache.ibatis.session.SqlSessionFactory;
   import org.mybatis.spring.SqlSessionFactoryBean;
   import org.mybatis.spring.annotation.MapperScan;
   import org.mybatis.spring.transaction.SpringManagedTransactionFactory;
   import org.springframework.beans.factory.annotation.Value;
   import org.springframework.boot.context.properties.ConfigurationProperties;
   import org.springframework.context.annotation.Bean;
   import org.springframework.context.annotation.Configuration;
   import org.springframework.core.io.support.PathMatchingResourcePatternResolver;

   import com.alibaba.druid.pool.DruidDataSource;

   import io.seata.rm.datasource.DataSourceProxy;

   /**
    * @Author: MysteriousGT
    * @Date: 2021/3/10 3:08 下午
    * @Desc: 使用seata代理数据源
    */
   @Configuration
   @MapperScan(value = {"com.sunyog.cloudalibaba.dao"})
   public class MybatisConfig {
       @Value("${mybatis.mapper-locations}")
       private String mapperLocations;

       @Bean
       @ConfigurationProperties(prefix = "spring.datasource")
       public DataSource dataSource() {
           return new DruidDataSource();
       }

       @Bean
       public DataSourceProxy dataSourceProxy(DataSource dataSource) {
           return new DataSourceProxy(dataSource);
       }

       @Bean
       public SqlSessionFactory sqlSessionFactory(DataSourceProxy dataSourceProxy) throws Exception {
           SqlSessionFactoryBean sqlSessionFactoryBean = new SqlSessionFactoryBean();
           sqlSessionFactoryBean.setDataSource(dataSourceProxy);
           sqlSessionFactoryBean
               .setMapperLocations(new PathMatchingResourcePatternResolver().getResources(this.mapperLocations));
           org.apache.ibatis.session.Configuration configuration = new org.apache.ibatis.session.Configuration();
           configuration.setMapUnderscoreToCamelCase(true);
           sqlSessionFactoryBean.setConfiguration(configuration);
           sqlSessionFactoryBean.setTransactionFactory(new SpringManagedTransactionFactory());
           return sqlSessionFactoryBean.getObject();
       }
}- 创建业务数据库
seata_order,seata_account,seata_storage,分别在不同数据库中创建相关业务表,sql脚本如下:
   /*
    seata_order库
   */
   use seata_order;
   SET NAMES utf8mb4;
   SET FOREIGN_KEY_CHECKS = 0;

   -- ----------------------------
   -- Table structure for t_order
   -- ----------------------------
   DROP TABLE IF EXISTS `t_order`;
   CREATE TABLE `t_order` (
     `id` bigint(11) NOT NULL AUTO_INCREMENT COMMENT 'id',
     `user_id` bigint(11) DEFAULT NULL COMMENT '用户id',
     `product_id` bigint(11) DEFAULT NULL COMMENT '产品ID',
     `count` int(11) DEFAULT NULL COMMENT '数量',
     `money` decimal(11,2) DEFAULT NULL COMMENT '金额',
     `status` int(1) DEFAULT '0' COMMENT '订单状态:0创建中,1已完结',
     PRIMARY KEY (`id`)
   ) ENGINE=InnoDB AUTO_INCREMENT=17 DEFAULT CHARSET=utf8 COLLATE=utf8_bin;

   SET FOREIGN_KEY_CHECKS = 1;
   /*
    seata_storage库
   */
   use seata_storage;
   SET NAMES utf8mb4;
   SET FOREIGN_KEY_CHECKS = 0;

   -- ----------------------------
   -- Table structure for t_storage
   -- ----------------------------
   DROP TABLE IF EXISTS `t_storage`;
   CREATE TABLE `t_storage` (
     `id` bigint(11) NOT NULL AUTO_INCREMENT COMMENT 'id',
     `product_id` bigint(11) DEFAULT NULL COMMENT '产品id',
     `total` int(11) DEFAULT NULL COMMENT '总库存',
     `used` int(11) DEFAULT NULL COMMENT '已使用库存',
     `residue` int(11) DEFAULT NULL COMMENT '剩余库存',
     PRIMARY KEY (`id`)
   ) ENGINE=InnoDB AUTO_INCREMENT=2 DEFAULT CHARSET=utf8 COLLATE=utf8_bin;

   SET FOREIGN_KEY_CHECKS = 1;
   /*
    seata_account库
   */
   use seata_account;
   SET NAMES utf8mb4;
   SET FOREIGN_KEY_CHECKS = 0;

   -- ----------------------------
   -- Table structure for t_account
   -- ----------------------------
   DROP TABLE IF EXISTS `t_account`;
   CREATE TABLE `t_account` (
     `id` bigint(11) NOT NULL AUTO_INCREMENT COMMENT 'id',
     `user_id` bigint(11) DEFAULT NULL COMMENT '用户id',
     `total` decimal(11,2) DEFAULT NULL COMMENT '总额度',
     `used` decimal(11,2) DEFAULT NULL COMMENT '已使用额度',
     `residue` decimal(11,2) DEFAULT '0.00' COMMENT '可用余额',
     PRIMARY KEY (`id`)
   ) ENGINE=InnoDB AUTO_INCREMENT=2 DEFAULT CHARSET=utf8 COLLATE=utf8_bin;

   SET FOREIGN_KEY_CHECKS = 1;
针对不同业务,添加相关业务代码,在主服务中(订单服务)业务代码中添加
@GlobalTranscation注解开启分布式事务,代码位置:https://gitee.com/sunyog/springcloud在每个业务数据库中创建undo_log表,用于存储分布式事务过程数据,数据库执行脚本如下:
   SET NAMES utf8mb4;
   SET FOREIGN_KEY_CHECKS = 0;

   -- ----------------------------
   -- Table structure for undo_log
   -- ----------------------------
   DROP TABLE IF EXISTS `undo_log`;
   CREATE TABLE `undo_log` (
     `id` bigint(20) NOT NULL AUTO_INCREMENT COMMENT 'increment id',
     `branch_id` bigint(20) NOT NULL COMMENT 'branch transaction id',
     `xid` varchar(100) NOT NULL COMMENT 'global transaction id',
     `context` varchar(128) NOT NULL COMMENT 'undo_log context,such as serialization',
     `rollback_info` longblob NOT NULL COMMENT 'rollback info',
     `log_status` int(11) NOT NULL COMMENT '0:normal status,1:defense status',
     `log_created` datetime NOT NULL COMMENT 'create datetime',
     `log_modified` datetime NOT NULL COMMENT 'modify datetime',
     PRIMARY KEY (`id`),
     UNIQUE KEY `ux_undo_log` (`xid`,`branch_id`)
   ) ENGINE=InnoDB AUTO_INCREMENT=2 DEFAULT CHARSET=utf8 COMMENT='AT transaction mode undo table';

SET FOREIGN_KEY_CHECKS = 1;- 启动以上三个微服务,使用POSTMAN调用创建订单接口,主服务和子服务提交/回滚日志如下:
   # 子服务回滚日志
   2021-03-11 15:56:37.399  INFO 10932 --- [atch_RMROLE_1_8] i.s.r.d.undo.AbstractUndoExecutor        : Stop rollback because there is no data change between the before data snapshot and the after data snapshot.
   2021-03-11 15:56:37.410  INFO 10932 --- [atch_RMROLE_1_8] i.s.r.d.undo.AbstractUndoLogManager      : xid 172.16.211.1:8091:113305726515941376 branch 113305752289939457, undo_log deleted with GlobalFinished
   2021-03-11 15:56:37.413  INFO 10932 --- [atch_RMROLE_1_8] io.seata.rm.AbstractRMHandler            : Branch Rollbacked result: PhaseTwo_Rollbacked
   2021-03-11 15:56:37.439  INFO 10932 --- [atch_RMROLE_1_8] i.s.core.rpc.netty.RmMessageListener     : onMessage:xid=172.16.211.1:8091:113305726515941376,branchId=113305751216197633,branchType=AT,resourceId=jdbc:mysql://172.16.211.101:3306/seata_storage,applicationData=null
   2021-03-11 15:56:37.439  INFO 10932 --- [atch_RMROLE_1_8] io.seata.rm.AbstractRMHandler            : Branch Rollbacking: 172.16.211.1:8091:113305726515941376 113305751216197633 jdbc:mysql://172.16.211.101:3306/seata_storage
   2021-03-11 15:56:37.466  INFO 10932 --- [atch_RMROLE_1_8] i.s.r.d.undo.AbstractUndoLogManager      : xid 172.16.211.1:8091:113305726515941376 branch 113305751216197633, undo_log deleted with GlobalFinished
   2021-03-11 15:56:37.468  INFO 10932 --- [atch_RMROLE_1_8] io.seata.rm.AbstractRMHandler            : Branch Rollbacked result: PhaseTwo_Rollbacked

   #子服务提交日志
   2021-03-11 15:59:48.301  INFO 10932 --- [atch_RMROLE_1_8] i.s.core.rpc.netty.RmMessageListener     : onMessage:xid=172.16.211.1:8091:113306549954285568,branchId=113306551229353985,branchType=AT,resourceId=jdbc:mysql://172.16.211.101:3306/seata_storage,applicationData=null
   2021-03-11 15:59:48.303  INFO 10932 --- [atch_RMROLE_1_8] io.seata.rm.AbstractRMHandler            : Branch committing: 172.16.211.1:8091:113306549954285568 113306551229353985 jdbc:mysql://172.16.211.101:3306/seata_storage null
   2021-03-11 15:59:48.305  INFO 10932 --- [atch_RMROLE_1_8] io.seata.rm.AbstractRMHandler            : Branch commit result: PhaseTwo_Committed

   #主服务提交日志
   2021-03-11 15:59:47.729  INFO 10912 --- [nio-2001-exec-5] i.seata.tm.api.DefaultGlobalTransaction  : [172.16.211.1:8091:113306549954285568] commit status: Committed
   2021-03-11 15:59:48.279  INFO 10912 --- [atch_RMROLE_1_8] i.s.core.rpc.netty.RmMessageListener     : onMessage:xid=172.16.211.1:8091:113306549954285568,branchId=113306550214332417,branchType=AT,resourceId=jdbc:mysql://172.16.211.101:3306/seata_order,applicationData=null
   2021-03-11 15:59:48.282  INFO 10912 --- [atch_RMROLE_1_8] io.seata.rm.AbstractRMHandler            : Branch committing: 172.16.211.1:8091:113306549954285568 113306550214332417 jdbc:mysql://172.16.211.101:3306/seata_order null
   2021-03-11 15:59:48.283  INFO 10912 --- [atch_RMROLE_1_8] io.seata.rm.AbstractRMHandler            : Branch commit result: PhaseTwo_Committed
   2021-03-11 15:59:48.334  INFO 10912 --- [atch_RMROLE_1_8] i.s.core.rpc.netty.RmMessageListener     : onMessage:xid=172.16.211.1:8091:113306549954285568,branchId=113306553854988289,branchType=AT,resourceId=jdbc:mysql://172.16.211.101:3306/seata_order,applicationData=null
   2021-03-11 15:59:48.335  INFO 10912 --- [atch_RMROLE_1_8] io.seata.rm.AbstractRMHandler            : Branch committing: 172.16.211.1:8091:113306549954285568 113306553854988289 jdbc:mysql://172.16.211.101:3306/seata_order null
   2021-03-11 15:59:48.335  INFO 10912 --- [atch_RMROLE_1_8] io.seata.rm.AbstractRMHandler            : Branch commit result: PhaseTwo_Committed

   #主服务回滚日志:==>无,任何一个字业务产生问题,主业务都会受到影响,一般会报错,没有回滚日志